


")

This is a 25 Watt basic power amp that was designed to be (relatively) easy to build at a reasonable cost. It has better performance than the standard STK module amps that are used in practically every mass market stereo receiver manufactured today. When I originally built this thing, it was because I needed a 25 Watt PC amp and did not want to spend any money. So I designed around parts I had in the shop.
Circuit diagram: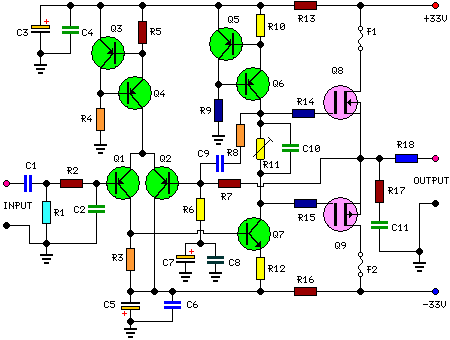 Parts:
- R1 = 47K
- R2 = 4K7
- R3 = 1K5
- R4 = 47K
- R5 = 390R
- R6 = 470R
- R7 = 33K
- R8 = 150K
- R9 = 15K
- R10 = 27R
- R11 = 500R-1/2W
- R12 = 10R
- R13 = 10R
- R14 = 220R
- R15 = 220R
- R16 = 10R
- R17 = 8.2R-2W
- R18 = 22R-4W(wirewound)
- C1 = 470nF-63V
- C2 = 330pF-63V
- C3 = 470µF-63V
- C4 = 100nF-63V
- C5 = 470µF-63V
- C6 = 100nF-63V
- C7 = 100µF-25V
- C8 = 100nF-63V
- C9 = 10pF-63V
- C10 = 1µF-63V
- C11 = 100nF-63V
- Q1 = BC560C
- Q2 = BC560C
- Q3 = BC560C
- Q4 = BC560C
- Q5 = BC560C
- Q6 = BD140
- Q7 = BD139
- Q8 = IRF530
- Q9 = IRF9530
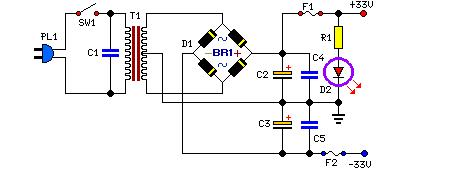 Parts:
- R1 = 3K3-1/2W
- C1 = 10nF-1000V
- C2 = 4700µF-50V
- C3 = 4700µF-50V
- C4 = 100nF-63V
- C5 = 100nF-63V
- D1 = 200V 8A Diode bridge
- D2 = 5mm. Red LED
- F2 = 3.15A Fuses with sockets
- F2 = 3.15A Fuses with sockets
- T1 = 220V Primary, 25 + 25V Secondary 120VA Mains transformer
- PL1 = Male Mains plug
- SW1 = SPST Mains switch