


")

 The exact moment of ignition of the combustible mixture in the cylinders of a car engine - a painstaking process that requires a certain skill and time-consuming. As described below, the device allows you to quickly and easily perform this operation in all conditions.
The device is based on the use of stroboscopic effect. If instant flashes of light synchronized with the pulses of high voltage to spark the candle of the first cylinder, to illuminate the alignment markers on the rim of the flywheel and the housing of the engine, movable label will visually appear stationary. If the advance angle billed incorrectly, by mutual arrangement of labels is easy to determine in which direction and how much you want to rotate the bar regulator ignition timing.
Diagram of the device depicted in Fig. 1. The light source in the device is pulsed on H1. The device is powered by a battery (12 V, with case is connected to negative terminal) of the vehicle, the engine shall govern. The supply voltage required for operation of the lamp (about 250), gives the inverter transistors V1 and V2 and the transformer T1 and the rectifier diode Assembly V3. An ignition pulse is removed from the spark of the first cylinder through the limiting resistors R4-R6.
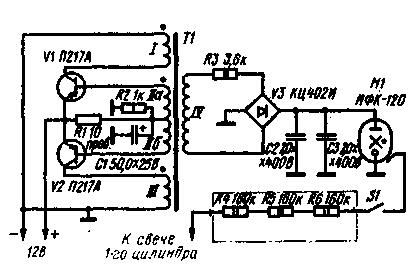
Fig. 1
The transformer is wound on a magnetic core W H. Winding / and /// is wound simultaneously in two PEV-2 is 0.5, the number of turns-21. Similarly wound and the winding // (7 turns of PEV-2 0,15), and the onset of one Polubotko must be connected to the other end-this connection will serve as a diversion. Winding IV contains 500 turns of wire sew-2 is 0.2. Capacitors C2 and C3 paper at a working voltage of at least 400 V. the Transistors V1 and V2, it is desirable to find loved ones in the parameters. The wire resistor R1, and the rest of the IFL.
The device consists of two nodes: the illuminator and adapter. The appearance of the illuminator shown in the header of the article. It is made in the form of a pistol. In the case placed all the parts of the device except the resistors R4-R6. The basis on which you installed the details of the illuminator, is a metal plate figure, located in the box vertically. The placement of parts on the plate shown in Fig. 2. Front reflector placed with a flash lamp (used without alteration from flash "Ray-70"). Button S1 of the device mounted in the handle. The case is glued together from sheet plastic.
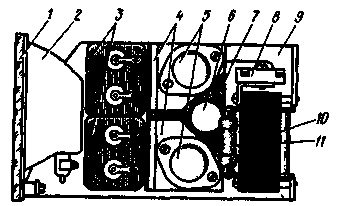
Fig. 2. View of the mounting illuminator: 1 - diffuser.
2 - reflector with a flash lamp, 3 - storage capacitors,
4 - heat sinks, duralumin. 5 transistors, 6 - electrolytic
capacitor C50-6, 7 - circuit Board, stellocentric,
8 - diode Assembly CCI, 9 - plate-base, duralumin.
10 - transformer. 11 - resistor-to 23,6
The device adapter shown in Fig. 3. In the housing 3, is turned in the form of a tube of solid heat-resistant insulating material (PCB, Micarta), mounted resistors R4-R6. The wire connecting the adapter to the illuminator must be insulated, for voltage not less than 15 kV.
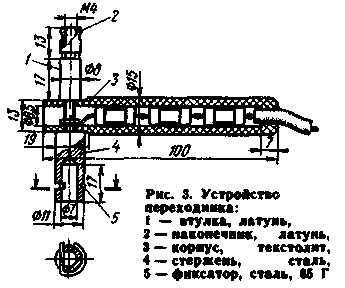
In the radial bore of the housing of the adapter is mounted steel rod 4, ending with the bottom (Fig. 3) the end of the spring clamp on the output of the spark plugs of the engine, and with the top - threaded tip 2, analogous to the conclusion of the candle.
Correctly assembled, the device does not require the establishment. Working with the device in the following order. From the spark of the first cylinder (while the engine is stopped) .remove pin cap, put on the output coupler . the display and the adapter cap candles. Apply power to the unit (the power plug of the device connected to an outlet with the vehicle network). On the ywheel housing remove the cover observation window and start the engine. Press the power button of the device and direct its light on the flywheel. If the marks on the flywheel and the motor housing are not the same, shifting the bar regulator ignition timing to match the labels. Then the motor stops and unplug the appliance.
Author: Rudenko, Moscow; Publication: N. Bolshakov, rf.atnn.ru