


")

Ultrasounds around us everywhere, it can be "negotiations" animals noises of various equipment, as well as ultrasounds are specially generated the sounders, medical devices. Unlike the sounds of the audible range ultrasounds are upon us unnoticed. And not always favorably. Visual example, - in a certain place, for example, near a unit, you got a head, and hearing somehow downgraded. All the symptoms of bleeding, but there was silence. The apparent silence. On your ears crush "decibels" ultrasonic range, they knock you out, but you cannot understand because you don't hear disturbing you acoustic oscillations.
With this simple device it is possible not only to determine the source ultrasound its intensity, but also to "listen" to the ultrasound, to determine the nature his sound (intermittent, variable frequency, etc.).
The heart of the device is an ultrasonic microphone MA40B8R (M1). The number "40" in it the name speaks about the frequency (40 kHz), where he has maximum sensitivity. At a frequency below 32 kHz sensitivity drops sharply (-90dB). Such a response curve gives the opportunity to use it for control of ultrasound without the use of special filters that suppress sound frequencies.
Diagram of the level of ultrasound consists of a microphone M1, two-stage amplifier transistors VT1 and VT2 and measuring the AC voltage on diodes VD1, VD2 and a dial indicator MA. The AC voltage from Ml via the sensitivity control R7 is supplied to the two-stage amplifier. Then amplified AC voltage is detected by diodes VD1 and VD2. On the capacitor C6 is formed constant voltage, proportional to the volume ultrasound. This strain shows a pointer instrument MA.
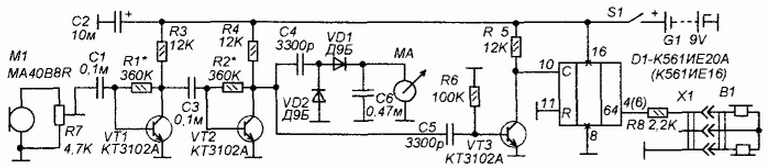
Fig. 1
To listen ultrasound method is used to lower its frequency to the frequency the audio range by dividing a digital counter.
With VT2 collector alternating voltage of ultrasonic frequency is supplied to the pulse shaper transistor VT3. The transistor included without bias base and avalanche opens when the amplitude of the AC voltage on it basis exceeds the barrier of opening of the transistor.
The pulses from the collector of VT3 arrive at the counting input of the binary counter D1. The counter divides the frequency by 128. Then, with the counter output pulses go to the head phones.
As a result, for example, the ultrasound frequency of 40 kHz headphones reproduce the sound frequency 312,5 Hz (40/128=0,3125). Now we can "hear" ultrasounds to watch for changes in their frequency, and to determine their the intensity on dial gauge. The drawback is that the sound volume in headphones does not depend on the volume of ultrasound, but this is offset by arrow the level indicator.
Most of the parts mounted on a circuit Board made of fiberglass with a unilateral folgirongi. The fee is placed in a plastic housing and is along it. Beside her in an engineered specifically in the housing hole installed import dial indicator (similar to the indicator M) end with the position of the scale. Current full deflection of the indicator 300mA, and the resistance of 1200 Ohms. However, you can apply any similar microammeter, with scale no more than 400mA and a resistance of 300 Ohms. To correct it sensitivity can the additional inclusion of series resistor, the resistance will need to pick up empirically.
Chip KIA you can replace the counter CIE. In this case, the output will be no 4-th and 6-th output of the chip (you need to slightly change the printing cost).
Power switch microtubles mounted by soldering on the Board. At the same time, nut of fastening of a toggle switch on the panel serves as an element mounting Board in the housing. Connector X1 is a nest for compact head stereoleto, he also is installed on the Board. The scheme of connection of the connector is such that the head the phones are connected in series.
The primary power source battery "Krona" voltage of 9V.
Adjusted the resistor R7 can be replaced by a variable, then we to adjust the sensitivity of the device over a wide range.
Figure print Board and the wiring diagram shown in figure 2, and figure 3 shows how the parts of the apparatus disposed in the housing.

Fig. 2. The printed circuit Board

Fig. 3. Wiring diagram
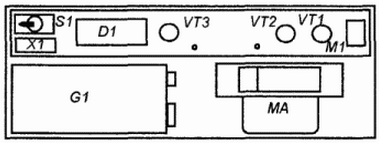
Fig. 4. Layout
In establishing need amplifying stages transistors VT1 and VT2. Setting a setup resistor to the minimum sensitivity position (engine down to the end, according to the scheme), you need to measure constant voltage at the collectors VT1 and VT2. If these stresses exceed the limits of 2.5-3V, you need to pick resistance base resistors (R1 and R2, respectively).
The overall sensitivity of the set trimming resistor R7 (original it can be installed in the position of maximum sensitivity, up the scheme).
If it turns out that the sound device starts only when microammeter indicates the level close to maximum, you need to downgrade the sensitivity of the microammeter so that the beginning sound was the first third of his scale.
To test the device by registering the ultrasound, for example, radiated ultrasonic washing machine or a device for repelling rodents.
The tone can be increased by half, if you take the pulse headphones with 64th the output of the counter, and 32nd.
Author: R. Lyzhin