


")

This joint the design of the author and engineer of the city of Donetsk (Ukraine) Yury Kolokolov (address it personal pages in The Internet http://home.skif.net/-yukol/index.htm), which managed to translate an idea into a finished product based on the programmable chip microcontroller. They developed a design and software, as well as conducted full-scale tests.
Despite the simplicity of the design of the proposed detector on the principle the frequency, its production in the home can be difficult because of the need to create special microcontroller programs. This can be done only if you have relevant experience and software and hardware for working with the microcontroller.
Currently the Moscow firm "Master kit" mastered the production of kits for ham radio for self-Assembly of the described detector. Set contains the printed circuit Board and electronic components, including the already the programmed controller. Perhaps for many fans of hidden treasures and relics, the acquisition of a set NM8041 (numbering in the catalog of the company "Master kit") and followed his simple Assembly, can be an easy alternative to purchasing expensive industrial unit or manufacturing of the metal detector is fully your forces.
For those who feel confident in themselves and willing to try to make and to program the microprocessor of the detector, on the personal page Yury Kolokolov placed on the Internet code trial version of firmware controller in the Intel Hex format and other useful information. This version firmware differs from the full version, which is written in the microcontroller kit NM8041, the lack of dynamic mode and some other features.
The principle of operation of the considered detector based on the measurement using electronic frequency counter frequency generator, the circuit which includes the sensor inductance coil. This useful information is not the value itself the frequency and the increment that occurs when approaching the probe to the target, and the sign of the increment.
The detector has a detection range of about one and a half times greater than that of the prototype on the beat. While it is selective for metals. Low current consumption and wide range of possible supply stress allows a wide range of connectivity options battery batteries or accumulators. The instrument automatically adapts to the start frequency of the measuring oscillator. Thus, theoretically, the value the frequency may be in the range from about 100 Hz to 200 kHz, which gives great opportunities also for the choice of the design of the sensor. The number details of the proposed detector is not harder than the metal detector on the beat. This was achieved thanks to the software implementation of most functions in single-crystal of the microcontroller.
Main technical characteristics
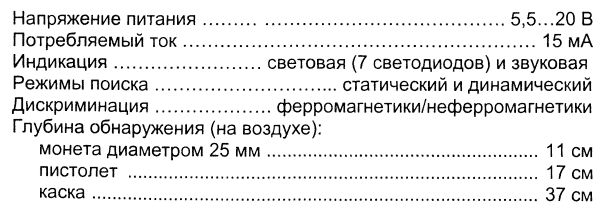
Structural scheme
Block diagram of the detector made by electronic the frequency, shown in Fig. 12.
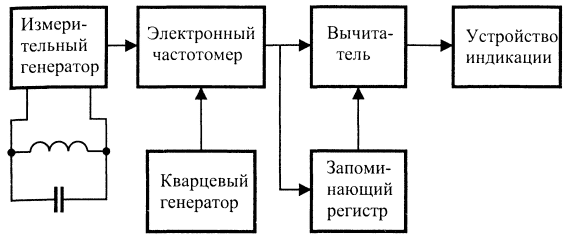
Fig. 12. Block diagram of the detector according to the principle of frequency counter
Actually, the detector consists only of measuring generator and electronic frequency counter. The structural scheme is rather illustration of the algorithm of its work.
And the algorithm of operation of the metal detector is. First electronic frequency counter measures the frequency of the measuring oscillator, when the sensor is away from metal objects and ferromagnets. This value is stored in memory register. Then, in real time, the frequency counter measures the frequency of measuring generator. From the obtained value is subtracted the value of the reference the frequency and the result is supplied to the display device.
Schematic diagram
Schematic diagram of the detector shown Fig. 13.
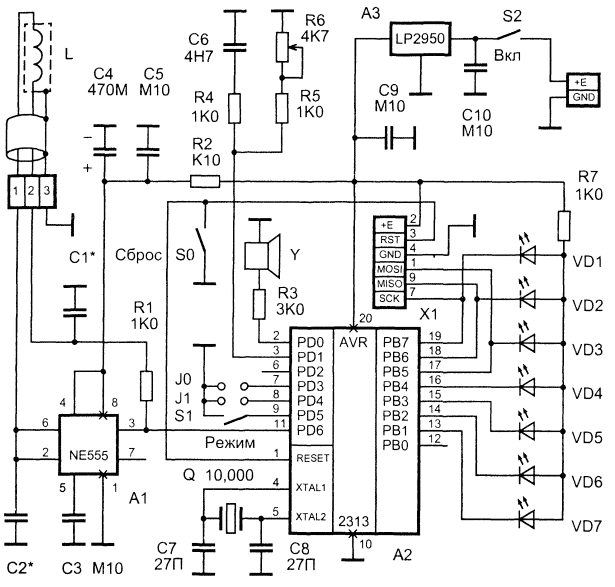
Fig. 13. A circuit diagram of a detector according to the principle electronic frequency meter
The measuring generator integrated timer A1 type NE555 (domestic analogue - K1006VI1). This chip is used in a somewhat unusual inclusion - as LC-oscillator. The oscillating circuit of the generator consists of capacitors C1*, C2* and inductor sensor L. the Resonant frequency is defined as for conventional oscillating circuit, at the same time as the capacitance of the circuit is the capacitance of series-connected capacitors C1* and C2*. When using the sensor model diameter 180 190… mm containing 100 turns of wire and the capacitors C1* = 0,047 µf and C2* = 0.01 UF, the generation frequency is about 20 kHz. If necessary the oscillator frequency can be changed by changing the capacitance of the capacitors C1* and C2*. When it is desirable that these containers were in a ratio of about (4…6):1.
The microcontroller A2 is entrusted with all other functions in the signal processing measurement of the generator until the indication. In this scheme applied the microcontroller AT90S2313-10PI manufactured by ATMEL. This is 8-bit economical RISC single-chip microcontroller. It has a frequency of 10 MHz the performance of 10 MIPS. Contains: 2 kilobytes of flash memory, 128 bytes EEPROM, 15 lines I/o, 32 working registers, two timer/counters, watchdog timer, analog comparator, universal serial port. For the task selected the microcontroller has a fairly high specifications when relatively low price.
Directly to the microcontroller IC is connected as controls, and organs indication. Variable resistor R6 adjusts the sensitivity device. LEDs VD1-VD3 indicate the level of frequency deviation measuring generator in case of prevalence of the ferromagnetic effect. LEDs VD5…VD7 - in the case of the predominance of the effect of conductivity. The led indicates zero VD4 the frequency shift. Earphone or system Y is designed for an audible indication the deviation of frequency of the measuring signal generator. With the help of switch S1 sets the mode of operation of the device is static or dynamic. In static mode signal which represents a digital code frequency difference, logarithmically and immediately fed to the display. Each level has a lighted accompanied by your tone audible indication.
The dynamic mode is designed to search for targets in background noise from the ground, minerals, etc. In dynamic mode, the signal is subjected to digital filtering, which highlights a useful signal on the background of interfering signals. In this unit applied optimal matched filtering. Briefly its essence lies in that for any signal there is an optimal filter that allows you to get the maximum response on the exit. Such a digital filter is implemented for signal of the frequency deviation, which occurs when the movement of the search coil over small targets at a rate of 0.5… 1 m/s. the Filter is implemented in software a microcontroller.
Connector X1 is used to connect your computer to the stage of downloading the program a microcontroller.
Types of parts and design
The design contains the minimum number of components. While not one of them put forward specific requirements.
Chip timer A1 (NE555) can be replaced by CREW. The LEDs preferably choose high brightness. Stabilizer A3 (LP2950) apply type IN or, slightly worse - 78L05. In the latter case the minimum allowable battery voltage would be 6.7 V.
The microcontroller A2 is soldered directly to the PCB (as adding the program is carried out through a connector, it is not necessary to remove it from the circuit Board even when it changes), but if desired, the microcontroller can be installed in the socket. Chip AT90S2313-10PI can be replaced AT90S2313-10PC, however, in this case the manufacturer is not guaranteed to work the temperature range of 0 °C (which may be in the field).
Resistors can be applied to a wide variety of types, the dissipated power 0,063 0,25…watts. Capacitors C1* and C2* - it is desirable to use thermostable, especially C2*. Electrolytic capacitor C4 may be of any type. The remaining capacitors - ceramic, type K10-17. Quartz resonator types WG-05, RC, or other small-size. The sensor - shielded coil. Design can be taken from this book.
Software
Most functions of the device assigned to the program running microcontroller and written (programmed) in its non-volatile memory. At the time of this writing, it was implemented the following algorithm device.
1. After starting the program, clicking the button SO that the microcontroller measures roughly the frequency of the measuring oscillator during a fixed time interval (about a few tens of milliseconds).
2. Then one of the internal timer of the microcontroller is configured to the result of dividing the input frequency was measured in the interval Ti, a little smaller than the above-specified fixed interval.
3. Next is the control measurement of the measured interval T. using second timer that provides counting pulses with a clock frequency of several megahertz.
4. The measured value of the time interval Ti is remembered in the future is used as a reference Tae.
5. In the cycle of repeated measurement interval Ti.
6. A comparison of the intervals Ti and Te by subtracting one from the other.
7. The result is processed convenient for his perceived through light and sound indication.
The software for this device was created and debugged more two years and continues to improve as a printed circuit Board. Perhaps by the time you read this text of the proposed design and the software has already undergone considerable change. Over the past information please refer to the personal page of Yury Kolokolov in The Internet http://home.skif.net/-yukol/index.htm provides information on new functionality.
Operation
With the closure of the switch S1, the device switches to static mode. In this mode when approaching the coil to the ferromagnetic target start consistently to light up the led VD3, VD2, VD1. If the coil closer to the non-ferromagnetic metal object, it will light up the LEDs VD5, VD6, VD7.
Unfortunately, in the same way the instrument reacts to metal objects with great surface area (e.g., tin). This is because when the impact on the search coil in ferromagnetic metal objects arises from two effects - the effect of conductivity and ferromagnetic effect. At a certain ratio of the surface area of the object to the volume starts to dominate the conduction effect.
In dynamic mode the device switches when opening the switch S1. In this mode, the detector has maximum sensitivity, but reacts to objects only when the movement of the sensor coil should move above the ground is about 0.5…1 m/s. the location of the object in dynamic mode is the method of "artillery fork" in the conduct of coil over the object twice from left to right and right to left. In this mode, it is important to feel the lowest speed at which you can move the coil. It's easy mastered in a short workout. Indication in the dynamic mode looks a little bit different. When moving the coil over a ferromagnetic object is first the LEDs Shine from the "scales" VD5, VD6, VD7, and then from the "scales" VD3, VD2, VD1. When moving the coil over a non-ferromagnetic object display works on the contrary.
As indicated above, each led corresponds to your tone sound display. After a short stint with a metal detector remembered "melodies" that are specific to different types of targets. This allows for looking to use mostly audible indication, which is quite convenient.
Before working in both modes it is necessary to set an optimal the sensitivity of the device using the variable resistor R6. He exhibited in this position, when the device begins to indicate a false response. Then slowly rotating the rotor of this resistor, it is necessary to achieve the disappearance of the false positives.
Author: A. I. Shchedrin