


")

To deep metal detectors are devices that let you "draw" them in the ground to a depth of 40 cm to detect large metal objects. In this publication, as well as in previous, not considered electronic the software of the device. To all whom it may concern, I would recommend a book Osipova and Shadrin "metal Detectors".
Structurally deep metal detectors can be divided into two types. In the first one sensor magnetic anomaly and gauge are combined in one housing and the second inductors posted. Below to the attention of interested readers proposed design of the device of the second type (with sensor and spaced emitter) allows the detection of large metal objects and ignore small, lying on the surface.
An experiment was made ruler of such structures with the "base" between the sensor and the emitter of up to two meters. In the example below design with nominal base 1200 mm Other sizes essentially anything not differ. As can be seen from the drawings, the device of the detector very simple and easy to manufacture even a novice DIY experts knows.
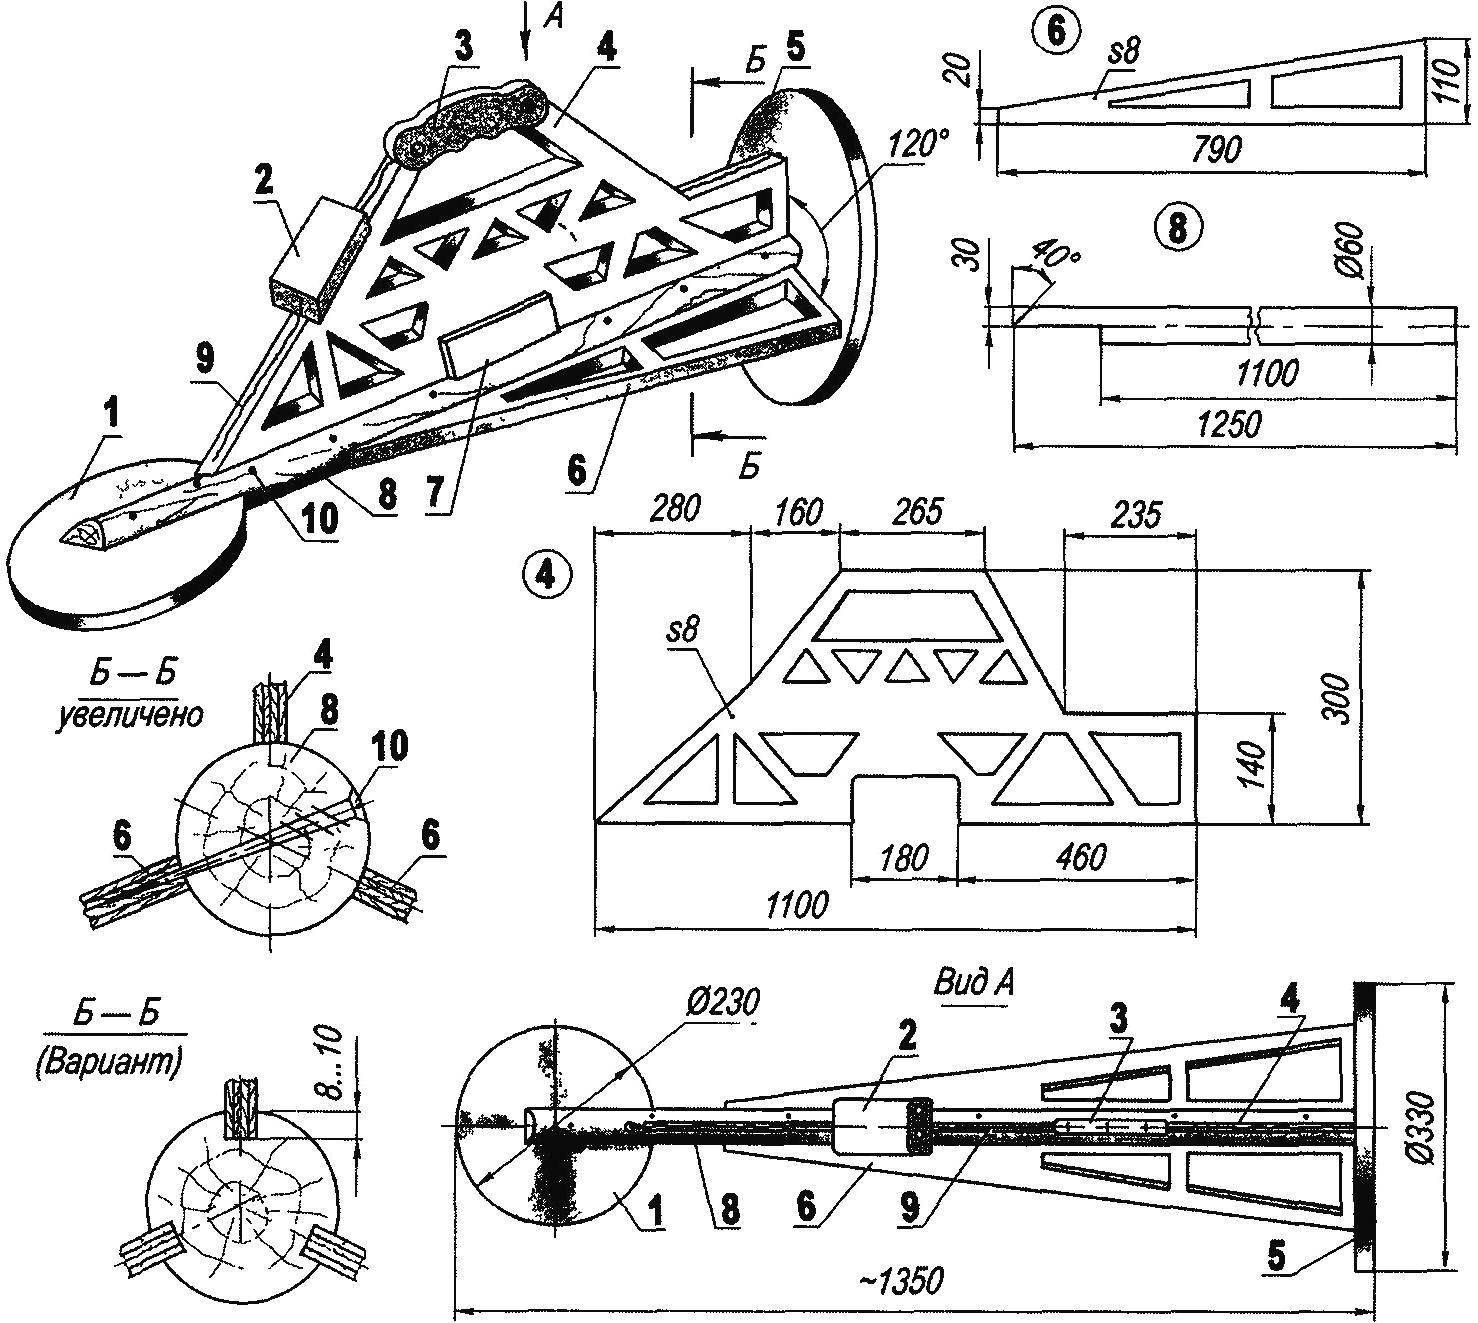
Deep dvuhmatchevyh metal detector (click to enlarge): 1 - sensor, 2 - e control unit; 3 - arm; 4 - the main rib (plywood, s8), 5-radiator; 6 - rib (plywood, s8,2); 7 - block power; 8 - beam (Linden, range 60), 9-operating the actuator of the sensor and emitter; 10 - attachment ribs (screws 4x90, according to needs)
The materials used are widespread and inexpensive frames For sensor and radiator, ribs and main ribs will need plywood 8 mm thick, the beam can be made of wooden logs (preferably made of lime), on the insulation sensors will go thin (3 - 5mm) foam, plain fabric and nitro. For fastening of structural elements will need screws and waterproof glue (or epoxy resin). Fabrication is done by using a minimal set hand tool, which is certainly there in the Arsenal of any home workshop.
To start harvestable according to drawings all the necessary details In the ribs for facilitate cut keyholes of arbitrary shape is the main thing that was saved the necessary strength and rigidity to the entire structure. In the main rib bottom center additionally cut a rectangular groove under the PSU In frame sensor and emitter in a circle choosing a gutter with a semicircular shape. It can be done on the winepress or in the absence of that - manually with a file corresponding section.
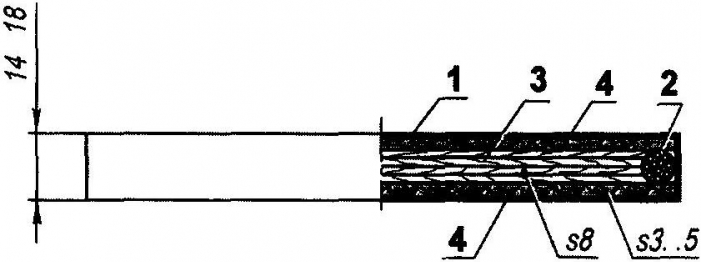
Sensor: 1 - external insulation (coated fabric nitroemalyu), 2 - working sensor wire and emitter; 3 - frame (plywood, s8); 4 - upper and lower internal drives insulation (foam, s3 - 5)
Assembly design we start with installation and fastening of the edges; the top of the ridge beams mounted the main rib, and at an angle of 120° to the ribs. To do this in two ways. The first is easier: on the beam, in the place of installation of the ribs, carefully plane or a rasp remove lyski width of 8 - 10 mm and glue docking to him the ribs with subsequent additional mounting screws. The second option is a bit more complicated, but provides a more durable and tough the connection details in the beam in the same places and at the same angles saws shallow (8 - 10 mm) groove width of 8 mm, glue set fin. To make the grooves can be milled (if possible), a circular saw or by hand with a chisel (the last option is more time consuming and requires a certain skill). As you can see, each option has its advantages and disadvantages - you choose.
Hereinafter, the sensor and emitter On the plywood frame on a circle in the gutter on the varnish wrap the working wire (what type and how many is a separate topic and in this the work is not considered), top and bottom for insulation laid the foam circles the entire structure wrapped in fabric and covered nitroemalyu. The sensor is fastened by screws to the console of the beam and the other to the rear end.
Now install the control unit, the power unit and provide you with final adjustment.
All - the device is ready for operation. Happy searching!
Author: C. A. Kotov