


")

Here is a simple and easy to build circuit diagram of a 12V car battery charger:
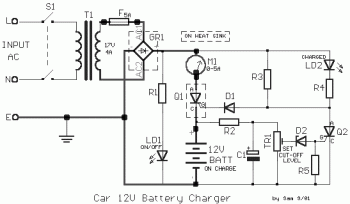
Components List:
R1 = 1Kohms D1 = 1N4001 T1 = 220V/17V 4A Transformer R2 = 1.2Kohms D2 = 6.8V 0.5W zener LD1 = Green LED R3 = 470 ohms TR1 = 4.7Kohms trimmer LD2 = Red LED R4 = 470 ohms Q1 = BTY79 or similar 6A SCR M1 = 0-5A DC Ampere meter R5 = 10Kohms Q2 = C106D SCR S1 = 10A D/P On ? Off Switch C1 = 10uF 25V GR1 = 50V 6A Bridge Rectifier F = 5A Fuse
The above circuit claimed have ability to prevent battery overcharge that make electrolyte lost due to evaporation. This circuit will eliminate the problems by monitoring the battery’s condition of charge through its retroactive control circuit by applying a high charge current until the battery is completely charged. When charging is complete, it turns on the red LED (LD2) and deactivates the charging circuit.
This circuit is drawn to charge 12V batteries ONLY. Certain emphasis should be taken when wiring up this circuit. They are the connections of the transformer to the circuit board, and those supplying current to the battery being charged. These connections should be made with cables having a large cross-sectional area to prevent voltage-drop and heat build-up when current flows through them.
Source: http://users.otenet.gr/~athsam/car_12v_battery_charger.htm
Please visit the original source for detail explanation.