


")

Car has failed an electronic on-Board voltage regulator. What does he do? If he's not a ham radio operator, buys new and replaces spoiled. The ham radio alone will produce original device, it was so that it characteristics not inferior to the old (and often surpass it). Below article is another confirmation of the above.
In case of refusal automotive voltage stabilizer (made in the form of small site, embedded directly into the generator housing) not always can easily buy a serviceable replacement. Deciding to make on the basis of publications in the magazine "Radio" homemade stabilizer in return for 17.3702 generator 37.3701 (VAZ 2104, 2105, 2107, 2108, 2109), I immediately faced with the need to use the device only tiny parts and minimize their number. This was dictated by the lack of free space for installation the stabilizer.
One solution to this problem is the use of the integrated stabilizer detector low voltage CRP (foreign equivalent - PST529) [1]. The detector according to the scheme (Fig. 1,a) is the best suited for the stabilizer in as its first stage. The operating principle of the detector is illustrated in figure. 1,b.
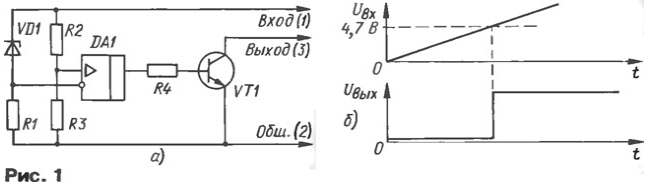
Upon reaching the increasing input voltage threshold (4.7 In for CROP and 4.8 In for PST529) detector abruptly changes from zero status single (output voltage is removed from the load resistor, included between pins 1 and 3). Voltage temperature coefficient switching detector is within ±0,03 %/°C. the Device is released in plastic three-terminal case of CT - 26. Own consumption current exceed a few tens of microamperes.
Automotive voltage regulator should control the current through the coil the excitation of the generator so that the voltage of battery ranged 13,8…14.1 In [2].
Care of tension within this interval leads to premature wear of the battery.
The detector in the stabilizer can be powered from the output of the voltage divider comprising from the Zener diode and dakotadome resistor. The Zener diode must be such that the amount of voltage stabilization and voltage of the detector response was in the specified limits, i.e. with the Zener diode 9.2 In and detector CROP the regulator will ensure that the voltage of battery 13.9 In (PST529 - 14).
Since the current of the excitation winding when the switching can be several amps, the output of the regulator will need powerful composite transistor. Schematic diagram of the stabilizer shown in Fig. 2.
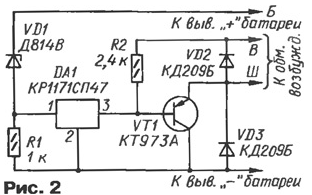
Diodes VD2 and VD3 protect power transistor VT1 from high voltage surges. Work the stabilizer of any special features has not. The width of the loop "hysteresis" the voltage on the battery entirely define the characteristics of the comparator in the detector voltage; it is close to 0.2.
Work on making a new start with stabilizer disassembly post building (17.3702). To do this, unplug the findings of the stabilizer and remove it from the of the generator. Unscrew the M3 screw, mounting to the housing brass elbow, and raspalaut (remove solder two pins closest to the screw and to the nearest the first is the findings from graphite commutator brushes located on the opposite side of the hull and marked with the letters W and V. Pinout easier easiest to do using a soldering iron and a device for sucking the molten solder. Then push the square with plastic parts guided by the body, otpaivaete charge from three angular conclusions and disassemble the transistors.
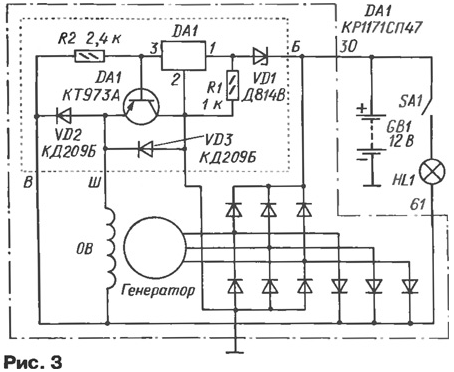
The connection diagram is made of the stabilizer to the generator shown in 37.3701 Fig. 3. The numbering of the parts of a stabilizer (it is circled with a dotted line) saved the same as in Fig. 2. In the generator (it is circled dash-dotted line) S - field winding of the generator.
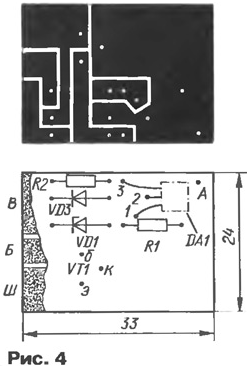
All elements of the stabilizer (except the diode VD2 and the transistor VT1) mounted on the PCB size 33x24 mm foil fiberglass with a thickness of 1 mm the Drawing Board is presented in Fig. 4. The transistor is attached to its place on the square and bend conclusions at a right angle so that when inserting a (party details inside) they went every man to his hole.
Next, as in a factory option, you can mount the second transistor and connect them in parallel. However, the durability of the stabilizer can be expected only if both transistors are either carefully chosen the same parameters, or adjusted their regimes on a current collector (for which in the emitter circuit of the include and choose equalizing resistors small the resistance).
Really enhance the reliability of the node with one (not two) transistor you can, if CTA replace CTA. To do this, however, will have slightly to adjust the circuit Board taking into account the differences in Pinout. For transistors should be put in a heat-conducting paste.
Diode VD2 soldered to the terminals W and h on the body of the stabilizer.
During final Assembly of the stabilizer mounted charge is established on the place of the old one, solder it to the findings of a square and probivaut conclusions of the transistor. Don't forget to provide a reliable connection between the common (negative) conductor Board and a square. For this purpose the Board has a hole in it solder a jumper wire with a diameter of 0.8 mm, the second end of which is soldered to square outside. A square with the Board along the guide rails slid to its original place and fix the screw M3. The final operation is the welds conclusions W and h, unsoldered at the beginning disassembly.
Before you mount the assembled stabilizer for a generator, you must ensure his health. This will require a source of DC voltage, adjustable in the range of 2…16 In, is able to give to the load current of 4.5…5 A (in least come deationary Latr with the rectifier diodes and powerful effective smoothing filter), a load resistor 5 10… Ohm power not less than 50 W and DC voltmeter with a scale 16 In (or any avometra).
Conclusions In a and B of the stabilizer is connected to the positive output of the source, and the body - with sub-zero. Load include a resistor between the positive output of the source and the output W of stabilizer (you can temporarily soldered to the output propiverine the square of stabilizer closest to the M3 screw), voltmeter between the output and W the body of the stabilizer.
The power source is set to the minimum output voltage and network. If you increase the voltage to 9.2 In the voltmeter should show similar increases. Further increase in voltage will lead to the opening of the Zener diode VD1, wherein the detector and opens transistor VT1 - the voltmeter should have decreased to the voltage saturation the collector - emitter of the transistor, i.e. to about 1.5 V.
If you continue to increase the voltage, the voltmeter will remain unchanged. However, at around 14 will switch detector and closing of the transistor VT1 - the voltmeter should show a voltage of 14 V.
After the described check stabilizer set into place on the generator, restore all the connections and experience in the complex.
In conclusion, it should be noted that along with CRP in the stabilizer with the well you can use other voltage detectors in this series. Need only choose a Zener diode VD1 (see Fig. 2) so that its voltage stabilization in the sum of the voltage applied to the detector was within 13,8… 14,1 V. Thus, for a detector CROP will need a Zener diode for a voltage of 7.6 V.
If you want to ensure the minimum possible value of the temperature coefficient of voltage stabilization, use a Zener diode to voltage 5.6 V and the detector CROP.
The Zener diode VD1 at the voltage divider (Fig. 2 and 3) can be replaced by a resistor, pick it up such that the detector is triggered when the voltage of 13.8…14.1 In between the output B and the common wire. It would make the "hysteresis" of the stabilizer, but improves its thermal stability and get rid of the selection of the Zener diode.
Literature
Author: Y. Citrare, Samara