


")

Features of the metal detector
The presented detector is relatively simple to manufacture, does not contain scarce elements, but has a sufficiently high sensitivity.
It can be used to detect a coin buried in the soil to a depth of 15-20 cm.
The principle of operation
Search for metal objects in the soil is mainly based on two physical phenomena. One of them is the influence of the magnetic properties of the object to the inductance coil or coupling coefficient between the two coils. These quantities can to increase or decrease depending on the relative magnetic the permeability of the material.
All known substances on magnetic properties are divided into three groups:
- the diamagnetic (bismuth, glass, copper, water, silver);
- the paramagnetic (aluminum, silicon, air, platinum, palladium);
- the ferromagnetic (cobalt, Nickel, iron, protoxide of iron, steel).
Differences in the permeability of the diamagnetic and paramagnetic negligible. But ferromagnetic materials are distinguished by this feature very much. The second phenomenon of eddy currents arising in the conductive objects located in an alternating magnetic field. The intensity of the currents depends on the size and shape of the subject and the specific electrical resistance of its material.
In a flat metal plate eddy currents is much stronger than in the object of complex shape with a rough surface. Has a value and position of an object in a magnetic field (the number running through its lines of force). If we take into account the dependence effect of distance and the effect of soil becomes obvious how difficult task.
Describe a simple metal detector works on the principle of TR/IB. This reduction stands for Transmit-Receive/lnduction - Balance-transmission, reception and the induction balance. In the sensor set two coils, a transmitter and the reception room. The presence of metal modifies the inductive coupling between them, which affects on the received signal.
The sensor consists of two coils. The device contains only two transistors and one chip.
Schematic diagram
Shown in Fig. 2.20 the scheme is quite simple. Generator PA transistor VT1 operates in the intermittent oscillation. It generates two frequencies simultaneously - high and low, and the high frequency oscillations are additionally modulated by a low frequency. With the start of generation of the capacitor C2 is charged through the diode VD1. Upon reaching a certain voltage (2 high-frequency vibrations to break down, and the capacitor discharges through the resistor R1. After a while the vibrations arise again, and the cycle repeats.
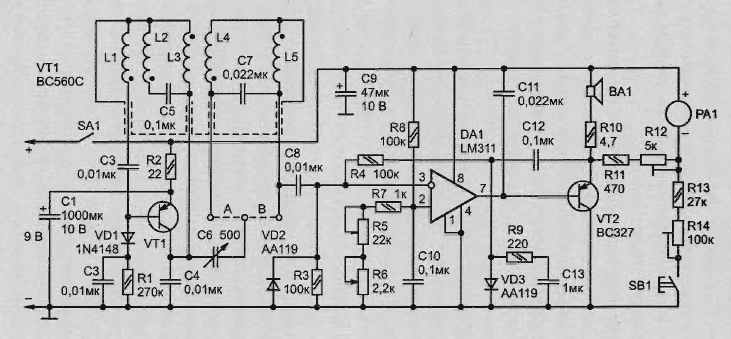
Fig. 2.20. A circuit diagram of a simple metal detector with high sensitivity
Between the collector and base of transistor VT1 is connected transmitting coils L1-L3, structurally executed in such a way that capacitive effects on them surrounding objects cancel out. The capacitor C5, located in the immediate vicinity of the coils, determines the generated frequency.
Coils L4 and L5 are adopted, they are located near transit. Covered turns receiving and transmitting coils zones partially overlap. In the absence of metal objects induced in the receiving coil signal compensated coming directly from the generator through an AC the condenser Sat. Appeared near the metal disrupts the balance. The signal is sent to the inverting input of the comparator DA1, which compares it with a constant voltage.
The latter set the variable resistors R5 (ROUGHLY) and R6 (EXACTLY). Diode VD2 necessary, so that the input of the comparator received only positive voltage. If the signal is above the set threshold, the output of the comparator appears the voltage, which opens the transistor VT2.
Because the comparator are the top signal flares, acoustic head BA1 (power - 0.1 W resistance - not less than 8 Ohms) the sound is audible. Changing connection between transmitting and receiving coils affects the amplitude received signal, which, in turn, leads to a change in the width of the pulses at the output of the comparator. This is audible as a change in volume and timbre sound coloration.
Rectified by the diode VD3 is the voltage of negative polarity proportional to the level of the signal at the collector of transistor VT2, is returned to the input of the comparator. This is achieved by automatic adjustment of the threshold, compensating slow the changes induced in the receiving coils of the signal. At the output of the device microammeter RA1 drain full deflection 100-250 mA. Therefore, to judge the presence of coils of metal objects and can fluctuations on its hands. While pressing the button SB1 through microammeter can to monitor the battery voltage supply.
Design of metal detector
Good performance of the detector can be achieved only if the correct the manufacture of the sensor, a drawing of which is shown in Fig. 2.21. Armatures coils serve two plates of organic glass or other a solid dielectric material. The wood in this case is not suitable because its hygroscopicity. Around the perimeter of each plate is in its edge cutter or file necessary to make the groove for laying the windings.
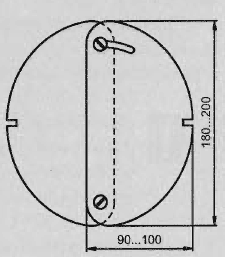
Fig. 2.21. A drawing of the sensor
All coils need to be wound copper wire with a diameter of 0.3 mm with enamel insulation. The beginning of the wire should be secured with a drop of glue at the point A of the frame, wind 22 turns of the coil L2 in a clockwise direction. The end windings also need to stick to the plate at point A. without clipping the wire, it is desirable to clean from the isolation of his small plot and solder to it beginning another segment of the wire, which is wound four turns counterclockwise the coil L1.
After this wire, which was wound coil L2, you need to make 22 more loop clockwise - coil L3. The findings of all of the windings are to be firmly sticking to the plate - frame at the point A. Coils L4 and L5 are proposed to be placed on the second wafer. Each of them begins and ends at point b and contains 36 of turns wound in one and the same direction.
Capacitors C5 and C7 need to solder directly to the pins of the coils in accordance with the scheme and sticking to the plates. Plate with the windings should impose on each other and fasten together with bolts of insulating material (e.g., nylon), as shown in Fig. 2.21.
An arcuate slit in one of the plates allows for the adjustment of the device to fix the plate in the optimum position. The entire Assembly is better to fix on the end of a wooden or plastic rod length 1-1. 5 m. To secure the Assembly in any case do not use metal screws, the screws or nuts.
On the opposite (upper) end of the rod is necessary to install the casing (can metal) to the circuit Board of the device. Arm controls (SA1, SB1, C6, R5 and R6), it is desirable to withdraw on the front panel of the housing. Coils L1 - L5 must be connected to the Board the detector is shielded wires.
Setting of the metal detector
Before you configure both detector plate with the coils should be deployed under maximum angle, not fixing them. Wire jumper A and b until install. After turning on the power at a certain position variable resistors R5 and R6 in the head BA1 should be a sound is heard. Slowly move the coil (not near them should be no metal) until then, until the volume starts be reduced.
A rotating axis variable resistors and moving coils, it is necessary to achieve minimum volume. Sometimes it takes several attempts. Finding at least, coils a little more (less than 1 mm) to move and fix. Further, the detector can be switched off and install a jumper wire A. After power is needed to find the position of the rotor of the capacitor C6, in which a sound is heard. If this do not succeed, the jumper And have to remove, place the jumper In and try again.
If this does not work, the position of the coils was probably found wrong. Last chance to configure the detector to connect the capacitor capacity 470 pF in parallel with C6 and try again to find a point of balance. In the case of failure to make other coils, strictly observing all recommendations. Getting started adjusting the control node of the voltage supply, the last set equal to 9 V. using R5 and R6 to ensure that the sound from the head BA1 heard was, and the needle of the microammeter RA1 didn't deviate. By clicking on the button SB1, using R14 set the arrow on the last scale division. Reducing the supply voltage to 7 In, mark the position of the needle corresponding to the minimum allowable voltage.
It remains to adjust the sensitivity of the device is a variable resistor for R12 's sole discretion. Sometimes audible in the head BA1 sound accompanied by a roar with a frequency of 100-150 Hz. To get rid of the hum should be included in series with R1 adjusted a resistor of 50 ohms and to choose the position of the engine.
Getting started
Before you start working with the metal detector, you need to make sure that whenever the deviation of the rotor of the capacitor C6 from the balance point in the head BA1 sound is heard. With a little experience, it is possible by setting C6 to different positions, even to distinguish between diamagnetic materials paramagnetic.
Literature: