


")

In recent times it has become a very topical problem of controlling the engine speed of the vehicle. Previously proposed schemes [1, 2] have a number of disadvantages associated with a large number of elements, a large input current and control engine speed only in digital form.
Proposed another variant of the tachometer, which provides:
- control of speed in both digital and visual form;
- minimum current consumption that depends only on the applied LEDs;
acceptable accuracy and ease of adjustment when using five IC series 176 and 561.
Schematic diagram of the device depicted in Fig.1. The signal from the sensor Rev B1 hits a pulse shaper assembled elements DD6.1; DD6.2, R2, R3. Elements C4, R1, VD14, VD15 limit sensor signal level is 9 V.
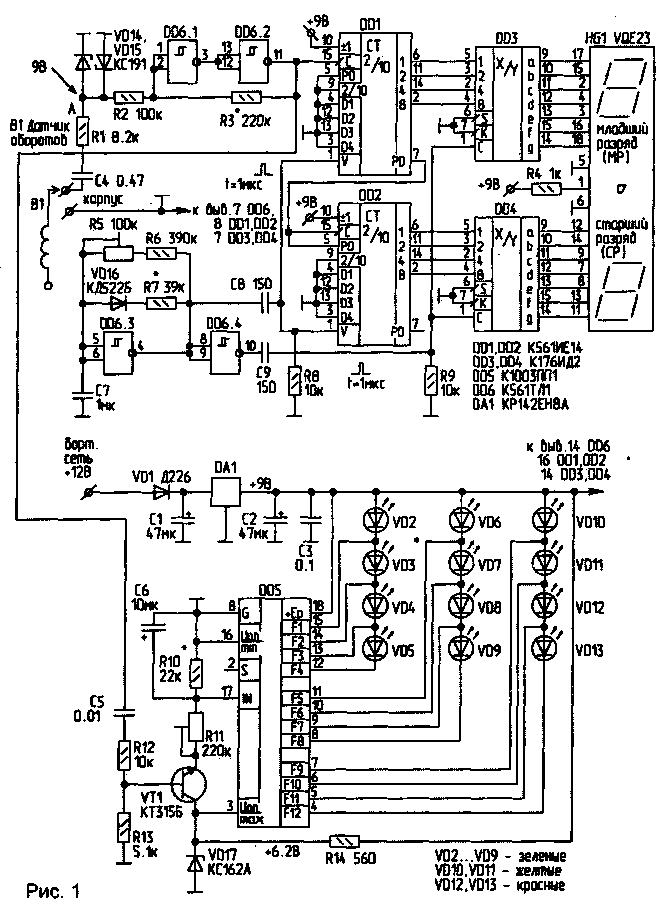
The generated signal is input to the counter collected on elements DD1, DD2. Decoders on the IC DD3, DD4 convert binary-coded decimal code counters in code seven-segment indicator, as well as provide an intermediate memory, thereby eliminating the flicker of digits in the account. Operation of the device controlled oscillator elements DD6.3, R5…R7, C7, VD16. The shape of the output pulses of the generator depicted in Fig.2.
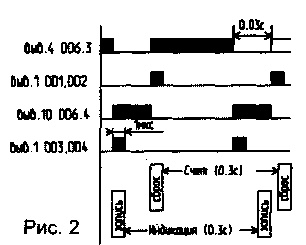
After power short pulse "write" writes in an IC DD3. DD4 random information. Next is reset counters DD1, DD2 short pulse "reset" with a duration of about 1 μs, formed by a chain of C8, R8, and the counting of pulses from the speed sensor for a period of 0.3 sec.
For 0.03 s before the expiration of this time is recorded in DD3, DD4 content counters DD1, DD2, with a simultaneous display on the display HG1 current number of revolutions of the engine. Operation is provided by a short pulse (=1 MS), formed by a chain C9, R9.
Visual perception of speed gives the device is made on the IC DD5. The higher the turnover, the higher the column of lights. Green zone - normal number of turns yellow - critical, the red is the limit. As DD5 applied polyommatinae IC CPP. Its connection scheme and principle of operation are described in detail in the literature [3]. The height of the column of glowing LEDs depends on the voltage at pin 17 DD5, which depends on the rotational frequency.
The transformation of the frequency-voltage elements provide VT1, R10 R13…, C5,C6.
Design and details
It is possible to replace these in the diagram elements: HG1 - on any two of the led with common cathode type ALSO; DD3, DD4 - CIJ; DD1, DD2 - KIE (but will have some to alter the scheme and cost); VT1 - CTA…G, KT3102; CT; CT; K. T. The rpm sensor is a 50…70 turns of PEV-1 cross section 0.5… 1.0 mm, laid turn to turn on the high voltage wire from the reel to the distributor.
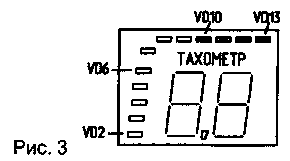
One end is connected to the scheme, the other is isolated and not connected. All the electrolytic capacitors must be rated for a voltage not lower than 16 V. DD6 series CTL substitutions are not recommended. DA1 is better to install on a small finned heatsink. VD2…VD13 - all LEDs (rectangular or round) of the corresponding color. The front panel of the tachometer shown in Fig.3.
Setting. To the point And the signal frequency of 100Hz. Adjusting the resistor R3, and achieve output DD6.2 the emergence of a steady signal. The adjustment of the resistor R5 achieve indicator 3.0, which corresponds to 3000 rpm. Further, according to the following formula to determine the minimum and maximum speed, i.e. the equivalent frequency.
N=2n/60,
where N is the frequency of the pulse ignition (point a); n is the frequency of revolutions of the motor shaft.
The line voltage,
9,0
9,5
10
10,5
11
11,5
12
12,5
13
13,5
14
14,5
15
The voltage at pin 17 DD5,
0
0,5
1
1,5
2
2,5
3
3,5
4
4,5
5
5,5
6
The led glow
-
VD2
VD3
VD4
VD5
VD6
VD7
VD8
VD9
VD10
VD11
VD12
VD13
Feeding the frequency corresponding to the maximum speed, the resistor R11 achieve ignition VD13. Now, feeding frequency minimum speed, control the ignition of the led VD2. If it does not illuminate, choose R10. The configuration is finished.
If you don't like the column of lights that you can offer a "moving point". In this case, VD2…VD13 connected according to [3].
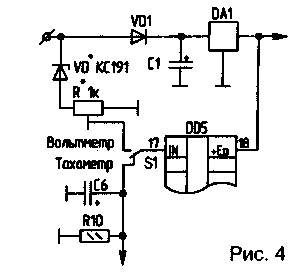
If you provide a switch S1 as shown in Fig.4, DD5 can function as a tachometer and indicator Board voltage of the vehicle. The elements of VD* and R* provide at pin 17 DD5 changing voltage in the range of About 6…with changes In the voltage in the vehicle electrical system. From VD* determines the range of variation of the voltage (see table). When you configure by using R* get correct readings DD5.
Literature
1. Kravchuk V. Tachometer. - Ham, 1997, No. 6, P. 31.
2. Rubtsov V. Digital tachometer. - Ham, 1997, No. 5, P. 24.
3. Shustov M. Application precomputing circuits in communications technology. -Ham, 1997.N6, P.13.
4. Digital tachometer. - Radio. 1993, No. 9, pp. 28-29.
5. Biryukov, S. A. Digital devices for MOS IC.
Author: A. Chistov, Brest region, Pinsk district. p/o Churchyard-Zagorodskikh, fish farm "Polesie"; Publication: N. Bolshakov, rf.atnn.ru