


")

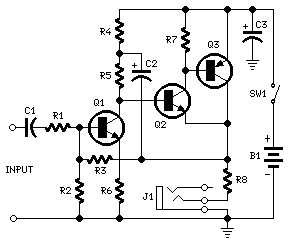 Parts
Parts
- R1 = 10K 1/4W Resistor
- R2 = 100K 1/4W Resistor
- R3 = 68K 1/4W Resistor (see notes)
- R4 = 1K5 1/4W Resistor
- R5 = 3K3 1/4W Resistor
- R6 = 330R 1/4W Resistor
- R7 = 4K7 1/4W Resistor
- R8 = 2R2 1/4W Resistor
- C1 = 1uF 63V Polyester Capacitor
- C2 = 100uF 25V Electrolytic Capacitor
- C3 = 470uF 25V Electrolytic Capacitor
- Q1 = BC239C 25V 100mA NPN High-gain Low-noise Transistor
- Q2 = BC337 45V 800mA NPN Transistor
- Q3 = BC327 45V 800mA PNP Transistor
- J1 = Stereo 3mm. Jack socket
- SW1 = SPST Switch
- B1 = 3V Battery (two 1.5V AA or C cells in series)
- Can be directly connected to CD players, tuners and tape recorders.
- Tested with several headphone models of different impedance: 32, 100, 245, 300, 600 & 2000 Ohms.
- Schematic shows left channel only.
- B1, SW1, J1 & C3 are common to both channels.
- R3 value was calculated for headphone impedance up to 300 Ohms. Using 600 Ohms loads or higher, change R3 value to 100K.
- Current drain: 35mA per channel with 32 Ohms impedance headphones. Much less with higher impedance loads
- Output voltage: Above 2V peak-to-peak on all loads
- Sensitivity: 90mV RMS input for 2V peak-to-peak output
- Frequency response: Flat from 30Hz to 20KHz
- Total harmonic distortion @ 1KHz & 10KHz: Below 0.05% on 32 to 600 Ohms load and up to 1.5V peak-to-peak output. Below 0.1% at maximum output
Unconditionally stable on capacitive loads