


")

Honeybees live on Earth for over 10 million years. And of course, have tried to adapt to the environment in the wild, but not in home… From hibernation, they often overlook the feeble, prone infectious diseases. And even whole families die. Although, it seems, and here nametype still, as they say, its lumen. Beekeeper and inventor longtime subscriber "M-K" S. Kalashnikov has developed an original method that allows bees greatly facilitate the winter, creating a truly comfortable environment with additional (electric) heating the hives.
However, it had to modernize the design of the last. In the quality of the heaters is proposed here to use… old, familiar every Amateur photographer electrogenerated. And the desired heating temperature ask using improvised electronic heat stabilizer output the stage, designed for large industrial thyristor.
Honeybees are known to belong to social insects. Live in large families, with a distinct hierarchical structure. And in his the hive (nest) they try to maintain the cleanliness and order. So even tough winter, in General, not terrible. Of course, with proper food, "comfortable" dry "housing" and other conditions, the observance of which vigilantly following instinct.
But irresponsible people sometimes intervenes in this harmony of nature. Breaking the laws of ecology, poisons life "brothers smaller". There's even ultra long bees do not stand up, start to hurt. And in the most difficult time for them - the autumn-winter period and early spring, will also die.
Don't know about other people, but the gravedigger for their winged Pets I never be not wish. So I decided to simplify wintering them by equipping hives special electric heating. And that "comfortable" conditions to sustain with extreme precision designed and the electronic temperature controller with output cascade, able to give to the load up to 20-40 kW (capacity depends on the type used thyristor).
Already the first winter of my Pets in modified, provided electric hives showed that I was on the right track. Convinced: each bee colonies are much better suffered the vagaries of weather and met spring, as they say, forearmed. Yes and feed it took to wintering my bees already much less.
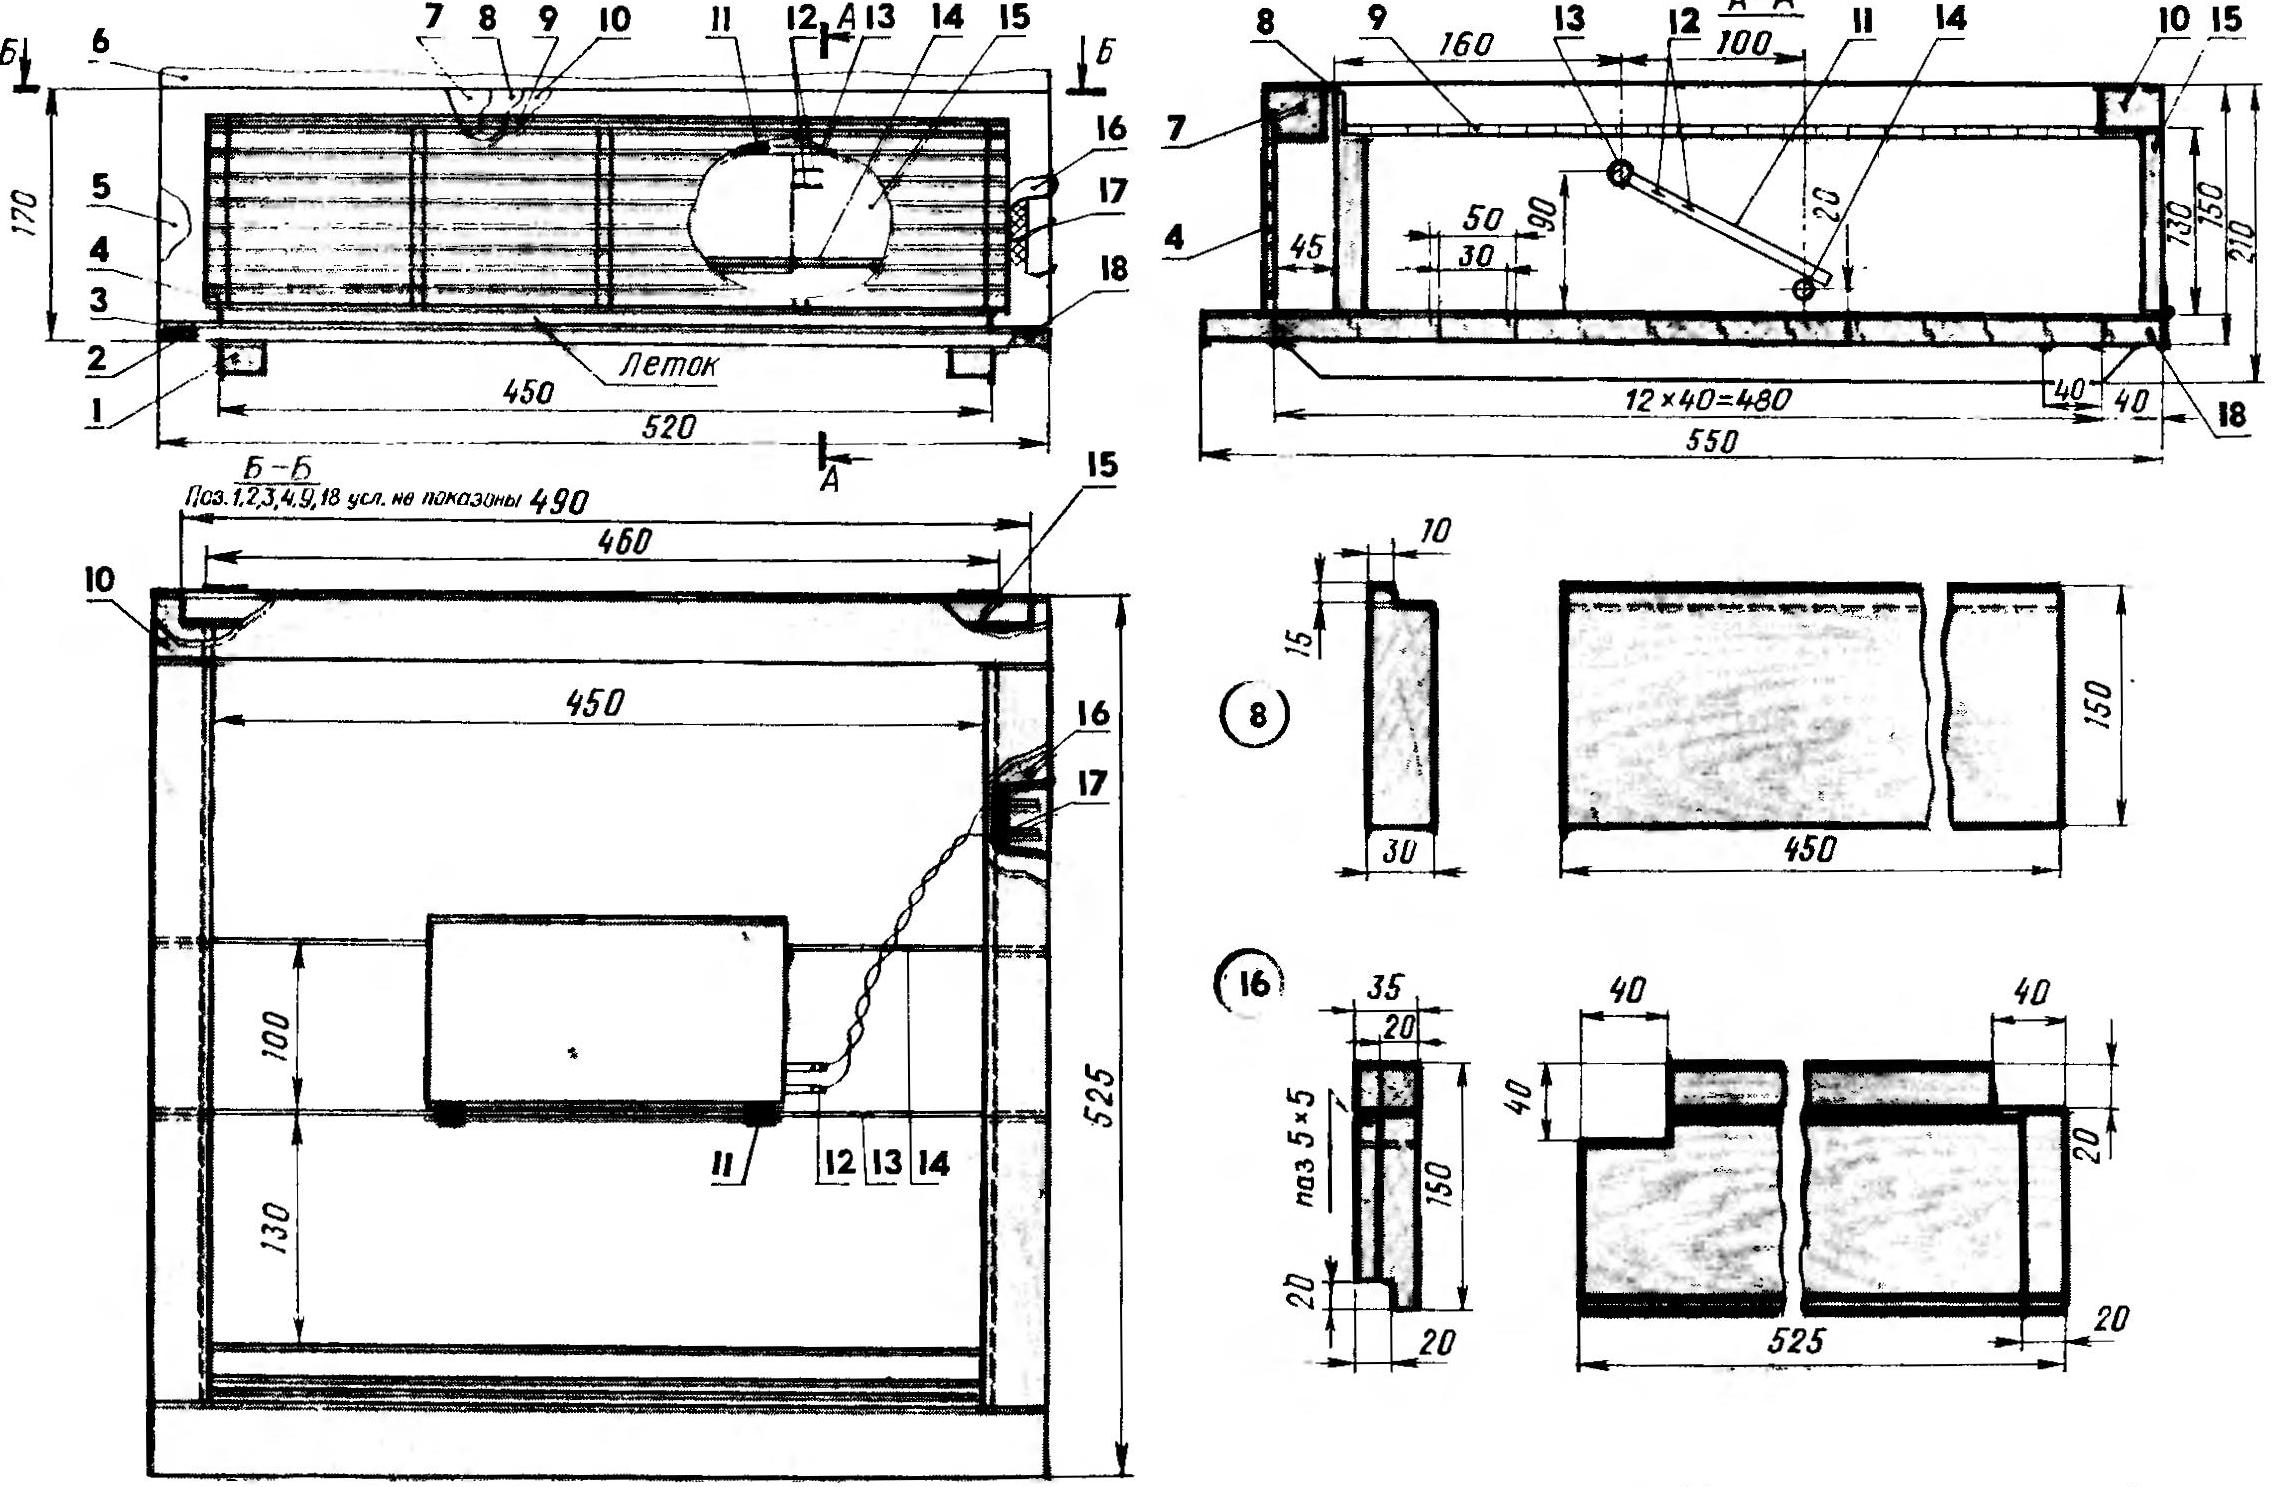
Design the bottom of the hive, equipped with electrical heating system (click to enlarge): 1 - the skids (spruce timber HH mm bevelled at an angle of 45° ends, 2 PCs.), 2 - front plate inlaid floor (pine "bolongongo"), 3 - basic Board inlaid floor (pine "paneling". 12 PCs.), 4 - Hanumanasana grille, 5 - side wall left (birch), In the case of the beehive, 7th cross member front (birch timber 40x40 mm), 8 - partition (Board core, birch), 9 - protection mesh, 10 - rear crossmember (birch timber 20x40 mm), 11 - the heater (element EN-9 from the old googlenauts FY-9 with two attached swivel hinges), 12 - conclusions spiral heater with soldered connecting wires to them, 13 - axis swivel (6 mm pin, St3), 14 - emphasis (6 mm pin, St3), 15 - door (birch Board HH mm), 16 - lateral wall of the right (mirror-left, birch), 17 - connector SHR (RM), 18 - the back Board of the mosaic floor (pine "poluvagony") .
By the way, all this is in strict accordance with science. And she, in particular, claims: the minimum energy expenditure of the club bees when the temperature the outside border is +8°C. under such conditions wintering observed optimum feed intake, the lowest content of the intestine winged bee plants in the spring. Therefore, there is a large the keeping of bees, achieved their best preparation for maximum bribe when flowering gardens; increased productivity, marketed output of honey from each hive.
Further creative search led to the need for a more rational placement of the electric heater. Through trial and error that the place he is in the bottom, under the framework (see illustrations). It really gives uniform heating of the entire interior space of the hive.
Analyzing the proposed technical solution, it is easy to notice the presence in design the bottom of the hive "cold corridor", a kind of "porch". It not at the whim of the developer, and dictated by life itself the need. After all in the spring there are so-called "recurrent" cold, while in the hive to time temperature advisable to keep from +20 ° C to +25°C. And if "cold corridor" was absent, bees could be induced on the fly. In sub-zero temperatures of the outdoor air is more cheul dangerous. Well, when the presence of "veranda" nothing is not happening. Bees, sensing in it not too comfortable, out of the hive not already out: cold.
Regarding the specifics of my proposed revision of the standard 12-frame hives under heating, we all of them are clear from the illustrations. Bottom part, as this can easily be verified, the team. The floor is composed of 40-50 mm boards type the "lining". It is mounted on two pieces of wood-runners. Side wall - boards section 35X XI50 mm, pasted together by cross members, made from bars of appropriate dimensions.
The front fastens Hanumanasana grille. And so, that between her and the floor remains notches - pass 10X450 mm for bees. Parallel lattice Handymanual rigidly mounted profile Board, separating (together with the beam 40X40 mm) 45-mm "cold corridor" from the rest of the design of the hive.
In the upper part formed at "the porch" - a new passage for the bees. Its size the profile also 10 X 450 mm. Rear bottom part of the hive closes (along with the cross bar 40 X 20 mm) 20 mm wooden door. Tightly made for entering her in the side walls of the nest, she has articulated (can also be used loopback) connection with the floor. And from the rest of the design of the bottom part of the hive separates planning grid, to secure which provides special grooves in the side walls and the recess in the profile Board.
The heating element is located in the center of the bottom at an angle for to accumulate debris and wax chips. Terminals for connection the heating element is displayed on the side wall of the bottom. As such used a homemade (or old electric heaters irons, dummies), but better to use standard connectors type SR or RM.
Now - about the thermostat. Its schematic is fairly simple.
Schematic diagram of the thermostat
When you turn on the toggle switch (SAt) is the voltage supplied to the transformer T1. 15-20V, derived from its secondary winding, straight, diode bridge VD2-VD5 and smoothed by the filter C2R3C1.
Stable with VD1 power is being supplied to the transistor VT1, which under the basic tension is triggered and its collector current opens transistor VT2. As a result, the emitter load R2 occurs last positive voltage 10-11, which is supplied to the control electrode powerful thyristor VS1 type PTL. Load devices are mentioned earlier the elements of EN-9, connected in parallel (up to 400 pieces). Mount them as already mentioned, within the hive. EN-9 begins to heat up and give off warmth in subscope space.
As soon as the temperature reaches a threshold (the level of the lower bars framework, where one of the hives is a mercury contact thermometer), work CRF and will shunt the circuit VT1 base. A transistor that closes. As a result will be locking and VT2. The resistor R2 will still fall voltage. Therefore, a powerful thyristor VS1 too close. This means that through the load will not pass current. Elements of AL-9 will no longer be heated, and the temperature inside the hive will start to fall. But this process keeps track of the EEOC. And as only the contacts of the mercury thermometer will open, and the cycle of operation of the circuit will be repeated.
Now a few words about the design and details of the device. Collected it (see illustrations) on the Board from double-sided foil fiberglass 2 x 62 x 100 mm. All the details of the circuit, except the diode Assembly KTS405, located at the top. And their selection is not so critical. In particular, Zener DD can be replaced D or similar semiconductor device. Electrolytic capacitors - type To a-50. The Resistors R1-R3 - small-sized, low-power with a tolerance of ±20% of the nominal value or the like. Resistance R1, R2 type MLT-0.5 W, resistance R3 - MINTS 1.0 W. The values: R1 - 82 kω, R2 - 1,3 kOhm, R3 is 200 Ohms.
Step-down transformer T1 can be taken from any transistor radio with mains powered ("Minsk", "Naroch", "Ether", etc.) or made by yourself. For its production we use a common set of W-12 with a thickness 20/24 mm. Network winding has 2800 turns of wire PEL-0,13. Secondary contains 109 turns PEL-0,8.
The thyristor PTL can be replaced by more powerful modern industrial devices T3-250, T-25, T-200 T-250, T-50, T-100, T-160, T-160, T-200, T-250 (the last number in the designation indicates the current in amperes). Instead MP42B suitable GT (B, C), GT, GTV, GT with any index GT (A, B), GT (B, G, D), and instead KT315-CT (A, b), CT (A, B, C) CTV. And as the load resistor is recommended to use an appropriate number (one per hive) elements (from googlenauts FG-9) - EN-9 with parameters U=220 V, P=160 W, R=300 Ohms. And not with an open winding (those should not be applied), and with a closed. Connecting wires the thermostat to the hive run wire type RPS corresponding section.
Printed circuit Board with the location of the schema elements
And yet. Remember that hives are outdoors with brought to them with a voltage of 110 volts. This requires accuracy in work. Connect to hives the thermostat only when the device is turned off. The wires should be double insulation, laid so as not interfere, do not lay on the road.
All connections must have a reliable contact without bare patches. Only making sure everything is, as they say, honor to honor, include the device in the network 220 V. After 20-30 minutes, check for heat in the hive, which opened the door bottom and determine (to the touch), the heat there.
In winter the temperature in the hive is set from +S to +S. And after the flight the temperature was raised to 20°C… +25°C.
Lastly: don't forget to put yourself in the apiary a drinking bowl for bees with warm water.
I wish you success!
Author: S. Kalashnikov