


")

There are times when during a phone conversation, you need to short time to mute the microphone of the phone. To complement the handset this feature by collecting one of the proposed sites.
To avoid certain sorts of unpleasant things, it is desirable to have the ability to disable and enable the phone's microphone as necessary. The phones that already have such a function, often some of the shortcomings inherent in its implementation. Here are some of them:
- mute or unmute the microphone, accompanied by strong loud clicks or rustle;
- for all the time off you need to hold the appropriate button;
- together with the microphone there is a complete disconnect spoken node;
- delayed up to 2…3 with the reaction to pressing the right buttons.
If there is no desire or ability to install a miniature latch button, having good quality, then the node mute the microphone you can perform thus, as shown in Fig. 1.
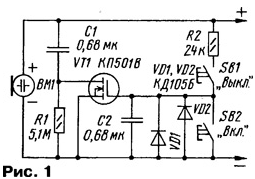
This is a simple timer with an exposure to mute about one minute. Its installation does not need to make major changes in the design of the phone. The device is intended collaboration with electret microphone, energized power is not less than 1.7 V.
When you short press the SB1 the capacitor C2 is charged up to voltage equal to the voltage set in the handset microphone. The voltage at the gate of the transistor VT1 relative to its source becomes more threshold, the transistor opens and bypasses AC-coupled microphone WM. The microphone is "disabled". The capacitor C2 is gradually discharged through the diodes VD1, VD2, performing the role of high-resistance resistor 70…200 MOhm the room temperature. When voltage gate-source VT1 will be close to threshold, the field effect transistor will begin to close, the resistance of its channel will rapidly increase and the signal from the microphone will resume.
Resistors R1 and R2 are designed to eliminate clicks when you mute the microphone. Capacitor C1 prevents the possible operation modes of the amplifying cascades conversational site that allows you to easily mount this a node in most phones. If you need to turn on the microphone before the capacitor C2 will have time to diluted shortly press the button SB2.
In Fig. 2 shows a diagram of a more perfect host to mute the microphone. Here to control it only needs one button. When you first circuit contacts button SB1 microphone is switched off and the second switches on, when the third - shut off again. In any of these States, the microphone may be any for a long time. The fact that the microphone is muted, the led indicates HL1.
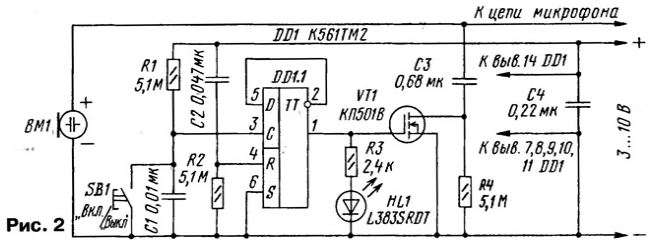
The connection of the D input of flip-flop DD1.1 with the inverse output enabled to implement the frequency divider by two. Capacitor C1 eliminates the effects of bounce contacts button. Elements C2, R2 are used to set the trigger at zero state after lifting the handset, which would mean "microphone on".
How to build this site into your telephone, we will show by example telephone the apparatus described in [1]. Negative terminal of the power supply node connected to the minus the output of the microphone VM - GND spoken node. Positive power supply pin should be connected to the positive output capacitor C15. Similar to this node mute the microphone can also be connected to microphone amplifier, described in [2].
Both nodes are easy to integrate into simple telephones Asian production with button dialer and apparatus of the brand WEF: Rita-201, Gunta-202, lnta-203.
Resistors you can use any small, for example, C1-4. All capacitors ceramic K10-17 or film K73-17. Field-effect transistors CPU can be replaced by any of this series, and KR1014KT1, CCT. Led HL1 (Fig. 2) red glow has a high luminous efficiency. Because it works at low current, is indicated on the diagram, it is desirable use the led has high brightness, for example, L1503SRD, L1503SGC, L1513IT. The buttons are easier to use small-sized, for example, TD-06XEX SMD. Can accommodate a pair of "rubber" buttons or connect one or two of free, available in the telephone. Diodes (see Fig. 1) can be replaced by any of series CD, CD, CD.
Node collected by the circuit of Fig. 1, needs to establish. The selection of the number and type diodes connected in parallel set the desired time of exposure. This a node can be mounted as in the case of a speaking-tube wire telephone apparatus, and in the case of the phone. Prefer the first option. In the casing tube, drill two holes for the tiny buttons. Good will look buttons from the calculator Elektronika MK-52".
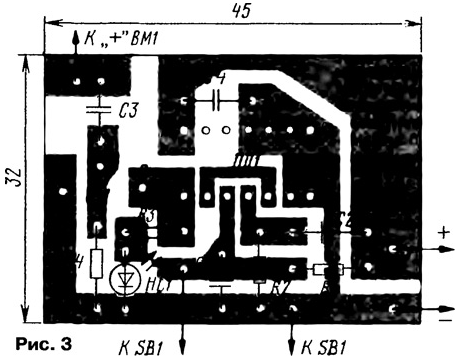
The node according to the scheme in Fig. 2 can be mounted on the PCB of unilateral steklotekstolite a sketch of which is shown in Fig. 3.
Literature
Author: A. Butov, S. CORBA Yaroslavl region