


")

The amplifier can operate at a load of 4 and 8th, can be used in a bridge connection to a load of 8 Ohms, while he'd throw in a load of 200W.
Main features are as follows: The voltage, V +/-35
Supply current in silent mode, 100 mA
Input resistance, ohms 24
The Sensitivity (100 W, 8 Ohms), 1.2
Power output (KG=0,04%), 80 watts
The frequency range 10 Hz…30000
The signal-to-noise (UN-weighted), dB -73
Amplifier circuit:
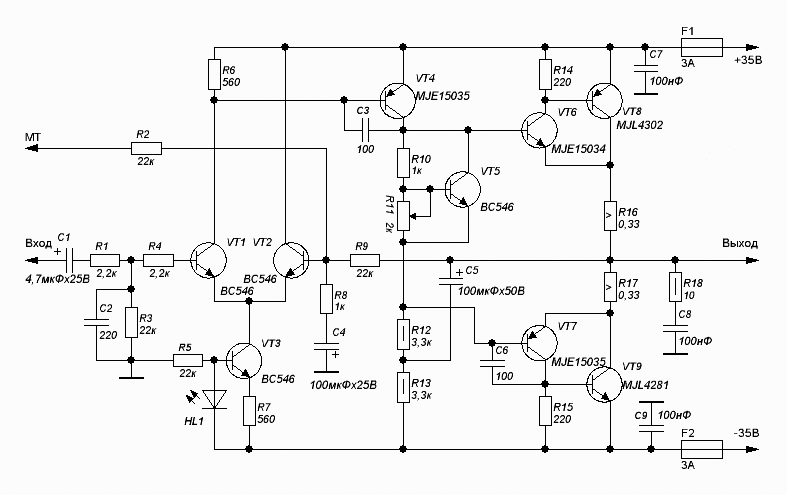
The amplifier is built entirely on discrete elements without any operational amplifiers and other tricks. When working on a 4 Ohm load and the power amplifier 35B has an output of up to 100W. If there is a need to connect the load 8th power can be increased to +/-42V, in this case, we get the same 100W.
Very strongly not recommended to increase the voltage more than 42V, otherwise you can go without the output transistors. When operating in bridged mode should be used 8 Ohm load, otherwise, again, are deprived of any hope for the survival of the output transistors. By the way, we must remember that the protection against short-circuit in the load is not provided, so we have to be careful.
To use the amplifier in bridged mode , you must sign-MT bolted to the output of another amplifier, the input of which a signal is given. The remaining input is shorted to ground.
Resistor R11 is used to set the quiescent current of the output transistors. The capacitor C4 determines the true boundary gain and decrease its not worth it - get-excitation at high frequencies.
About the details.
All resistors are 0.25 W except R18, R12, R13, R16, R17. The first three to 0.5 W, the last two on 5 watts. Led HL1 is not for beauty, so no need to stick in the scheme of high-brightness diode and output on the front panel. The diode has to be the most common, GREEN is important because the LEDs of other colors have a different voltage drop.
If someone not so lucky and he couldn't get the output transistors MJL4281 and MJL4302, they can be replaced by MJL21193 and MJL21194 respectively.
Variable resistor R11 is best to take a multi-turn, although suitable and conventional. Nothing critical here - just easier to set the quiescent current.
Well and the plate, all in one place:
The symbol on the diagram
The value
Note
R1, R4
2.2 kω
R2, R3, R5, R9
22kohm
R6, R7
560
R8, R10
1 kOhm
R11
2K
trimmer
R12, R13
3K3
0.5 W
R14, R15
220
R16, R17
0,33
5W
R18
10
0.5 W
C1
4,mcfhs
C2
220
C3, C6
100
C4
Thu
C5
Thu
C7, C8, C9
NF
VT1, VT2, VT3, VT5
BC546
VT4
MJE15035
You can replace the BD140
VT6
MJE15034
VT7
MJE15035
VT8
MJL4302
VT9
MJL4281
HL1
AL307
GREEN
The actual setting is to install the quiescent current of the output transistors resistor R11 approximately 75-90 mA.
The output transistors, of course put on the radiators. An area of 300-400 square meters for each. VT6 and VT7, too, can make life easier by screwing them on the radiators 50-70 sq cm
The circuit Board can be downloaded here [attachment=8]