


")

The first option was two drawbacks. Firstly, a certain subject standing back instead the seat has attracted the attention of young people and middle-aged policeman. Secondly, SPL was clearly below potential, and frequency response ignored the region above 60 Hz. As the decision, the public advised to deploy bubukal reverse and horn effect. On the advice of the public… no, I didn't buy the car "Moskvich", and decided to make new bubuka the Anti-Stealth, maintaining the VISIBILITY of the rear seat and obscurity actually Saba.
The decision was in my head: Sub needs to be done hoax the back of the sofa is covered in this same case, and front (real) seat no pioneer will not guess. The back of the sofa - it's just a rectangular volume 120*1370*520 mm, albeit with curly cut out that even with thick the walls will give a minimum of 35 liters. Because the depth poklonski speaker (press it to heart! I will not to change it, not wait) - 160 mm, the head does not fit in the envelope backless, and requires additional volume "muzzle". So it is in the profile should be.
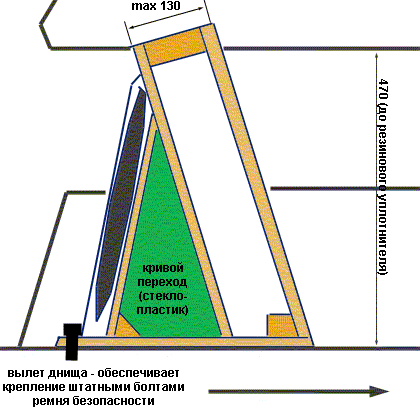
But the size of the back and bottom the drawer. Approximate file size is 30-35 litres actually the back and 10-15 in "the growth". A total of 40-50, will succeed.

How much
Materials and budget (spring 2000, Moscow markets)
- Plywood 20-25 mm - 1 sheet 1.5*1.5 m - cut sheets 520*1360 (the front wall), 490*1360 (rear), 360*1000 mm (bottom). In the leaves cut shaped cutouts under the arch and Cup suspension, driven by out of place. The rest of use to to cut a landing flange under speaker and left "the rafters" between the flange and the main volume. 250 RUB just note, having a supply of 12 and 15 mm plywood, I was doing side the walls of the compound (15+12=27 mm, Masha castle and not to spoil).
- Board (dry, strugala) 80*30 mm - 5 meters. From she took the wall of the shell between the front and rear walls. In the internal the walls - to saw through the window 50 mm width for circulation air. 100 rubles.
- Adhesive in cartridges - water-resistant liquid nails - 3 cartridge (150 rubles). It is sticking all wooden structures, then we draw the screws on 50-65 mm (30 rubles).
- Fiberglass 0.20 (4m=120 rubles), placenta (3M = 120 rubles), resin (400 rubles) - in my version need about 4 square inches fiberglass wall. Using FRP sheets, wall turns out not thick - I it all took a liter cans bourgeois politiki Cargroom. Expensive, but glued at T=5C ideally, when consistency kissel and penetrates easily, and do not drain.
- Foam - about 1/3 the cylinder 30 rubles.
- Remnants of carpet, about 1 sqm - for pasting the inside of the box - And 100 rubles. glue for this - 50 rubles.
A total of 1300 or less 50B. Without finishing
A weekend project.
Here is the sequence work - using quick polyester resin, really all to be done for finishing for less than two days (one assistants, Negro and companions are welcome but not required).. the Main thing in advance prepare everything you need wasn't incredibly painful from lack a cheap screw.
Day 1
First, cut and fit across the front seat (without cut the wall. She perimeter inside and sewed the ends of the boards 80*30 mm, using liquid nails (profusely) and screws. In the internal partitions (in my case one vertical, one horizontal) pre-cut window. Then, with using the Negro and better of the two, back to the place marked the exact shape of the bottom and rear walls. We cut out.
There, right in the plane the rear wall at the bottom (Niva and bubali) - InterMedia arches - there are two outgrowth - Cup suspension. Right Cup drawer just bypasses, and the left - actually included in the scope the ledge under the speaker. For her the bottom is constructed a house out of bricks and the plywood. Also to the bottom on the front edge mounted oblique bars, which will then sew the front wall.
Then all internal plane, not touching each other and struts, cover with carpet. Perfect moment, almost divorced any solvent. To smear with a spatula. Or PVA, but he longer dry. But you can beat small carnations. But you can not to upholster, a matter of taste.
Temporary calcium, what to eat. Cut installation the ring under the speaker and find the best position is that beautiful, and a lot of space not occupied, and so the magnet on the wall not doodling. The designated place on the form and shape fiberglass transitions from ring to the box and the bottom. Cut in the rear hole on the contour a little fiberglass forms.
If you have the opportunity - do the walls, the bars, etc. forming a transition from the "muzzle" the crate. In my case, the left wall "transition" 2/3 - just triangular scarf of the same the plywood. As defined - finally, collect the crate on glue and the screws, fix the face (flange that is).
Intelligible don't need to explain that in the last row was presents the first stage serves "The podium is Lutinski". Stage 2 - removing glue drips, and protecting inside what is necessary (convenient old jeans in p/e bag) - area the transition becomes covered with foam. Preferably a "wet mix", so the cured foam was dense and crumble. Lights out, let dries…
Day 2
You guessed it however? right, the second day begins with remove excess foam and vyklicky of the shell. At once I warn, Politica dissolves the foam, and that to avoid failure (literally and figurative) - I have to reinstall the surface foam… hot clay. All about all it took liter resin 4 kneading. Before you start the next batch, be sure clean up drips of resin burrs! I just peeled, on the advice Genn and all the Bulgarian.
1. Primary 2 layers of fiberglass on the clay. Not anymore, it starts to slide.
2. The main array glass-to-glass-coal-coal-coal-coal-thrice glass is one Stakhanov jerk. Since may turned out to be cold and solidified resin no sooner than an hour, I put in time, but in the sun most likely it will be necessary to split the operation into two admission. The output should look a minimum of 7 mm wall without bubbles.
3. Basically, outside in 3-4 coats of joint the bottom of the back wall. Because of the bar- there is nothing on this the "area" of fiberglass to hold on to. Pasted over other joints the perimeter (top). Wycliffe on foam disc "fairing" for the right Cup pendants.
4. Turn the object and sizing the remaining joints.
Publication: www.cxem.net