


")

This low-cost, general-purpose electronic hearing aid works off 3V DC (2x1.5V battery). The circuit can be easily assembled on a veroboard. For easy assembling and maintenance, use an 8-pin DIP IC socket for TDA2822M.
Circuit Diagram: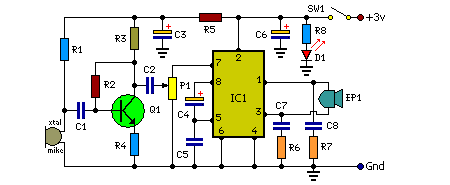 Parts:
- P1 = 10K
- R1 = 2.2K
- R2 = 330K
- R3 = 680R
- R4 = 33R
- R5 = 100R
- R6 = 4.7R
- R7 = 4.7R
- R8 = 220R
- C1 = 0.01uF-10V
- C2 = 100nF-63V
- C3 = 47uF-10V
- C4 = 10uF-10V
- C5 = 0.01uF-10V
- C6 = 100uF-10V
- C7 = 100nF-63V
- C8 = 100nF-63V
- D1 = Red LED
- Q1 = BC547
- IC1 = TDA2822M
- EP1 = Mono Earphone 32R
- SW1 = On-Off Switch
In this circuit, transistor Q1 and associated components form the audio signal preamplifier for the acoustic signals picked up by the condenser microphone and converted into corresponding electrical signals. Resistor R5 and capacitor C3 decouple the power supply of the preamplifier stage. Resistor R1 biases the internal circuit of the low-voltage condenser microphone for proper working. The audio output from the preamplifier stage is fed to the input of the medium-power amplifier circuit via capacitor C2 and volume control P1.
The medium-power amplifier section is wired around popular audio amplifier IC TDA2822M (not TDA2822). This IC, specially designed for portable low-power applications, is readily available in 8-pin mini DIP package. Here the IC is wired in bridge configuration to drive the 32-ohm general-purpose monophonic earphone. Red LED (D1) indicates the power status. Resistor R8 limits the operating current of D1. The audio output of this circuit is 10 to 15mW and the quiescent current drain is below 1 mA.