


")

A sensor in controlling devices is usually clamp meter resistor [1; 2], which often limits their use, for example, because a large voltage drop in the controlled circuit and useless power, dissipated by the current sensor. In [3] these disadvantages are minimized, but by complications of the scheme.
The proposed device adopts a different method of controlling the current in the circuit of the lamps - relay using the electromagnetic relay hysteresis and inherent lamp filament inrush current pulse when triggered. This method allows to reduce the voltage drop in the controlled circuit to a negligibly small values. Unlike the previously described devices, it indicates three States the lamps.
Schematic diagram of the controller of the lamps stop-signal is presented in Fig. 1.
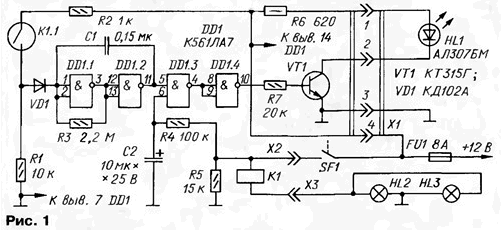
A current sensor is used reed relays K1, winding of which is included in series with the signal lamps HL2, HL3. Logic elements DD1.1, DD1.2 assembled a controllable pulse generator with a period of about 0.5 s. the Element DD1.3 - electronic switch, triggered with a time delay. Transistor VT1 - current amplifier, loaded with led HL1.
When the brake pedal is not pressed and contacts SF1 associated with it, open, works only the pulse generator. The lower scheme input element DD1.3 through resistors R4, R5 is connected to the common wire. Therefore, the pulses through the element don't pass and it's output is high level. Low level output inverter DD1.4 closes the transistor VT1 - led НL1 off.
When pressing on the brake pedal she closes contacts SF1 and current from the electrical system begins to flow through the fuse FU1 car, the coil K1 and lamps HL2, HL3. If both lamps are working properly, then their starting current, though brief, but most rated almost ten times, leads to a reliable relay operation K1.
The Contacts K1.1 reed switch are closed, the voltage from the resistive divider R1R2 through the diode VD1 is supplied to the combined inputs of the element DD1.1 and blocks the operation of the generator, and the output element DD1.2 is fixed to high level. The values of resistors R1, R2 are selected so that at a relatively a small current through the reed switch voltage taken from the voltage divider match single level.
After a short time the current in the circuit of the lamps is reduced to a nominal values, but the switch K1.1 remains closed because the nominal current of the two lamps HL2 and HL3 more current release of relay K1.
After the time Τ=R4-C2 (about a second) since the depression of the brake pedal the voltage on the capacitor C2 is increased to the threshold switching element DD1.3. The output element appears low, and the output of inverter DD1.4 - high level, opening the transistor VT1. The led turns on to indicate that faulty lamps.
After releasing the pedal extinguished the lamp, HL2, HL3, de-energized coil K1 and the reed switch opens, allowing the operation of the generator. His pulses periodically closes the transistor VT1, so the led flashes.
The capacitor C2 discharges through the resistor R4, the relay coil K1 and lamps HL2, HL3, and after a while, when the voltage across it decreases to the threshold switching element DD1.3, the pulses will not flow to the input of the inverter. The transistor will not open, the led will turn off. This mode indication allows you to verify proper operation of the lamps and at the same time in the operation of the generator.
If when you press the brake pedal was faulty lamp (burns out or broken contact in the cartridge), the relay will work first under effect of inrush current second - serviceable lamp. But nominal current one the lamp is not enough to hold the reed switch closed, and it opens. This the process takes several tens of milliseconds and does not display is reflected. A second element DD1.3 will begin to pass pulses from the generator and the led will begin to flash. When you release the brake pedal the process is the same considered above.
In the case where one after another out both of the bulb or an open circuit their power, the switch will not be closed and the led will blink as when one faulty lamp.
It happens that blows a fuse FU1 (or its oxidized contacts). Then the supply voltage is not supplied to the device and when you press the pedal brake indication is completely absent.
As an indicator of course, you can use incandescent lamp but the reliability of the led above.
The controller used resistors C2-OPA, ALT; capacitors - ceramic, Km-5, km-6, and oxide - C50-35. Instead CLA suitable chip CRL. Transistor CTG replace any silicon n-p-n transistor, for example, CTG-CTE.
Reed - CAM-1; its winding contains nine turns of copper winding wire Sew-2 to 0.8. If applied, the reed switch is smaller, the number of turns needed to reduce, by approximately 1.5…2 times.
Socket connector X1 - GNR-1 to 3 and insert - RSN-1-17. When replacing the connector on the another it is necessary to consider conditions - vibration and shock, elevated humidity and temperature. Connectors x2 and XS is designed for high current, used car; it is permissible to replace them with screw terminals.
Led ALM better replaced by a more bright L-53SRC-E Kingbright company.
Structurally, the device is assembled on the circuit Board with wiring wire MGTF section of 0.07 mm2 and placed in suitable insulating box. The block connector X1 is fixed at its front part.
For the manufacture of relays pick up or stick together of thick paper tube with such that the reed switch easily included. Suitable rigid tube and from any other non-magnetic material is metal or plastic. The tube is wound the winding so that the axial length of the winding was slightly less than the length of the cylinder reed relay, and coat with epoxy glue. The findings are pruned to 8…10 mm obluzhivayut for mounting on PCBs.
Wires connecting the relay coil with the electrical system of the vehicle, cross section must be not less than (and preferably slightly greater) than that of the wires to the lamps. The controller should be placed as close as possible to the contacts SF1 and securely to strengthen. The led is mounted on the dashboard.
When creating a controller connected to the vehicle required the sensitivity of the relay pick up movement of the reed relative to the winding. The switch is the optimal position is fixed in the tube drops of glue.
In Fig. 2 is a schematic diagram of such a controller for lamps near and far light.
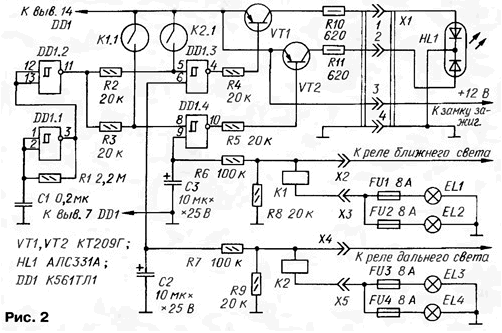
Here on the Schmitt trigger DD1.1 is assembled, the clock pulse generator with a repetition period of about 0.5 s, the trigger DD1.2 - buffer-inverter, triggers DD1.3, DD1.4 - electronic switches with time delay, similar to those used in the previous device, channel and far beam, respectively. Transistors VT1, VT2 are the current amplifier, load - two-color led HL1. The current sensors K1 and K2 are the same reed the relay. The generator runs continuously, regardless of the state of switch K1.1 and K2.1.
Since both channels are identical, we will consider only the channel beam. From the clock pulse generator sequence through inverter DD1.2 enters the upper circuit input trigger DD1.4. Since the lower input of the trigger through the relay coil K1, fuses FU1, FU2 and lights EL1, EL2 beam (and also through resistors R5, R8) is connected to the case, its output is high level. The transistor VT2 and HL1 led is off.
With proper lights EL1, EL2 inclusion beam leads to the appearance of voltage at connector x2, whereby they are enabled. From their starting current relay K1, and via the switch K1.1 voltage is supplied to the upper entrance Schmitt trigger DD1.4, however, the trigger does not change its state. After establishing a nominal current through the lamp reed switch remains closed.
After about a second the voltage on the capacitor C3 increases, reaches a high level at the input of the trigger, it switches to the zero state. The transistor VT2 is opened and includes a green led Assembly HL1.
When you turn off beam disappears, the voltage at connector x2, lamp turn off the switch opens the reed switch K1.1. The pulses from the generator periodically switch trigger DD1.4, which leads to the flashing green light. After some time, the capacitor C3 is discharged and the Schmitt trigger DD1.3 again will block the passage of pulses from the generator to the base of transistor VT2.
When blown at least one lamp (or fuse) the inclusion of the middle light will result in a second blinks green signal, indicating the driver on the fault. Accurately indicate the cause of the lack of the illumination of this lamp controller.
Second channel - beam - works similarly, except that the indicator is the red led Assembly HL1.
Instead CTG in your device, you can use any transistor from CT. Led ALSO advisable to replace its analogue with enhanced brightness, for example, L-59EGC company Kingbright. With chip CRT, allowing more the power supply voltage, the controller will work better.
In the relays K1 and K2 used the same reed switches CAM-1. The relay coil K1 contains 6 turns, and K2 has 2 spiral wound wire sew-2 diameter not less than 1.5 mm.
Circuit Board device is placed in an insulating box of appropriate size, fixed close relay for high and low beam of the vehicle. Relays K1 and K2 connect the electrical system of the four flexible insulated wires with cross section not less than 2 mm2.
Operation of the described controllers on the car VAZ-2106 for several years have demonstrated their reliability and ease of use.
Literature
Author: V. Khromov