


")

We offer our readers the call is galvanically isolated from the mains, and the call button is brought safe voltage. It can be used for example, on the garden and suburban areas, as well as in other cases, when the wire is, connecting the button and call, available for touch. At a voltage of 220 V, a typical control circuit of conventional call, it can be dangerous for others.
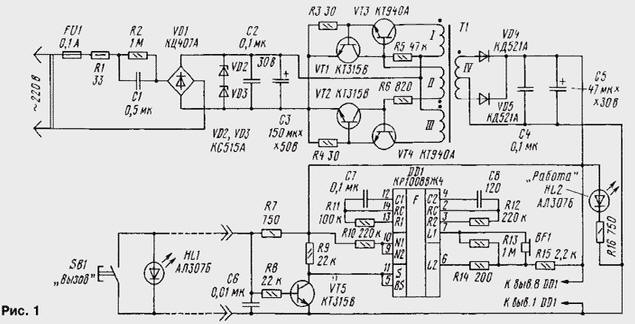
Schematic diagram of the call the calling device shown in Fig. 1. It consists of a tone generator, which is made on a specialized chip CRUZ, and power supply. The generator is assembled according to the scheme, not different from model [1]. His work manages transistor VT5. When open contacts call button SB1 transistor VT5 is open by the base current, flowing through the resistors R7, R8 and the collector signal is present low level. When contacts call button the transistor VT5 is closed and conclusions 5 and 11 DD1 chip receives the signal of high level. The generator runs, and the output of the chip (pin. 7, 6) appears tone signal. He enters the piezoceramic emitter BF1, which publishes the melodic sound.
When you press the SB1 is extinguished mounted in its housing led HL1.
The main unit of the power supply unit is a voltage Converter [2], collected transistors VT1 - VT4 and the transformer T1.
Along with such advantages as simplicity and reliability, magnetotransistors generators with saturating transformer and have a significant drawback. Case that the transition of the transistor of one arm of the generator from the open state in closed accompanied by the uncontrollable growth of its collector current. The presence of such powerful impulses of current forces to apply the transistors allowable collector current several times higher than the rated operating current, which, in turn, leads to poor use of transistors in the current and the decrease in the efficiency of the entire device. Short pulses of collector current are, in addition, the source of the interference. To eliminate this drawback of Converter installed current limiting transistors VT1, VT2 with sensors current R3, R4. Resistor R6 limits the base current of the switching transistors, and R5 creates the bias current required for reliable start up of the Converter.
Fed by the drive voltage from the rectifier, which includes the quenching capacitor C1, limiting the charging current of the resistor R1, pavement rectifier VD1, Zener diodes VD2, VD3 with a total voltage stabilization In 30 and capacitors C2, C3, smoothing the rectified voltage ripple [3].
The voltage from the secondary winding of the Converter transformer T1 is supplied to full-wave rectifier diode VD4, VD5, filtered by capacitors C4, C5 and is used to power the chip DD1. Connected to the output of the rectifier led HL2 signals the device is turned on.
All elements of the call, except for the buttons SB1 and LEDs HL1 posted on PCB from one-sided foil fiberglass with a thickness of 1.5 mm. Its drawing is shown in Fig. 2. Card installed in a plastic housing, which is posted in the room. When installing used resistors MLT ( S2-23 and the like), C1 is composed of the five capacitors K73-17 0.1 MK x 400 V, applied also K52-1B (C3), K53-4, or K52-1(C5), the other - CM-6. Instead diodes KDA (VD4, VD5) you can use any of the series KD521, KD522. Transistors VT1, VT2, VT5 - any low-structure n-p-n voltage IKE not lower than 20 V. Instead of transistors CTA (VT3, VT4), CT, CTA. LEDs HL1, HL2 - AL307 with any letter index. Piezoceramic emitter RFP-3 replace on ZP-5, ZP-22. To the button SB1 special requirements, it can be of any type (km-1, etc.).
The transformer T1 is made on the yoke CHH ferrite MNM-1. Winding I, III contain 60 turns of wire sew-2 0,23, winding II - 4, the winding IV - 2x25 turns of the same wire. Winding I, III and IV are folded double wires. Between the primary windings and the winding IV is necessary to lay two layers of varnished cloth. Magnetic CHH can be replaced Khj,5, winding data remain unchanged.
Starting to build the device, first check for proper installation. Then the Converter serves the 24 V voltage from any power source. The inverter shall immediately earn, what convinced the glow LEDs HL1, HL2. If this does not happen, check the correctness of the connect the windings of the transformer T1. Next, instead of putting the button SB1 jumper, selection of items C8 and R12 is necessary to bring the frequency of the tone parcels to the self-resonance frequency of the piezo oscillator that will provide the greatest volume of its sound. Thereafter, by turning off the power source and removing the jumper, you should make all the right connections and connect the call to AC.
Literature
Author: I. Yushchenko, Sverdlovsk of Lugansk region, Ukraine