


")

The proposed device, in addition to measuring frequency and period of signals capable to count the number of input pulses, to generate rectangular pulses, and to perform a clock function with calendar and pathiparampil alarm clock.
Device, scheme of which is shown in Fig. 1, provides a measure of the frequency periodic signals with TTL levels up to 110 MHz, to produce the score input pulses, to measure the period of the input signal to produce a rectangular signal shape with a duty cycle of 2 and a frequency of 1 Hz to 3 MHz, display the current time, day of the week, date, month, year, and also work as an alarm clock. Current, consumed by the device from the power source voltage of 5 V ±10 %, less than 30 mA (when the indicator light).
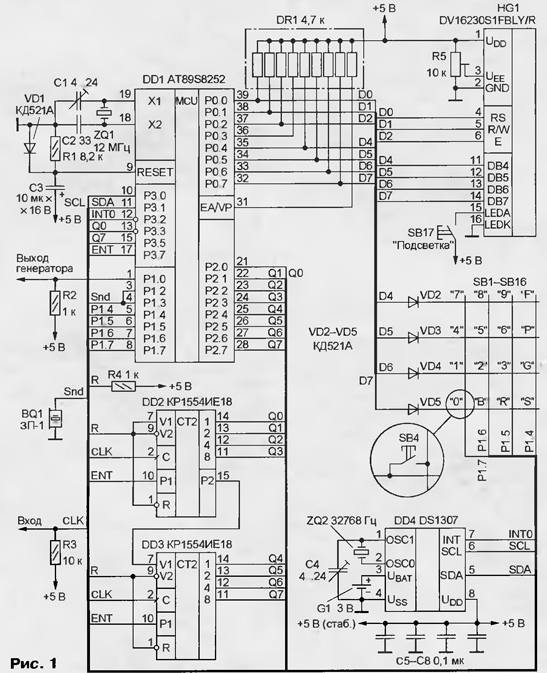
The basis of the device - microcontroller (MCU) ATMEL AT89S8252. It consists of ROM of 8 Kbytes electrically erasable EPROM has a capacity of 2 Kbytes, RAM 256 bytes, four port I/o, timer/counter (T/-T/S2), watchdog timer, clock generator, and the other nodes.
When using T/C as a counter of external pulses the counting frequency is not can be more than 1/24 of the clock generator frequency. To increase the frequency of account you can, for example, by incorporating the input of high-speed divider, however it requires the introduction of switching nodes. In the apparatus described for increasing the frequency of account input use high-speed counters series KR1554, thanks the counting frequency is increased to 256 times and theoretically can reach 128 MHz (with quartz resonator for a frequency of 12 MHz). When using chips CREE (DD2, DD3), the maximum frequency is 110 MHz.
After power-on input 9 MK DD1 is formed by a reset signal, the duration which is determined by the circuit parameters R1C3. Diode VD1 is used to quickly discharge of the capacitor C3 after a power outage.
At the beginning of program execution, you can set display HG1. In this case is cleaning up its buffer, prohibited the display of the cursor and blink. For reduce the number of lines of input/output required for recording information in the display, the tire size is set equal to 4 bits.
Then you set the modes of operation T/C, permitted the necessary interrupts and recover mode and the oscillator frequency, which were before prior to shutting down the device. In all modes T/WITH works as timer. It is programmed in such a way that it overflows and an interrupt from it occurs 50 times per second. In the process interrupt processing occurs a survey of the keyboard and produced exemplary signals for operation of the device in the counter operation.
Reset counters DD2, DD3 is carried out synchronously on the falling edge of the input signal With when the level of the log. 0 input R. This fact dictates contradictory requirements for the duration of the reset signal. On the one hand, to increase count rate she must be rather small, on the other - in such the duration may not be reset when a low frequency input signal. For resolve the contradiction in this unit from the reset signal, it was decided to give up entirely. After each measurement the state of the counter and remembered subsequent measurement is subtracted from the result.
Modes of operation the T/C1 depend on the mode of operation of the device and are described below.
Alarm clock made on the chip DD4. It contains all nodes that are required for counting hours, minutes, seconds, weekday, date, month and year. It has also RAM 56 bytes available for writing and reading. When connected the element G1 (e.g. CR2032) IC can operate up to 10 years, keeping in the memory of all recorded data. The required accuracy of the clock set trimmer capacitor C4, the contrast of displayed information a trimming resistor R5. Button SB 17 is used to turn the led the display illumination in the dark.
In the frequency measurement mode transfer the device by pressing the "F" dimension period - the button "P", generator click on the button "G". These same buttons when pressing the button "S" include modes respectively to count input pulses, hours and alarm. Acoustic signal emitter BQ 1 by button and when the alarm goes off. Alarm issued when pressing, is carried out by removing the pin 4 of the chip DD1, and of the alarm when the alarm sounds, o 3.
Consider the operation of the device in different modes in more detail.
In the frequency measurement mode the device switches at power-up, as well as, as noted, after clicking the button SB13 ("F"). In this mode, the T/C1 programmed to work as a counter input pulses. After 1 with the result of the account is displayed on the top line of the display (Fig. 2,a). At the same time calculated the period of the signal and displays the result on the bottom line.
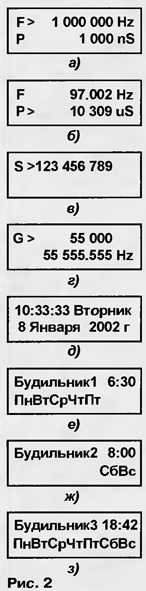
Sometimes, for example, when you configure the oscillator continuously tunable on specific frequency it is convenient to measure more than once per second, and often. In this device has a mode, when the measurement is carried out 10 times more often (every 0.1 s). The measurement result is displayed on the display five times per second. The resolution in this case is reduced to 10 Hz. The transition to this mode by pressing the button SB12 ("R"). This is the last digit the measured values of the frequency displays a "*". To return to normal mode measure the frequency press the SB8 ("In").
The response time to an interrupt depends on the command being executed and can reach several microseconds. To resolve arising for this reason, error MK after executing the current action is translated in a mode with reduced power consumption. In this mode, the CPU stops, but all peripherals continue to operate. When an interrupt performs all necessary actions and MC again translates into a reduced of energy consumption. The response time to an interrupt in this case is always the same easily taken into account when shaping time intervals.
In the measurement mode period of the timer/counter T/C1 is programmed to account the pulses coming from the internal divider. The frequency is equal to V12 the frequency of the generator, i.e. 1 MHz. The permission of the account is performed from the input INT1 (vyv. 13) DD1: in the log. 1 on this input, the counting of pulses allowed in the log. 0 - prohibited. At the time of the level difference from 1 to 0, an interrupt is generated, the process which is the result of the account is displayed on the lower line of the display (Fig. 2,b). Simultaneously calculates the frequency of the signal (to three decimal places shares) and the result is displayed on the upper line of the display. To be coupled to the input of the device the signal frequency of over 10 kHz is not recommended, as interrupt processing, with input INT1 will occupy almost all the time on the processing result, and poll keyboard won't have time.
In the counting mode of the input pulses T/C1 is also programmed to work in as a counter of external pulses. Conclusion the result of the account (Fig. 2) on the screen display is performed 50 times per second. Press SB8 ("In") when the need to stop the counting of pulses (in this case, the symbol ">" off). By pressing the button SB8 account resume. To reset the counter use the button SB12 ("R"). It is necessary to consider that the reaction to pressing any key occurs within 100 MS (the time required to suppress of contact bounce).
The frequency of the generated pulses are administered using the numeric buttons "0"to"9". Press the SB8 ("") deletes the rightmost digits. In the top line of the indicator (Fig. 2,g) displays the dialed frequency, in the lower the actual oscillator frequency, which is determined by the formula 3000000/t (T varies from 1 to 65535). Thus, by typing, for example, 55000, really get 55555.555 (3000000/54). When you click SB12 (R) is a change the frequency of the generator.
At a frequency of 46 Hz to 3 MHz T/C2 operates in generator mode. His exit is connected to pin 1 DD1. Interrupt on overflow T/C2 is prohibited. More low frequencies (from 1 to 45 Hz) M/S2 is used as a timer, wherein interrupt enabled. Their frequency depends on the oscillator frequency and is within 16…90 Hz. In the range 8…45 Hz is inverting the signal at pin P1.0 whenever T/C2 overflows (frequency output signal two times lower than the frequency of interrupts). At frequencies 1…7 Hz inverting signal occurs 2, 3, 5 or 8 times depending on the frequency. The interruption from T/S2 is a low-priority, because otherwise it will increase the error in the instrument is in the counter mode. In this regard, the period of the output signal maybe slightly (in units of microseconds) to differ from the calculated values.
The signal generator output is present regardless of the mode of operation of the device. When you set frequency 0 Hz the generator is switched off.
Current time set buttons "1" (clock), "2" (minutes), "3" (zero seconds) "4" (day of week), the "5" (number) "6" (month) and "7" (year) is pressed button "B" (if the readings need to increase) or "R" (if they must reduce). Display is in clock mode shown in Fig. 2,D.
Alarms described in the unit five. For each one you can set the hour, minute and day of the week. Switch the alarms by pressing the button "0". Time positives administered as described above to set the clock. Day of the week set buttons"3"-"9" ("3" - Monday, "4" - Tuesday, … "9" - Sunday). Pressing the button symbol on the corresponding day the display disappears. Examples of setting alarms is shown in Fig. 2 e-z. In the first case, the alarm 1 will be served on weekdays at 6: 30 PM in the second (alarm 2) - weekends at 8 h 00 min, in the third (alarm 3) - daily at 18 h 42 min note that the alarm will trigger only if the device is in clock mode. To turn off the beep sound you can by pressing any key (except, of course, SB17).
Table with the codes of the firmware ROM MK in hex format
A few words about the details. Chip CREE interchangeable with their counterparts from the series K555, KR1533, and with a corresponding change in scheme and other series meters K555, KR1533, C, KR1554. Depending on the applied meters maximum the counting frequency will be in the range of 20… 128 MHz. Instead of the specified at the scheme is permissible to use the indicator DV16252. The purpose of the same conclusions, how DV16230S1FBLY/R, you only need to swap the power pins 1 and 2.
To calibrate the device in several ways.
1. Changing the device in the frequency measurement mode, apply the input signal is known frequency and trimmer capacitor C1 to set the indicator this value. The higher the frequency of the input signal, the more accurate the device will be configured.
2. Connected in parallel to the input of the device model frequency counter and going to the mode measure the frequency, to apply to the input signal. By changing the capacitance of the capacitor C1, to ensure that the readings matched. As in the first case, the higher the input frequency, the more accurately you can configure the instrument.
3. Changing the device to the measurement mode period, apply to the input signal is known frequency and capacitor C1 set the desired value. The longer the period the input signal, the more precise adjustment of the device. When calibrating in this way it is convenient to use a signal frequency of 1 Hz with an electronic clock.
4. By setting the generator output frequency 3 MHz signal to the input the reference frequency. By changing the capacitance of the capacitor C1, to set the frequency of 3 MHz.
Author: A. Pikaev, Orel