


")

Millions of our compatriots use in household refrigerators, manufactured in the Soviet era. Economical, durable, sensitive to fluctuations of the supply voltage, these devices are faithfully carry their watch in the kitchen for several decades, sometimes serving multiple generations of a family clan. Indeed, there is something to be proud of: a power consumption of 120 W at the fridge "Codri", and the maximum at the fridge "Pamir-5", which is equal to 195 watts, everywhere in the evaporator is consistently maintained at a temperature of -12°C.
Total useful volume is in the range 160…300 dm3, the amount of low-temperature separation ranges from 1 to 6…45 dm3. All seems well, however, one parameter overshadows the operation of this device, as you have regularly 1 time in 2 months to thaw the freezer for a few hours, what upsets as modern refrigerators this procedure does not require. However, this dignity is given to the user at a high price: the power consumption 220 V on average is in the range 1200…2000 W, and the cost of the device is several times more expensive than domestic, for the user doubly expensive.
Below is a description of a simple electronic device for refrigerator "Dnepr", which will in domestic refrigerators to get rid of the procedure of defrosting the freezer while maintaining its other technical advantages, i.e. relieve the user of situations where, in General, the refrigerator 10 months, and 2 months worth in defrosting mode.
The operation of the circuit
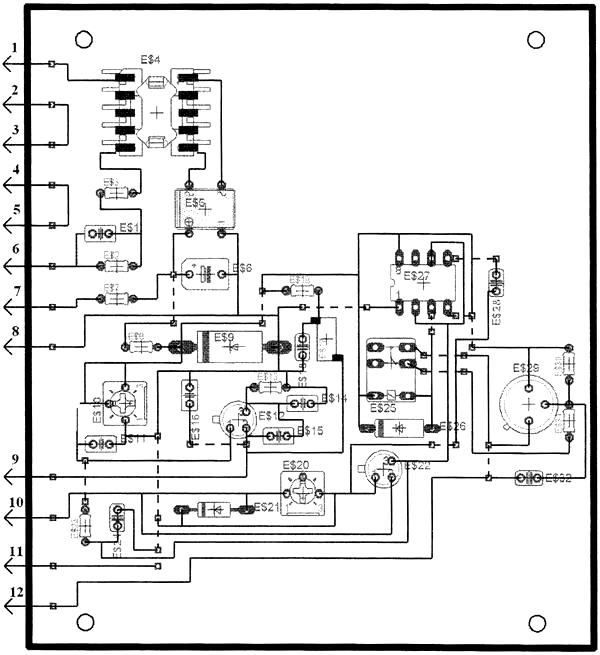
In Fig. 1 shows a schematic electrical diagram, in Fig. 2 - printed circuit Board.

Fig. 1
The mains voltage of 220 V is supplied to the control circuit with the outlet located in the refrigerator. With the closure of the switch S1, the voltage falls to the primary winding of the transformer T1, the secondary - bridge rectifier VD1, where it is rectified, smoothed by capacitor C2 and a stable 12 V Zener diode VD3. Further, this voltage is applied to the voltage generator, assembled on the transistor VT1 with strapping. Through the frost sensor S8, which is installed in the freezing chamber, voltage is applied to the amplifier transistor VT2 with strapping.
The idea is that depending on the frost layer in the freezer to send to the amplifier a voltage level that can lead to rollover timer circuits DD1 and tripping relay K1, through his contacts K1.1 powerful key will open the transistor VT3, and he, in turn, will include fan motor Ml and apply mains voltage to the resistors Rl2-R14, performing the function of the heaters. When cold the refrigerator is included in the work, on the walls of the freezer is getting ice in the form of frost, which eventually turns into a thick layer of snow, popularly nicknamed "the coat". The objective of this scheme is to control the level of a certain thickness of the initial layer of frost on the walls of the freezer, and in case of its excess inclusion heater, warm air which throughout the freezer is distributed by microventilation.
Excess frost dissolves, and a controlled layer of frost remains at the same level. Since in this case the cover is established, and do not need defrosting. Important points are: proper installation of the capacitive sensor of frost C8, and current selection of heaters given the fact that the size of the freezer at a variety of different refrigerators, and hence required different heating intensity. Freezers are made from duralumin, which has good heat conductivity, so initially it is necessary to properly install the fan using a plastic funnel blows hot air on the metal freezer.
Under the influence of hot air excess frost dissolves, then the motor turns off and the system goes into "standby mode" in anticipation of the growth of the frost layer. It should be noted that to maintain the frost layer at the desired thickness is sufficient, the temperature of the airflow within +10…+20°C, as the temperature inside the freezer is at a level of -12°C, therefore the cost of power to the control system is negligible. To protect the circuit from overvoltage are used diodes VD4 and VD5. Included the schema status led indicates green glow VD2.
Design
In creating these designs, you should decide the usability of this design with the main product. In this case, the whole scheme is in a plastic box along with a blower motor that is running tapering plastic funnel to the heated air supplied to the evaporator housing.
In the neck of the funnel are the heating elements (resistors), the magnitude of the power of which depends on the square of the specific evaporator of the refrigerator; in addition, the socket must be able to shift in a horizontal plane that regulates the flow of heated air in place of the evaporator heating point or at an angle. This measure changes the time of heating the entire area of the evaporator and, as a consequence, the overall effect of adjusting the thickness of frost on the evaporator.
It must be emphasized that proper installation of the socket of the heater (the distance of the neck of the funnel from the surface of the evaporator, and the right angle of attack relative to the plane of the evaporator) are crucial, as incorrect installation may cause excessive overheating of the evaporator phase of the frost goes into phase with dew, the evaporator is fully thawed, and the compressor of the refrigerator will be uninterrupted, trying to dial in the desired evaporator temperature, which is unacceptable. Therefore, without exaggeration, the setting of this system can be called jewelry. In refrigerators the old design, the inner casing is made of galvanized iron, so it is convenient to fix the device to the body of the refrigerator with the help of powerful magnets. In this case precluded the drilling of the refrigerator body and other unwanted locksmith manipulation inside of the refrigerator body, which can lead to leakage of cooled air from the refrigerator.
For this reason, connecting the minus supply circuit to the evaporator of the freezer is made with a clamp type "crocodile". The size, shape, location in the freezer every fridge has its own characteristics, so the location of the icer, the user determines individually. It is most convenient to place it outside of the freezer under the evaporator. As the sensor S8 is convenient to take the contact pair of relay type RES-48 or similar, clean the mounting area on the freezer dirt from alcohol, glue the insulator relay contact to the housing of the evaporator glue "Apartement" or "Moment". The second contact sensor S8 will serve as the evaporator housing. Height of contact over the evaporator is determined experimentally, it is approximately equal to 1.0 to 1.5 mm. in Other words, this height is allowed a layer of frost on the freezer.
As further growth of the frost layer, a tracking system will include a heater with a fan and dissolve this increase, keeping it unchanged layer thickness. As heaters are convenient to use resistors type ALT-1, ALT-2, and for large capacity resistors C5-35. It is important to remember that for them, the load factor of power equal to 0.5, i.e. it is allowed to load these resistors on half of their nameplate capacity. The circuit can be carried out using a circuit Board or mounted Assembly using wire mgshv-0.2 mm. For safety reasons, the sensor S8 should close the protective cover.
Setting
To configure the following equipment is necessary: Latr, adjustable power supply, oscilloscope, vacuum tube voltmeter, multimeter, resistors for matching. With Latri apply for the scheme voltage 220 V, across the capacitor C2 multimeter to check the DC voltage, it should be about 15 In; light diode signal VD2. The Zener diode VD3 vacuum tube voltmeter shows 12 V. Then connect an oscilloscope in parallel with the inductor L1 and the potentiometer R5 to put in the middle position; at the same time on the oscilloscope screen must be harmonic oscillations with a frequency of about 10 MHz. This is quite a high frequency selected from those considerations that the layer of frost, which plays here the role of the capacitive sensor has a small capacity, and therefore to increase the sensitivity of the scheme is required to raise the oscillator frequency. Adjust R5 to align the shape of the curve generator.
The next step is to verify the operation of capacitive sensor S8. This requires the slider of potentiometer R8 to set up the scheme to the base of VT2. Connect the oscilloscope, vacuum tube voltmeter in parallel with the inductor L1, and the space between the relay contact and the housing of the evaporator to fill a fraction of the snow that should be scraped off with another freezer working refrigerator, it will be the equivalent capacitive sensor S8 with frost, which should conduct a draft schema customization. On the oscilloscope screen must be visible sine wave, and vacuum tube voltmeter (with contact gap gauge 1.5 mm) will show a voltage of about 100 mV (depends on the layer of snow). With a match to loosen the snow under the contact and check the voltmeter - they have to change. This is an important point, because in a real circuit the growth of frost will go smoothly, and the scheme must be responsive.
Thus the voltage level of the relay K1 has to work; turn on the motor Ml, and begin heating resistors R12-R14. The motor can still be disabled, and a multimeter you need to check the load current through resistors R12-R14. Under optimum conditions, the load resistors within a half hour, warmed to about +40°C. To check the effect of the temperature on the freezer should be secured a narrow fan nozzle at a distance of 10 mm from the freezer.
In the camera itself to scrape from another working refrigerator snow and cover them check the bottom of the freezer. Now to include heating and a fan, note the time on the clock. A light layer of snow at the bottom of the freezer should dissolve in about 30 min. otherwise you should adjust the heating of the heaters, to increase or decrease the value of their resistances, or by changing the angle of attack of the fan nozzle relative to the body of the freezer. After a rough setup, you can proceed to finishing. For this purpose it is necessary to completely assemble the entire scheme and to enable experienced the fridge in the network, wait to receive the frost on the freezer desired thickness. When, in your opinion, its thickness is sufficient to check, you can just press the contact sensor to the bottom of the chamber; this should turn on the fan heated, and a layer of frost should gradually dissolve within a half hour, and the blower motor and heater will turn off. If necessary re-set up the scheme by the above procedure. It should also be borne in mind that the sensitivity of the whole scheme is regulated by the resistor R8.
Details
Capacitors: C1 - K73-1 1 capacity of 0.82 mcfh; C2 - C50-35 capacity 1000 mcfh In; other - type km: NW - 0.01 UF, C4 - 22 pF; C5 - 82 pF; C6 - 4.7 pF; C7 - 8,2 pF; C9 100 pF; XIU - 0.1 μf;C11-pF.
Resistors: permanent type ALT-0,25; R1 1 Mω; R2, R4, R7 - 510 Ohms; R3 is 1 kω; R10 - 10 ohms; R9 is 5.6 ohms; R11 * - 22 ohms; R12*-R14* - 720 Ohms; R5, R8 - VR 10 kOhms.
Semiconductors: VD1 - 3N259; VD3 - SA; VD4, VD5 - KDA; VT1 - 2N1893; VT2 - 2N6763; VT3-US; VD2 - AL366K; DD1 - NE555.
The transformer T1 type RM4LS; the inductor L1 type SM-L15B; relay K1 type FSMR-12; the switch S1 type VT; fuse F1 type VP-1 at 0.2 A; motor Ml - computer "cooler" Intel voltage of 12 V, current consumption of 0.44 A.
Numbers corresponding contacts of the printed circuit Board shown in Fig. 2, and plug external items are shown in the table:
The pin numbers on the Board The name of the chain 1-2 The Network 220 3-4 The Switch S1 5-6 Fuse F1 7-8 Led VD2 9-10 The Sensor S8 11-12 Motor M12, R12-R14According to the magazine, glad I oamator
Publication: www.cxem.net