


")

This device, unfortunately, not possible to determine the approximate size and depth of the detected object, and the metal from which it is made.
Schematic diagram
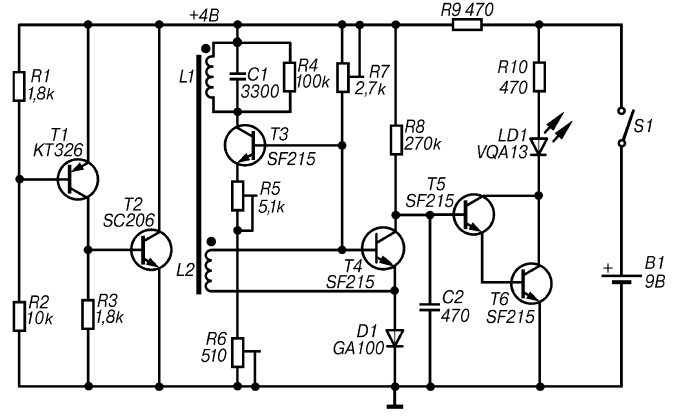
Fig. 2.9. Schematic diagram of the detector with led indication
The basis of the scheme of the proposed detector consists of a RF generator, RF detector oscillation, a DC amplifier with an indicator led and a stabilizer of the supply voltage. A high-frequency generator is performed on the transistor T3, the collector circuit of which includes a tuned circuit consisting of coil L1 and capacitor C1 is shunted by the resistor R4. The working frequency of the RF generator is about 100 kHz and is determined by the inductance of the coil L1, which at the same time is the search coil, and the capacitance of the capacitor C1.
In the absence in the area of the coil L1 of metal objects a radio frequency signal, induced in the coupling coil L2 is detected by a special detector, which is used as the emitter junction of transistor T4. In this case the transistor T4 is opened. As a result, the transistors T5 and T6, which are assembled on the DC amplifier will be closed and the led LD1 is off.
After near the search coil L1 will be a metal object, it the inductance will change. This will lead to the disruption of oscillation of an RF generator that will immediately registered by the transistor T4, which will be closed. The transistors T5 and T6 opens, and the led LD1 will light.
We offer our readers the design represents one of the variants of detectors type FM (Frequency Meter), then there is a device in based on the principle analysis of the frequency deviation of the reference oscillator under the influence of metallic objects caught in the area of the search coil. The decision about the presence of a metal object is taken to disrupt fluctuations RF generator register receiver and special fixed visually. The main distinctive features of this device can be considered interesting schematic of the analyzer, and the use of led as an indicator (Fig. 2.9).
Food metal detector with led indication provided from a source B1 voltage of 9 V. the supply voltage is stabilized special circuit, transistors T1 and T2, which is a parallel voltage regulator.
Details and design
As in the previous construction, for the manufacture of consider the metal detector you can use any development Board. So used to detail without facing any limitations associated with the overall dimensions. Installation can be mounted and printed.
Coils L1 and L2 are wound with a coil to a coil on a round ferrite core from magnetic antenna transistor radio. In this case, the coil L1 contains 120 turns, and the coil L2 - 45 turns of wire sew-2 with a diameter of 0.3 mm. is Necessary note that the sensitivity of the detector depends on the length of the applicable the ferrite rod. The longer the ferrite core, the higher the sensitivity device.
Instead of transistors type SF215 indicated in the diagram (Fig. 2.9), in this design you can use almost any domestic silicon low power transistors with a gain of at least 100. Instead of the diode type GA100 it is recommended to use any germanium diode series or D2 D9, and led type VQA13 no problem to replace, for example, led AL.
Diagram of the proposed detector can be considerably simplified if, instead of parallel voltage regulator, made in the elements T1, T2 and R1-R3, set the Zener CS or any integral stabilizer the voltage of 4 V.
As the power source B1 can be used, for example, the battery "Krona" or two batteries 3336L connected in series.
Board with the controls it contains and the power source are placed in any a suitable plastic or wooden case. On the housing cover are the led LD1 and power switch S1. These elements are connected to the dress flexible stranded wire. The housing can be positioned at the end of any convenient handles.
To the bottom of the housing with the inner side of the ferrite rod is attached with a mounted search coil L1 and the coil L2. In this case the wires from the coils to the PCB should be as short as possible. Ferrite rod with coils can be placed in a pouch made of the insulating material. In this case the author many years ago used plastic holder for the toothbrush, which was glued with the outside to the bottom of the housing of the detector.
Establishing
The main condition for ensuring quality setting for this device is the lack of large metal objects at a distance of not less than one meter from the search coil L1.The establishment of the detector should begin with the installation of this mode of operation RF generator, in which the excited oscillations would be on the verge of collapse. For this first tuning resistors R5 and R7 should be sought to the excitation oscillations of the RF at which the led will begin to glow. Previously the engine tuning resistor R6 should set in the middle position. Then, slowly rotate the engine resistor R6, we need to ensure that the led went out.
If now to the ferrite rod to bring a metal object, the led to break out again. The adjustment should be repeated several times, trying to find such provisions are engines of trimming resistors R5 and R7, which is achieved the maximum sensitivity of the device.
The order of work
The order of operation before the device is simple and does not require additional explanation. When approaching the search coil L1 to metal the subject of the led should begin to glow.
In accordance with the data given in the source, the detector must have the following sensitivity: large metallic objects, for example Central heating radiators, can be detected at a distance of 200 mm, small metal objects (scissors) - at a distance of 50 mm, and the copper power the cable at a distance of 40 mm. in Addition to a small screwdriver, the device must to begin to respond from a distance of 30 mm, a small nail driven into the wall, - from a distance of 20 mm, and copper telephone wire from a distance of 10 mm.
It should be noted that the parameters of the sample, made on the the scheme, were less than those given by about 25-30 %.
Author: M. V. Adamenko