


")

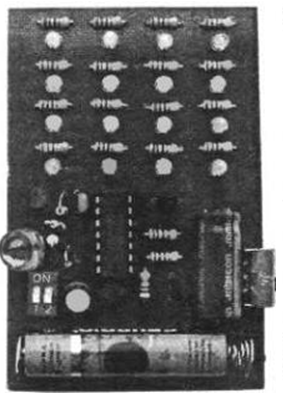
Describe the flashlight has high brightness, which provide 16 LEDs assembled in a matrix. Directional characteristic radiation of the LEDs creates a powerful light output at a distance of not less than 3 m without the use of reflectors and lights up significant space.
Turn on the flashlight by a microswitch. Modes installed additional switch, allow the use of this flashlight for various needs. For example, use it directly as a flashlight, a lamp or a powerful beacon.
In lighthouse mode Ultrabright flashlight gives flashes of light, visible at a considerable distance. The flashlight can be switched to standby mode when it will automatically turn on at dusk or in the dark.
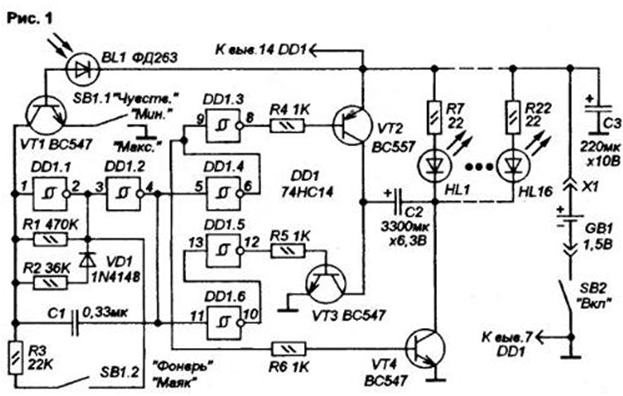
The flashlight circuit is shown in Fig.1.
Using the section of the switch SB 1.1 set the sensitivity of the flashlight to the surrounding light level. So, in position, when the contacts SB1.1 closed, sensitivity to light level maximum, and a flashlight will turn on only in complete darkness. This mode of operation can be combined with a continuous glow and pulse, set by the position of the contacts in section SB1.2 In position when the contacts SB1.1 are open, and the light level is minimal, the flashlight can be switched on even in the shade or in cloudy weather.
Both units allow you to use the flashlight as a lamp with automatic switching, for example, in the tent.
The second section of the switch SB1.2 sets of light pulses emitted by lantern ("lighthouse" or "flashlight"). In the "lighthouse" LEDs emit short bright a light flashes.
This mode can be used for searching, marking, or of attracting attention. In the "lamp" LEDs emit bright smooth white light, as in conventional flashlight.
The flashlight is powered by one element AAA 1.5 V, which is very convenient while trekking when every gram of weight counts.
Scheme (Fig.1) consists of a generator of short pulses on the elements DD1 chip.1, DD1.2, buffer elements DD1.3…DD1.6, the electronic switch transistors VT2 VT4…and the spark gap across the capacitor C2. LEDs HL1…HL16 located on the printed the Board, in matrix form, erupt periodically with a high frequency. The flashlight is a switch SB2.
Immediately after the power starts to run the generator on the elements DD1.1 and DD1.2. The introduction of chain R2-VD1 in the structure of the generator is reached getting on his output of short positive pulses with a longer pause. It is necessary for normal charging and discharge of the capacitor C2.
For example, after power on the output of the generator appeared wide the negative pulse. After passing through the elements DD1.3, DD1.4 and twice inverterbrates, this pulse opens the VT2 transistor and connects the positive electrode the capacitor C2 to the "+" power.
This same pulse after a single inverting element DD1.4 opens the transistor VT4, connecting the negative electrode the capacitor C2 to GND. The capacitor C2 is quickly charged.
After the change the negative pulse at the generator output short positive transistors VT2, VT4 are closed and held in closed condition at the time of the positive pulse. This positive momentum duration of about 10 MS with output 4 DD1.2 flows through the elements DD1.5, DD1.6 to the base of transistor VT3 and opens it. As a result the charged capacitor C2 is connected in series with the power source to the load of the LEDs HL1…HL16.
For a short time to the pins of the LEDs connected twice the supply voltage, i.e., about 3 V. the LEDs and current limiting resistors R7 R22…the current flows, and the LEDs are flashing, illuminating the space in front of a. The output generator appears again negative pulse, which closes the transistor VT3, and the charging process of the capacitor C2 repeats.
This ensures that the periodic ignition of the LEDs. Energy flash LEDs determines the capacitance of the capacitor C2 In this circuit the capacitor accumulates charge, enough for a very bright glow LEDs.
Photocell BL1 and transistor VT1 control on-off of the generator on the chip DD1, and hence the inclusion LEDs HL1…HL16. Section of the switch SB 1.1 allows you to set sensitivity to lighting conditions. When SB1.1 is in the closed position (maximum sensitivity), the emitter of the transistor VT1 is connected to the common the wire, and the transistor becomes an amplifier. If dark, the photodiode is closed, and also, the transistor VT1 is closed. The generator automatically turns on, ie the light comes on.
When BL1 lit at the anode of the photodiode appears positive potential, which opens the transistor VT1. Via VT1 at the output 1 of the element DD1.1 arrives a logic low and disables the generator. In the locked state, the oscillator is until, until the photodiode receives at least a small stream of light, and a generator for DD1.1, DD1.2 turn on only in complete darkness.
If SB1.1 - in the " off " position, the photodiode BL1 are connected through the transition base-collector of transistor VT1 to the input of the generator on DD1.1, DD1.2. Additional signal amplification transistor is missing. This leads to lock generator weak current of the photodiode BL1 only at a high level light. In other words, even a slight dimming of the photodiode leads to the inclusion of the generator on the chip DD1 and the ignition led flashlight.
The second section of the switch SB1.2 - sets the mode of operation of the generator. The closure of this section leads to the connection resistor R3 in parallel with R1, which causes a decrease in the frequency of the generator and flashes LEDs.
The device is assembled on the PCB of unilateral fiberglass size 55x85 mm. the Drawing Board is presented in Fig.2, and the location radio components are in Fig.3. Contacts for connection batteries taken from an old remote control TV.
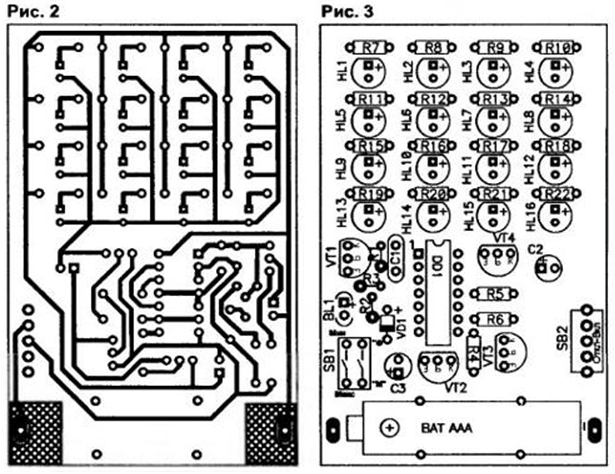
Disassembling them is easy, just carefully disassemble the console and remove the contacts that are in the slots of the battery compartment. Contacts on the PCB so that they are securely touched the ends of the batteries, and sealed neutral besomebody flux. After installation batteries it is secured by means of thin solid copper wire, which is soldered to the shown on Fig.3 pads (near the battery).
List of used device in electronic components shown in the table. Chip NS can be replaced by 74LV14, which is operable at very low supply voltages.
In this case, the duration of the flashlight from one battery will increase. The flashlight uses LEDs ARL-3014UWZ (white color, high brightness). But you can install other LEDs.
As long as they were with high brightness. In case replacement it is recommended to select the current mode of the LEDs increases or the decrease of the resistance R7 R22....
If the use of the flashlight in the mode of the photosensor is not planned, the transistor VT1 and photodiode BL1 seal is not necessary. I note that the use of mode photosensor increases the total current consumption from the battery, which is also needed to take into account.
To power the flashlight I used "fresh" element "GRUNDIG" (rather all, Chinese) size AAA voltage (no load) 1.66 In (on the label - 1.5 V). When connecting element, the current consumption in the "Lantern" was 15 mA, in the mode "Lighthouse" - 9…10 mA. To extend the range the supply voltage down, it is necessary to reduce resistance a current-limiting resistor to 15.20 Ohms and simultaneously to reduce the capacity bit capacitor (otherwise it will burn the LEDs) to 1500…2200 UF.
Author: A. Lickin, Ryazan