


")

In the laboratory the novice radio Amateurs generator is not the last 3H place, with his help, they set up and testing of various electro-acoustic devices and their components. But not every generator can be connected to the output low-impedance load, for example, a speaker system or dynamic head. Readers are invited description generator, which allows you to do this. It was assembled on a chip of USC KUN, and its scheme is shown in Fig. 1.
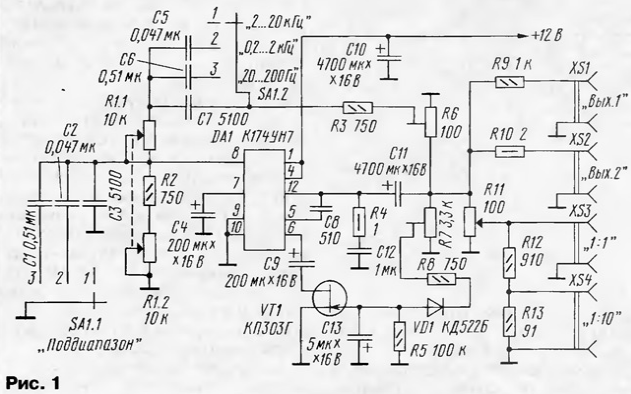
The generator produces an electrical sinusoidal signals in the range frequency 20 Hz…20 kHz, which is divided into three sub-bands: 20…200 Hz, 0,2…2 kHz and 2…20 kHz. The chip is enabled by the standard scheme. Customizados chain generator forms a bridge Fault, which is positive feedback (PIC) from the amplifier output to its input. The bridge consists of Wine resistors R1 - R3 and the two capacitors C3 and C7, to which the lower frequency the subbands switch SA1 is connected to the capacitors C1, C2, C5 and Sat. The depth of the PIC is regulated by a trimming resistor R6. A smooth change in frequency within each sub-band is a dual variable resistor R1.
To the amplitude of the generated signal was kept constant at the frequency change introduced into the generator, the device for stabilizing the output voltage. It is made on the elements VT1, C9, C13, R5, VD1, R8 and R7. Channel field-effect transistor VT1 is connected in the negative feedback circuit (EP) chip and determines its gain, and hence the amplitude output voltage.
The device operates as follows. The output signal from the engine resistor R7 through a resistor R8 is supplied to the diode VD1, rectified, smoothed capacitor C13 and is supplied to the gate of the transistor. If you increase the amplitude the output voltage increases, and the end voltage across the gate of the transistor. The channel resistance increases, which increases the depth of the EP the decrease in gain of the chip, and hence the amplitude output voltage. Manner and ensured its stabilization.
To the jacks XS1 connect a high impedance load, for example, frequency or oscilloscope. Low-impedance load - dynamic heads, speakers and etc. - connect to the jacks XS2. Socket XS3 (1:1) and XS4 (Exit 1:10) are used to connect the studied devices, the voltage at these outputs smoothly is regulated by the resistor R11. Is powered from a regulated generator unit supply voltage 12… 15 V and a maximum current up to 1 A.
Most parts of the generator are placed on the PCB of one-sided foil fiberglass, a sketch of which is shown in Fig. 2.
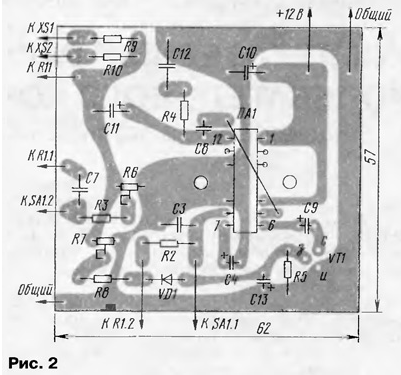
All nests, and the elements C1, C2, C5, C6, R1, R11, R12, R13 are placed on the front panel generator. The housing may be plastic or metal. If to control the frequency generator frequency meter, for example, a multimeter with built-in frequency counter, the axis of the resistor R1 is not necessary to provide a pointer, and the front panel can do without the scale that will simplify the design and reduce the dimensions of the generator.
In your device, you can use the following details: diode VD1 - KD522, KD521 with any letter index, oxide capacitors - C50-6, K50-35 or similar imported, the rest - K10-17, K73, and capacitors C1 and C6, C2 and C5, and C3 and C7 are preferably selected so that their capacity was different from each other by not more than 5%. Trimmer resistors - SDR-19a, variables: double R1 - SP-Ill, R11 - STRs JS4, fixed resistors - MLT, S2-33. Switch - any compact. The chip must be provided with a radiator a minimum area of 10 cm2, which can be made from plate aluminum. For turn on the generator in the supply chain it is useful to set the breaker, and for display this mode between the power bus and the common wire should enter the chain of series-connected LEDs (AL307, AS with any letter index) and resistor 0,75… 1 kOhm.
The establishment of the generator is reduced to the adjustment of the boundaries of the sub-bands selection capacitors C1 - C3, C5 - C7 and install the required amplitude of the output signal. The last operation is performed using resistors R6 and R7. Resistor R7 sets the amplitude - when specified in the scheme the transistor it can be changed in the range from 1 to 5, with higher amplitude there noticeable distortion. This engine resistor R6 should be set as close as possible to top circuit position. At the beginning of the configuration engine of the resistor R6 set in upper circuit position, a R7 - at the bottom, the rest of the bodies generator control - about in the middle position. This output signal should not be, if it is present, it means that the amplifier excited at high frequency. In this case, between pin 5 and GND you must install the capacitor 500…2000 pF.
Then, smoothly rotating engine of the resistor R6, achieve oscillation, and resistor R7 sets the desired amplitude (1 to 5 V) output and check its stability over the entire range of frequencies. If necessary setting repeat. If the amplitude of the output voltage must lie in 0.5… 1 V, the generator should be set transistor CPA or B. The device is configured correctly, if in the whole range of operating frequencies the amplitude of the output signal does not vary by more than 10%. If necessary conduct grading scale with frequency. If you spend some time selection of the capacitors C1, C2, C5 and C6, we can ensure that the scales on all three ranges will be the same, differing only in the multiplier, then you can do only one scale.
Total harmonic distortion of the output signal is determined in large as parameters of the chip. It also depends on the accuracy of selection of capacitors and resistors in the bridge Fault and can amount to several percent. In addition, when you connect a low-impedance load to the jacks XS2, XS3, possibly small the change in the generated frequency.
Author: I. Nechaev, Kursk