


")

We offer our readers the power supply is designed to work together with the radios, stereos and other home equipment medium class, having built-in timer. In addition, it can be used as a timer with a fixed response time to manage any the devices supplied by the lighting system.
From similar devices the power supply has an elevated operating qualities: convenient push-button control, a complete disconnection from the network from any mode (button, the timer signal, during a short circuit on the output), include and adjustable one-button timer.
Main technical characteristics
- The coefficient of output voltage stabilization, not less......130
- The maximum load current, And.....1
- Output voltage, V.....9
- Consumption current, mA, max.....15
- The response time of the timer, min.....5/10/15/20/25
The device (Fig. 1) consists of a power supply transformer T1. the diode bridge VD1, integrated circuit voltage regulator DA1: host manual and disconnecting from network comprising a triac VS1, relay K1, transistor VT1, and timer with time-setting R8-R12C7 bit and VT2R4 chains, and also a management node on the chip DD1.
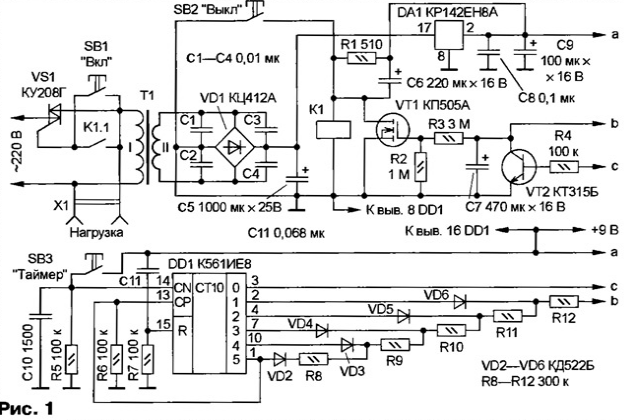
A distinctive feature of the power supply - the availability of the disconnecting node, arranged on the triac VS1 in the circuit of the primary winding network transformer TT. This ensures disconnection of the device from the network-side supply voltage, and the applied circuit design is much easier and more reliable than, for example, described in the article [1]. The state of the triac VS1 control button SB1 "On" and the locking contacts of the relay K1.1. The Capacitors C1 - C4 eliminate multiplicative background and interference network.
Relay K1 with the accompanying elements running in the node automatically disconnect block. To enable pulse relay is used the principle of allowing significantly reduce current consumption. Switching off of the relay, which the shutdown of the entire device from the network, possibly in one of three ways: manually the button SB2 "Off"; signal timer - the transistor VT1 connected parallel to the button; in case of overload or short circuit at the output or at the input stabilizer DA1.
As a threshold element FET transistor VT1 with a large the slope of the transfer characteristics and low resistance of the open channel, that clearly contributes to the triggering of the timer. To the gate of the transistor via resistive divider R2R3 connected to the timing capacitor C7. The presence of the divider is driven by the desire to get the maximum exposure time at small values of the elements of the charging circuit. It illustrates the effectiveness of modeled in Micro-Cap 7.1.0 charging characteristic of the capacitor C7 (Fig. 2), which is obtained for the first stage of the timer when R12 = 300 kω, R7 = 470 UF.
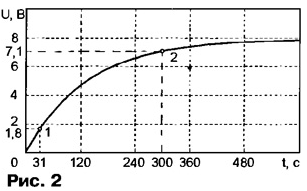
The graph shows that without the divider transistor VT1 is opened when the voltage across the gate 1.8 V (point 1 on chart), and the exposure time is equal to 31 C. With divider R2R3 increased almost 10-fold (point 2), as capacitor C7 is charged now up to nearly four times more tension. For other steps of the time constant determined included at this point, the resistors R8-R12 matrix management node. The transistor VT2 is designed for rapid discharge time meadowmere capacitor C7 before each new cycle of the timer.
The main difference between timer - original control unit that is made on decimal counter DD1. Control counter input CN, which is connected to button SB3. In turn, the outputs of the chip are connected to a resistance-diode matrix R8-R12VD2-VD6. Diodes VD2-VD6 required to launch active the output of the chip (on which there is a high level), from the other, United in this moment with the common wire. The purpose of the chain C11R7 - installation the counter to the zero state at power up. The capacitor C10 inhibits a "bounce" contacts button SB3 and prevents the entrance CN external interference, can cause false triggering of the counter.
The device operates as follows. To turn on the power supply, click on the button SB1, causing the triac VS1 is opened and the device enters the supply voltage. The momentum of the charging current of the capacitor C6 includes the relay K1, the contacts K1.1 block button SB1, leaving the device in all enabled state. Resistor R1 sets the holding current of the relay K1 level about 10 mA.
In this mode the unit provides power to the radio or radio stabilized voltage of 9 V. however, he is fully protected against overload and short circuit protection: in case of sharp increase of the load current, the voltage at circuit output DA1 is falling, the holding current of the relay K1 becomes insufficient and relay, off, de-energizes the entire device, closing the triac VS1.
For "manual" (without delay time), turn off the unit and connected equipment briefly press the button SB2. This leads to off the relay K1, the contacts K1.1 open the control circuit of the triac VS1, and the latter, closing, disconnect the unit from the network.
The timer requires a separate explanation. At power-up timer set to the zero state by submitting to the input R of the counter DD1 short the reset pulse through a capacitor C11. After that, the output 0 (pin 3) you receive a single signal to all other outputs are zero. Voltage high-level output of 0 through resistor R4 is supplied to the base of transistor VT2, opening it. The transistor VT2 is a plot of collector-emitter shunt capacitors C7 and discharges it, if it was residual charge. This is the training cycle timer to work.
Further work is timer controlled with only one button, without any additional switching characteristic of other devices, for example, [2]. The operation mode is set to speed, the number of short taps on the button SB3. Each press switches the counter one step and install the corresponding time delay. After the first press of the button SB3 counter DD1 counts one pulse, whereby the output 1 (output 2) set a single signal. The transistor VT2 is closed, and the voltage output 1, which is close to the supply voltage through diode VD6 and resistor R12 is supplied the capacitor C7, charging him. The remaining output circuits DD1 at this point unleashed closed diodes VD2-VD5, preventing discharge of the capacitor on common wire.
As the charging of the capacitor C7, the voltage at the gate of the transistor VT1 increases. The time constant circuit R12С7 first stage is selected such that the time to reach the threshold level is about 5 min after that time the transistor VT1 opens and bypasses the relay coil K1 which, off, disables the entire device, as described above.
When double clicking on the button SB3 single signal appears at the output 2 (conclusion 4). Consequently, a charging circuit is formed by two serially included resistors R11 and R12, which increases the exposure time to 10 min. Pressing the button SB3 several times (up to five), program the timer to the desired the time within 5/10/15/20/25 minutes Past the clicking stops counter, prohibiting further account, since the maximum time the shutter speed. This is achieved by supplying to the input CP of the counter DD1 single signal with output 5 (pin 1).
Several complicating the management node, you can get even more comfortable cyclic control indication. How to do this, shown in Fig. 3. Algorithm the counter is changed by the filing of a single signal output 6 (pin 5) DD1 chip input R. in addition, the outputs of the counter 1-5 is connected to the node display, assembled transistors VT3-VT7 and LEDs HL1-HL5.
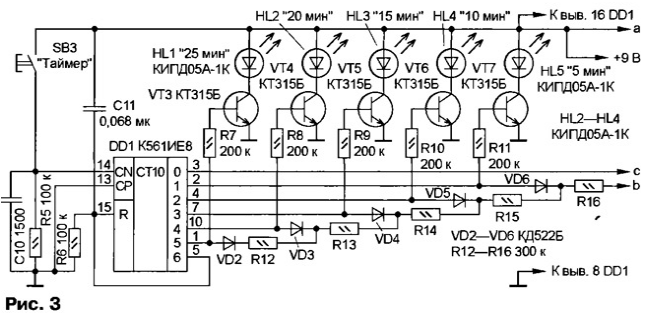
In this device each time you press the button SB3, in addition to switching mode exposure, leads to the inclusion of one of the LEDs indicating the appropriate mode. The fifth clicking is not fixed, and the following sixth - again translates the counter to the zero state. When the capacitor C7 is discharged and no one led is not illuminated - off timer. Further, pressing the button SB3 and focusing on LEDs HL1-HL5, it is possible to re-program the timer on the right time. Thus, there is realized an infinite loop control the display is very convenient in practice.
In the power supply, designed for a load current of 1 A, applied standard network transformer T10-3 (T1), secondary windings of which are connected in series. Of course, you can use any other transformer, the voltage on the secondary winding of which under load of not less than 8.5 V, Instead of the triac COG permissible use TS-10, designed for higher current and having a smaller the dimensions. Chip CIE interchangeable analogues of the series 564, C. In the device applied relay RASA performance RS4.569.600-01, but it can be replaced by another small reed relays with voltage 4…6 V and current hold no more than 7 mA. All three buttons - on the basis of an uncommittable switches the MP7. Transistors KT315B can be replaced by CTG, and, to the brightness of the LEDs in the device of Fig. 3 was the same and sufficient, transistors VT3 - VT7 should be selected according to the transfer ratio current h21e = 100…120. To use transistors with a transfer rate more 140 is not recommended, because in this case the current of the LEDs will exceed the maximum allowable value (6 mA). Instead of red LEDs KIPDA-1K permissible use IPDB-1L (green), CIPAV-1G (yellow), but it should be in mind that the brightness of the indicator is reduced by about half.
The versatility of the proposed device lies in the fact that it can be used as a separate timer, managing household appliances by mains voltage. In this case, the load power up to 1 kW (for triac COG) or up to 2 kW (for triac TC 106-10) is connected parallel to the primary winding of the transformer T1, as shown in Fig. 1. The PSU in this case only needed to power the timer, respectively, power network transformer T1 may be reduced to a few watts, the capacitance of the capacitor C5 reduced by about ten times, and the capacitor C9 is excluded. Instead bridge VD1 you can install a low-power silicon diodes. All of the above functions in this case are saved, but the switching of the load is carried out with "high voltage", and the disconnection from the mains and the load and timer happens at the same time.
Establishing the device does not require. The only thing that may be required - adjusting the operating time of the timer resistors R8-R12 in Fig. 1 (R12-R16 in Fig. 3), especially at the upper levels, where the charging current is comparable to the current leakage of the capacitor C7 and a current divider R2R3.
In conclusion, we note that the proposed timer allows ample opportunities modernisation. Thus, the number of degrees of regulation can be increased up to ten (the number of outputs of IC DD1), and the exposure time of each stage is changed in any party to the selection of resistors R8-R12.
Literature
Author: A. Pakhomov, G. Zernograd, Rostov region