


")

Diagnostic device - trip computer performs the functions of the onboard computer (BC) of the vehicle. It is designed to display in real time motion parameters of the vehicle, the current time, the values of the selected parameter and fault codes of the controller, and Executive management the mechanisms of the engine management system with distributed injection of fuel and controllers Bosch M 1.5.4" and "January 5" as with the oxygen sensor, and without him.
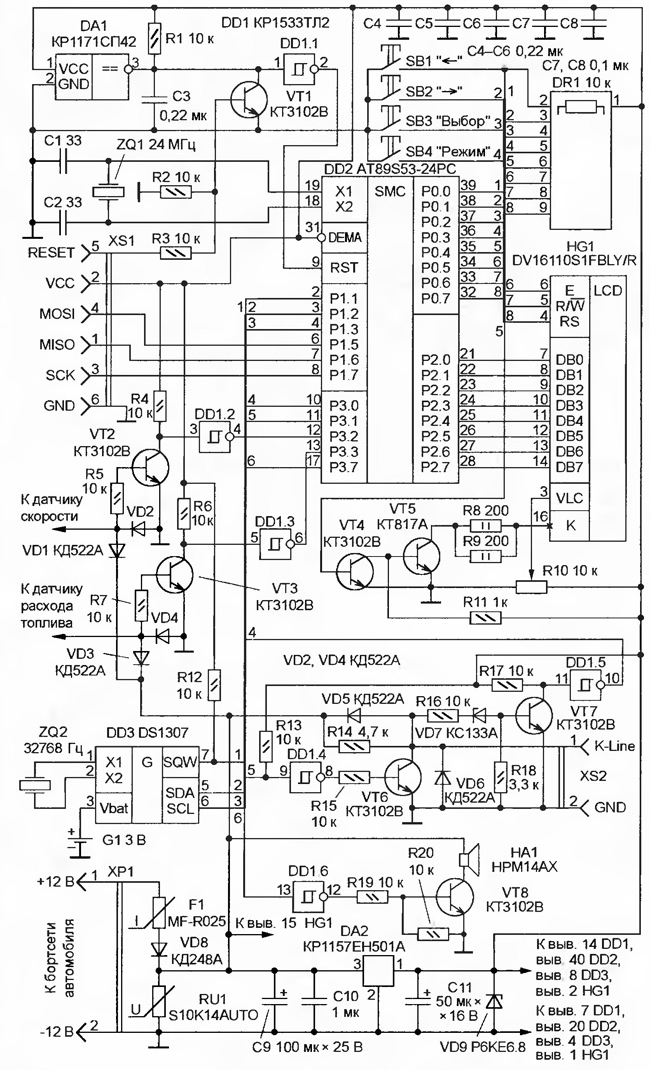
Scheme Bq shown. It is based on the AT89S53 microcontroller-24PC (DD2). In unlike applied in diagnostic devices [1, 2], the AU is equipped with a microcontroller with a large volume (12 instead of 8 Kbytes) FLASH memory.
(click to enlarge)
For reliable startup of the microcontroller after power-up and lock it work by lowering the voltage applied to the chip CSP (DA1). She holds the output (pin 3) low level when the supply voltage is less 4.2 V. the Capacitor C3 delays the transition in the state log. 1 after the power supply voltage exceeds this threshold value. Full features and constructive analogue circuits CRS - PST529D company Mitsumi. In addition, taking into account different pinouts this chip interchangeable on DS1233-15 Dallas miconductor, functionality to the adm705 (Analog Devices), the MAX705 (Maxim).
In the extreme case, the chip CSP can never be set. The signal reset will form the RC circuit R1C3. It is desirable to increase the capacity capacitor C3 1 UF and parallel with the resistor R1 to mount any diode from series KD521, KD522 cathode to +5 V. in this case, However, faults in the instrument with a sharp decrease in voltage ("dips") power.
To display information used single-line 16-symbol-tion Russified LCD with led backlight DV16110S1FBLY/R company Data Vision (HG1). Although this device is designed to operate in extended the temperature interval included it on the "normal" scheme (for engaging features extended temperature interval needed a bipolar source power).
The LCD is permissible to replace a functional analog of other manufacturers meets the following requirements: system commands its controller compatible with KS0066, and the character generator Russified. These conditions correspond to the LCD JA-16101 firms JE-AN Electronic, AC161B (Ampire), and indicators of firms Seico, Hantronic, etc.
BC fed from the vehicle electrical system, in which the possible interference and significant inrush voltage. To eliminate the influence of unfavorable factors designed a number of additional elements.
Diode VD8 CDA protects the device against reverse polarity of the supply voltage. It can be replaced by any equivalent allowable direct current of at least 300 mA, for example, part no 1n4001 firm DC Components.
To protect BC emissions from the on-Board network employs a special car varistor RU1 firm S+M (Siemens Matsushita Components) SIOV S10K14AUTO. It you can replace the Zener diode with a voltage stabilization 15…20 V, for example, XA, XA etc.
In series with the diode VD8 connected resetable fuse MF-R025 (F1) company BOURNS rated current 250 mA, which protects the device from emergency situations due to possible faults in the circuit.
In addition, to protect the power circuits Bq +5 V as a result of failure of stabilizer (DA2), but such cases were noted in the operation, installed protective diode VD9 RCE.8 company Motorola. This diode is valid replace with similar parameters 1.CA.8, SА5.0A the same company or Zener diode with voltage stabilization from 5.6 to 6.8 In, for example, KSA.
For additional sound indication button, the operation mode changeover of the device, as well as warnings of the output of the controlled parameter for valid use the range from the site of sound generation (DD1.6, VT8, HA1). The main element - piezoelectric emitter NRMA firms JL World with built-in a generator operating at frequencies 4300…5500 Hz. Therefore, for sound generation enough to sue him power supply voltage of +12 V. It performs the switch on the Schmitt trigger DD1.6 and the transistor VT8. Since the current consumed the emitter is about 15 mA, the site of VT8 can operate the transistor with the allowable current collector is not less than this value. Emitter to replace NRMA, NRMA, NRMA or similar to the power supply voltage is less than 12V.
The signals from the speed sensors and fuel consumption is converted to TTL levels nodes pairing transistors VT2 and VT3. The fronts of the received signals form the Schmitt trigger DD1.2 and DD1.3. Diodes VD1-VD4 protect the inputs from possible Bq voltage spikes from exceeding the supply voltage. For these purposes it is possible to use any low-power pulsed diodes, for example, series KD521, KD522.
The host interface with the diagnostic line (K-Line) transistors VT7 (receiving key) and VT6 (transmit key) and the Schmitt trigger DD1.4, DD1.5. He converts signal levels from TTL to 12 volts as per specification IS09141. Diodes VD5 and VD6 protect the entrance of BC from possible surges on diagnostic lines exceeding the supply voltage. In their place can to use any low-power pulsed diodes, for example, KDE or any series KD521, KD522. Since the specifications IS09141 the signal level of the log. 0 can significantly greater than zero voltage, it is necessary to ensure reliable the closing of the transistor receiving the key when the input voltage to 3.3 V. This the function of the Zener diode XA (VD7).
For the formation of a timestamp to be used in computing time parameters route and store these settings when the power is off BC applied chip DS1307 (DD3), which is a real-time clock with non-volatile memory. The frequency generator chip DD3 stable quartz resonator RC-206-1A 32768 Hz (ZQ2). When replacing the resonator to other you should pay special attention to the fact that its capacity should be close to of 12.5 PF. Otherwise, clock and trip computer can work properly.
Temporary route settings and the current time value to be retained in the power is off, used a backup source - cell lithium CR2032 (G1) voltage of 3 V. It is permissible to substitute any other cell or battery with the same voltage.
Blocking capacitors C4 - C8 are located on the motherboard of the device near circuits DA1, DD2, LCD HG1, chip DD3 and connector XS1, respectively.
Connector XS1 Bq connect the programmer or connect to a wall outlet the parallel port of the PC. To eliminate the possibility of failures during recording the program in the microcontroller, the signals of the parallel port should be "umonit". With for this purpose in the gap lines connecting cable connected to the buffer elements chip CRAP fed from pin 2 (line VCC +5 V) connector XS1.
The control program of BC is composed of modules written in languages Assembler and C for Keil compiler (Keil Electronic GmbH). The program was developed and compiled in the IDE Keil mVision2 V2.04b.
Assembler - A51 version 6.00 f, the C compiler - C51 version 6.00 i, linker - BL51 version 4.00 d. The project file - mktstr.Uv2. The compiled program in the format Intel HEX - mkt-str.hex.
Download the project files
Before programming the microcontroller, it is necessary to check the correctness installation BC, and then the serviceability of its major units.
Without connecting the output of the stabilizer DA2 to the +5V supply, connect voltage power +12 V and verify the operation of the stabilizer (the presence of voltage +5 V at the output). Then, check if the circuit between the power line +5 V and GND. In the absence of a circuit, connect the output of the stabilizer DA2 to the +5V supply and verify the presence of voltage.
After power on pin 9 (RST) of the microcontroller DD2 needs observed single impulse, and then all the time be present low level. Otherwise, probably faulty chip DA1.
Of the pins 18 and 19 of the microcontroller DD2 needs to be sinusoidal the signal frequency of 24 MHz, and the output 30 (ALE) - meander (4 MHz).
To write the control program in the AT89S53 microcontroller-24PC two ways. First, parallel programming using any universal programmer. This option is suitable if the microcontroller is not sealed in charge, and installed in transition panel. If programming the microcontroller assumes only in parallel mode, the connector XS1, transistor VT1 and resistors R2, R3 can be eliminated. Second, consistent programming with the help of special programs ISP (In System Programming), for example, Atmel AVR ISP.
Option serial program is preferable because it there is no need to remove the microcontroller from the panel, and for automotive applications (in conditions of high vibration) it is desirable to solder into the Board.
Check for proper addressing to program memory. At pin 29 (room) DD2 must be a high level. If there are pulses - microcontroller works with external program memory, - verify the presence of the log. 1 at pin 31 (DEMA) DD2. If the withdrawal of the room periodically pulse packet, the program goes beyond the internal memory, which should not be. Rather all the microcontroller's "clean" program is not recorded or recorded wrong.
After starting the control program initializes the serial port and a system timer of the microcontroller, and then initializes the LCD: the port P2 outputs command codes, followed by a pulse of high level at the input E of LCD. By submitting the command, the microcontroller translates all port P2 in the read mode and is waiting for The LCD tone, continuing to apply a single pulse to the input e. If the indicator is faulty, the program is stuck in a "loop" on a survey of its readiness.
After initialization, the LCD screen will clear and will appear as a screen saver. If the screen shows only black rectangles, it is necessary to adjust the contrast image variable resistor R10. On the screen is not black rectangles it must be visible or they should be barely noticeable. Simultaneously with the appearance screensavers at pin 35 (P0.4) of the microcontroller DD2 appears low illuminated indicator.
Then, the control program configures the chip DD3: at its pin 7 (SQW) you receive the square wave frequency of 1 Hz. If such a signal, it means the chip programmed correctly.
If the signal is missing, but BC does just used quartz the resonator appropriate capacity and clock functions and trip computer are to work correctly.
When switching to the display mode parameters, error codes or control actuators BC is trying to establish a connection with the controller of the motor. At pin 11 of the microcontroller DD2 every 300 MS pulse appears the low level duration of 25 MS, then after 25 MS pause passed several of bytes of data at a speed 10400 bps. a Similar signal, but the amplitude of 12 V, should appear on pin 1 of connector XS2 (K-Line). In the absence of communication with the controller displays the message "No connection".
In BC has six operating modes: clock, trip computer, readout the values of the option selected by the user, display and reset codes controller faults, the control of actuators and excretion unit information. Switch modes by clicking on the button SB4 "Mode".
In clock mode, the indicator displays the current time in the format HH:MM:SS, where HH is hours, MM is minutes, SS is seconds. To adjust the current time must press and hold the button "Select" (SB3) not less than 1.5 C. First set the hour then the minute value of the current time (modifiable the parameter flashes). The seconds value in this case is forcibly set to zero. Values hour/minute change by pressing SB1 Left (decrease by 1) and SB2 Right (increase of 1). Changing the adjustable parameter is clicking on the button "Select". After the installation is complete BC returns to the mode display the current time.
Mode trip computer accumulates and displays the following options movement:
- the distance travelled from the beginning of the route, m;
- the time spent on the route (latched) when the ignition is on);
- time in motion (with speed not less than 3 km/h);
- the current vehicle speed, km/h;
- the average speed on the route, km/h (valid after
- run at least 1 mile);
- the maximum achieved (peak) speed route, km/h;
- spent on the route, fuel, ml;
- average fuel consumption on the route, l/100 km (valid after a run of not less than 1 km).
The indicated parameter select buttons "Left" and "Right".
To stop the calculation of the parameters of the route (without zeroing) must press the button "Select". To resume the counting of parameters, re-press the button "Select". Control start/stop of computation parameters through "the time spent on the route". If the motion parameters the route is not calculated, the seconds counter is stopped.
To reset the settings of the previous route, press and hold pressing the "Choice" of not less than 1.5 C.
BC in review mode, the selected parameter value indicates real time one of the following variables:
- ID software controller;
- throttle valve position, %;
- coolant temperature, °C;
- the rotational speed of a crankshaft of the engine, min-1;
- specified engine speed at idle, min-1;
- the ignition timing, grad.;
- the vehicle speed, km/h;
- the current position of the idling regulator, step;
- specified position of the idling regulator, step;
- the coefficient for correcting the fuel injection time;
- the voltage at the oxygen sensor for the engine with the sensor;
- the correction factor for the engine WITH no oxygen sensor;
- the ratio of the air/fuel for the engine with the oxygen sensor;
- the voltage, V;
- the pulse duration of the injection, MS;
- fuel consumption in one cycle, mg;
- air consumption, kg/h;
- hourly fuel consumption, l/h;
- track fuel consumption, l/100 km (only when the vehicle);
- the symptom detection of detonation;
- the lock sign fuel supply;
- sign idling;
- symptom power enrichment.
In addition, BC beeps when the displayed setting is beyond limits:
- in the display mode of the coolant temperature in excess of the value 110°C;
- in display mode, the rotational speed of the crankshaft of the engine in excess of values 5520 min-1;
- in display mode the vehicle voltage with the voltage less than 10 and more than 15 In;
- in display mode tag detection detonation detected detonation;
- in display mode indication locking fuel delivery lock fuel supply;
- in display mode indication power enrichment the enrichment of a mixture of power.
Choose the desired option by pressing "Left" and "Right"
BC in display mode fault codes in the loop reads from the controller codes and displays them on the LCD. If it is zero (no fault), available only the "Mode", when clicked takes the exit display fault codes. If the codes NEIS-
prevesta available, to view them you must click on the button "Select", "Left" or "Right". Flip a few fault codes is use the "Left" and "Right". To exit the display mode fault codes without treatment, you must click on the button "Mode". To erase codes fault, press the button "Select" and hold it for at least 1.5 seconds. In this case, the Bq will erase all codes in the controller and considers them again (after Erasure should be read 0 fault). Faults and their codes given in [2].
In the mode control actuators are available in the following nodes and units:
- warning light Check Engine;
- the control relay of the fan of system of cooling of the engine;
- control relay fuel pump;
- ignition coil 1 (1st and 4th cylinders);
- ignition coil 2 (the 2nd and 3rd cylinders);
- the nozzle 1;
- the nozzle 2;
- the nozzle 3;
- injector 4.
In addition, in this mode you can modify the following parameters of the engine:
- the correction factor for the engine WITH no oxygen sensor;
- the rotational speed of a crankshaft of the engine is idling;
- the position of the idle speed regulator.
The transition from one node to another by pressing the buttons "Left" and "Right." Thus, for each unit displays its current state (except ignition coils and injectors). To navigate to the selected control the actuator should press the button "Select". After that you can change the state of the actuating mechanism by pressing once or pressing and holding the buttons "Left" and "Right." Changing the state of the unit is indicated the symbol "*" (asterisk) in the first position on the LCD screen. To return the actuating mechanism to the controller, you will need to re-click on click "Select".
In the management of any unit using the BC controller loses the ability "influence" on him. Therefore, after the transition to the management Executive mechanism (the "*" symbol in the first position of the LCD screen), you cannot switch to another mode until the control is not returned to the controller by pressing the button "Select".
Control relay fuel pump, ignition coils and injectors are only available when the ignition and the engine running. When you click on the Left button the fuel pump turns off when you press the Right button is enabled. If control of the pump, instead of his condition are displayed signs "-" (minus).
When you click on the button "Select" ignition coil served 20 pulses duration 5 MS, with an interval of 5 MS, and the nozzle - one,with a duration of 2 MS. The work of the ignition coil and the nozzle is indicated by the characters "***" (asterisk) at the LCD screen and beep.
For control units with simultaneous injection mode is available only "Nozzle 1". When you click on the button "Select" in this case, the pulse will be served at the same time the injectors all cylinders.
For control units with pairwise parallel injection modes are only available "Nozzle 1 and Nozzle 2". When you click on the button "Select" in the "Nozzle 1" the pulse is fed to the nozzle 1 and 4 cylinders, and in the "Nozzle 2" - the nozzle 2 and 3 cylinders.
For control units with phase injection is available all the nozzles.
You should pay special attention that the engines simultaneously and in pairs parallel injection is not recommended for more than five consecutive times to activate jets, as the candles will be filled by injected gas and the subsequent inclusion of the the engine will be difficult (you need to blow out the cylinders spinning the engine with full throttle for 20…30).
The change in the coefficient correction is only possible for a controller with the recorded program is working without oxygen sensor and potentiometer (for example, M1V13R55, M1V13R59, M1V13R61). When you click on the Left button the correction factor decreases WITH, and when you click on the Right button increases in 0,003 unit for pressing and is 0.019, if the button to hold it in place. Maximum lean operation corresponds to the coefficient correction WITH -0,25 units, and the most enriched - +0,25. Save changed value in the memory controller is when you press the button "Choice" and is only possible when disconnected FROM the potentiometer (disable WITH potentiometer recommended by experts of AVTOVAZ for programs that allow his absence) as the potentiometer has a higher priority than diagnostic equipment.
When the control knob is idle, pressing the Left button decreases, while pressing the Right button increases its current position on one step for pressing and five steps, if the button is held down. In the position of the idling regulator, is 255 steps, his rod fully operational (air channel is open, the maximum speed), and in the position 0 steps, the rod is fully extended (the air duct is closed, the engine muted).
It is necessary to pay special attention to the fact that in position 0 steps removed from engine idle speed regulator possible loss of stock.
When controlling the idling speed of the engine crankshaft. press on the Left button decreases the value of the frequency, and press the Right increases it to 10 min-1 for pressing and 50 min-1, if held down. It should also be noted that the control the motor is installed at the idling speed, and the screen and the LCD will display the current value.
In this regard, there may be a delay in setting the frequency (the engine should some time to set the frequency was current).
To switch to the mode of deducing information about BC, you must switch off the ignition, press the "Mode" and turn ignition on, hold the button the top button down. In this mode, you can view information about the version of the device, and their authors. Scroll through the displayed information by using the buttons "Left" and "Right". To to exit this mode, press the button "Mode".
If the vehicle is not equipped with immobilizer, communications line information diagnostic interface (K-Line) of the controller to the "M" pads diagnosis, which is connected to pin 1 of the connector XS2 device, usually ripped. To install it, you must install a jumper between pins 9 and 18 pads to connect them-instant mobilizer. If the vehicle has already passed diagnostics in the service station, it is likely that the jumper is already installed.
The calculation of distance, speed and fuel consumption is pay-offs from speed and fuel system engine management. The signal from the speed sensor can be removed from the contact 9 the connector of the controller and the sensor signal fuel consumption - with contact 54.
Meals on BC I recommend to serve with ignition switch - contact connector 27 of the controller. The unit will automatically turn on when you turn on ignition on and off when turned off.
In some versions of cars already installed connector trip computer, which are connected to the power supply voltage from the castle plugs and wires from the speed sensors and fuel consumption. In the presence of this connector BC should be connected to it.
Note that in the software immobilizer, released to March 2000, there is an error associated with possible desync information in the controller and the immobilizer when diagnostic equipment. In this case, when the diagnosis it is necessary to translate immobilizer in the maintenance mode.
Literature
Author: A. Alekhine