


")

The proposed device is very simple in the scheme, but has good performance characteristics, assembled on available components. The tachometer can be very useful in adjusting operations with electronic components of the ignition of the motor vehicle, with accurate setting of the threshold of the economizer, etc But the feasibility of using a digital tachometer as on-Board (installed on the dashboard) we would put a big question, and this in the magazine "Radio" was in its time an article by A. Mezhlumyan Digital or analog?" -1986, No. 7, pp. 25, 26.
The tachometer is designed to measure the rotational speed of the crankshaft of a four-cylinder automobile gasoline engine. The device can be used for adjustment work on idle and operational control of the shaft speed of the engine while driving.
The measurement cycle is 1 s, and the time zone is also equal to 1, i.e. during the time indication is the next dimension, the change of the indicator occurs once per second. The maximum measurement error of 30 min~1, the number of bits of indicator - 3; switching the measuring range is not provided. The tachometer has a stable quartz oscillator, so the measurement error does not depend on the ambient temperature and changes in the supply voltage.
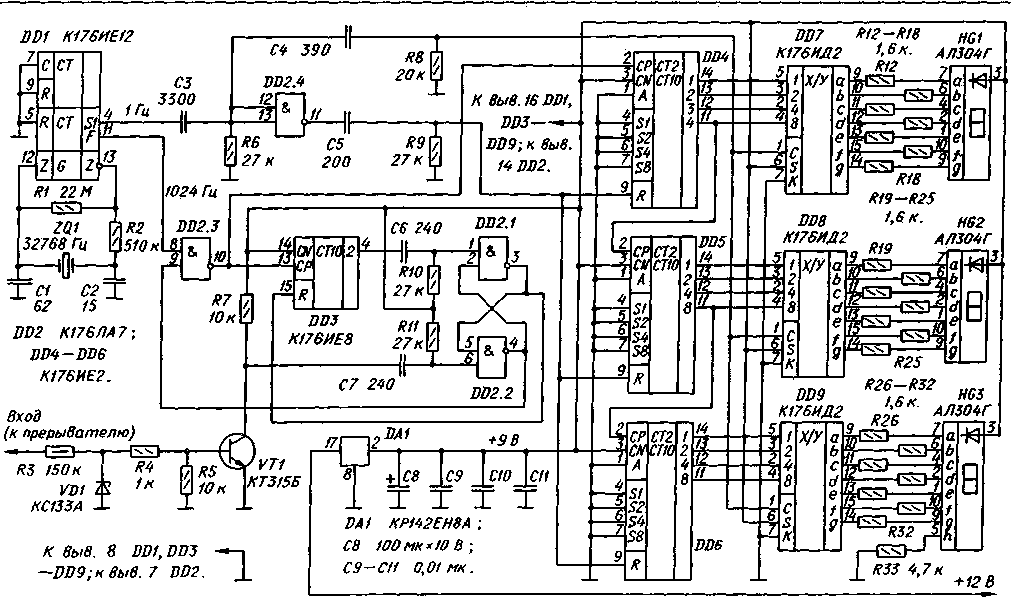
Schematic diagram of the tachometer shown in Fig. 1. Functionally, the device consists of Kartavenko generator, assembled on a chip DD1, the input node of transistor VT1, tripler frequency of the input pulses on the elements of DD2.1-DD2.3 and the counter DD3, counters DD4-DD6, code converters DD7-DD9, digital indicators HG1-HG3 and voltage regulator power OA. The signal at the input node of the tachometer comes with breaker contacts.
(click to enlarge)
After applying voltage trigger DD2.1, DD2.2 may be in any state (of two possible). Assume that the output element DD2.2 there is a low voltage, which prohibits the passage through the element DD2.3 pulses of a frequency of 1024 Hz output F of the counter DD1 at the counting input of the SR counter D03 and DD4.
Upon opening the breaker contacts of the transistor VT1 is opened, switch trigger DD2.1, DD2.2 and opens the item DD2.3. Counters DD3 and DD4 starts counting of pulses the frequency of 1024 Hz. The decay of the third input pulse counter DD3 at its output 2 is formed impulse, which will switch the trigger DD2.1, DD2.2 in the initial state, an element D02.3 is again closed, and the counter DD3 - zeroed. When the next pulse interrupter process will be repeated. Thus, at each opening of the breaker contacts, the number recorded in the chain of counters DD4-DD6, will increase by 3.
The recording process will continue for a second, i.e. until the moment when the output S1 of the counter DD1 will appear next positive voltage drop. At this point, the information accumulated in the counters DD4-DD6, will be copied into the buffer registers code converters DD7-DD9, and soon the counters DD4-DD6 reset input R signal chain C5R9. Immediately after the recession of the high level pulse input counters DD4-DD6 will begin a new cycle recording, etc., To provide the necessary time delay between the moments of overwriting information from counters DD4-DD6 in buffer registers code Converter DD7-DD9 and counters are reset are differentiating circuit C3R6, C4R8, C5R9 element and DD2.4.
Tripling the frequency of the pulses coming from the breaker, it is necessary to obtain the correspondence between the meter and the rotational speed of a crankshaft of the engine in min-1. As the time to count input pulses equal to 1, then the counters will be written, and then will be displayed on indicators number 2N3/60, where N is the engine speed in min-1, 2N - frequency sparking. When the shaft speed 3000 min-1, the meter reading will be 3.00.
All the details tachometer, except the voltage regulator DA1 and indicators HG1-HG3 placed on the PCB of bilateral foil stack-latexotica. Drawing of the PCB and the location of the parts on it are presented in Fig. 2. The tachometer is not critical to the type of parts used. The values of resistors and capacitors may differ from those indicated in the diagram by ±20 %.
The resistor R1 is KIM, but because of high resistance resistors is quite scarce, the Board is provided a mounting pad for mounting instead of the single resistor 22 IOM consistently several smaller resistance.
Quartz resonator ZQ1 - any, from the digital clock. The Zener diode VD1 - Liu- ¦ fight small for voltage stabilization 3…5 V. Chip series C can be replaced by the corresponding series C. Integrated stabilizer CREA installed on the heat-dissipation area of about 10 cm2.
In the tachometer used semielemental indicators ALG (digit height 3 mm) with high brightness and relatively low power supply current of about 5 mA per element). The brightness is sufficient for confident reading information in the vehicle even in Sunny weather. Scoreboard tachometer should be covered by a dense filter of the corresponding color.
If necessary, you can use indicators and with larger numbers, for example, ALSO, ALSB, ALSO, ALSB. The current consumed by each component, significantly more - up to 20 mA, so for providing supplies the brightness of the output current of the decoders need to be strengthened. Diagram of a current amplifier for indicators series ALS and ALS presented in Fig. 3, a and b.
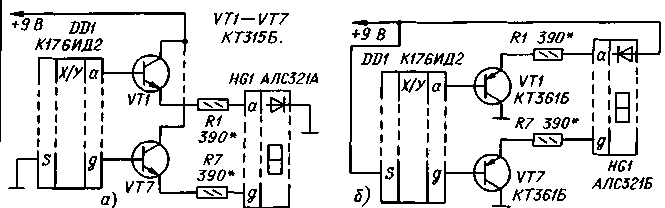
Please note that when using indicators with common cathode ALSA and ALSA to the input S of the code converters DD7-DD9 should apply a low voltage (pins 6 to connect the common wire).
Of course, the use of coarse-coded indicators will require correction circuit Board and install the stabilizer DA1 to heat a larger area (at least 30 cm2).
Correctly assembled from undamaged parts of the tachometer starts to work immediately, and the scoreboard should highlight the zero reading about 2 seconds after power-up. If not, check for the existence of second pulses at the output S1 of the counter DD1. Their absence or marked difference of 1 means most likely the fault of the quartz resonator. To check the operability of the remaining nodes of the tachometer signal from the output 3 of the counter DD1 (pulses with a frequency of 128 Hz) submitted through the resistor 10 ohms to the base of transistor VT1. The LCD should appear the number of 3.84.
In a vehicle equipped with a standard battery ignition system, the entrance the tachometer is connected to the output of a circuit breaker. When contactless electronic the ignition system tachometer can be connected to its output, increasing the resistance of the resistor R3 to 200-250 ohms, and the resistor preferably set not on the Board, and to break the wire that goes from the Board to tachometer the output of the ignition system. This is because the output voltage electronic ignition system can reach 400 and even more that can lead to breakouts on the Board of the tachometer. If the electronic ignition system works from the contact breaker, the tachometer is connected to the output breaker, reducing the resistance of the resistor R3 to 12 ohms.
Author: A. Biryukov, Moscow; Publication: N. Bolshakov, rf.atnn.ru