


")

Just 30 minutes will it take to build a simple and reliable timer, which given point (in the range of 1-11 h) will turn on or off any home the appliance power up to 0.5 kW. The device is made on the basis of the usual mechanical sound, for example, "amber", "Sevan", "Beam", in plastic the case of which a simple device consisting of two neon lights T-0.3, the pair of resistors MO-0.25 or MLT-0,5, microswitch MP-1, nests under a standard plug and fuse.
The principle of operation of the time relay is simple. The coiled flat spring alarm, dance, beyond the clock mechanism until rested in the Cup of the call. This fact makes it easy to turn alarm clock timer - is enough to remove the Cup of the call, and in its place set the dip switch. Now the spring of an alarm clock, releasing the stored energy, external coil rests not in the Cup of the call and click on the "more button" microswitch, which, in turn, would short-circuit the power circuit external the device (tape recorder, radio, lamp, electromarket (secure the unit with a work surface temperature of 95 ).
Neon lamp V1 (Fig. 1) indicates the device is connected to the network, and V2 indicates the presence of voltage on the sockets x2. Resistors R1 and R2 limit the current using V1 and V2. S1 - switch, actuated by a spring of an alarm clock. Fuse F1 protects the device from short circuits.
Signal arrow set at the right time, wind the watch and alarm clock, fork X1 include network and connect the load. At a given point will work the alarm clock, and a spring call will close the contact S1: lamp lights V2, and the voltage will go to the load.
Adding a toggle switch S2 (Fig. 2) you can set two modes for the device: "load" and "load shedding". In the first case it works similarly to the previous one. When you switch S2, the power supply circuit of the load is shorted, and at the specified time, the switch S1 opens her.
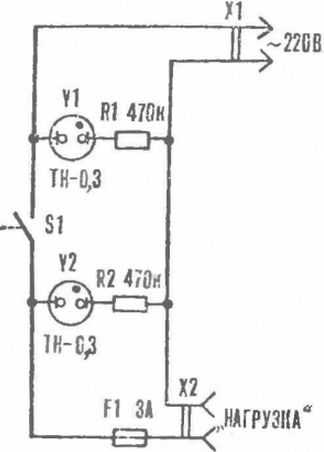
Fig. 1. The electrical circuit of the first embodiment, the relay time
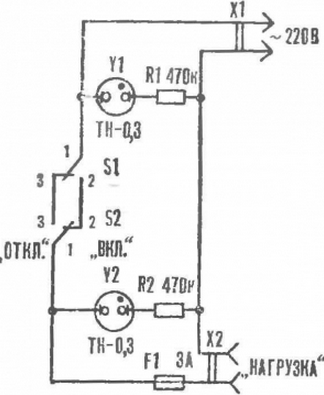
Fig. 2. The electrical circuit of the second option time relay
To mount the elements of the time relays in the case of the watch is easy. Only need a knife, a drill, needle files, glue, pencil erasers and file. The quality of the work depend "commodity" type of device and the reliability of its work.
The microswitch and the "nonki" krepjat by means of pencil erasers (Fig. 3). In one of them sharpened knife cut a groove the size of the microswitch, so after installing it looked only a "little button", and perforate the workpiece awl holes for the wires.
Then secure the switch with the second eraser, gluing it to the side surface of the first side of the notch. For this fit glue BF, "Apartement" or similar. After it dries, trim the glued block width and height. The last set depending on the distance of the external the coil is unwound the spring to the wall of the case. Measure it, first compressing the spring on 1 to 3 coils, thus providing the necessary force, which in further she will push on the test site, and stick with erasers a microswitch to the case.
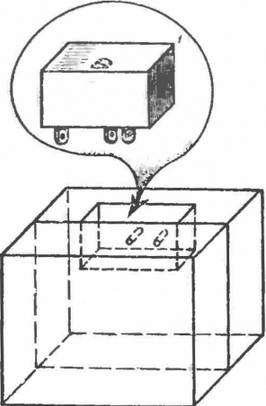
Fig. 3. Block microswitch
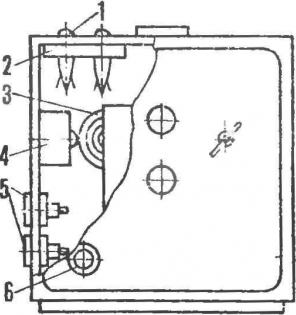
Fig. 4. The location of elements of a time relay in case of alarm: 1 - neon lamp, 2 - holder, 3 - spring, 4 - microswitch, 5 - socket, 6 - fuse.
Third, the eraser will be used to manufacture the holder of the neon lights. Make it two holes 1-2 mm smaller than the diameter of the glass cylinders "neonok" and setting holder at the top of the enclosure, drill two more holes. Not hurt" plastic case, this work should be done with caution, outlining first, future hole with an awl; then drill the intermediate hole with a diameter of 1 to 2.5 mm. To size they are driven by a drill of appropriate diameter or knife. Round needle file to remove the bumps. The surface of the eraser with the grease holes glue, paste them in neon lights and fasten on the watch.
Least install socket and fuse holder, drilling under them in targeted areas of the body necessary holes (Fig. 4). Under mount the fuse in the lid or in the body make file a groove for the network wire.
Switch S2 (see Fig. 2) can be placed on top of the body to the right staff the button to disable the alarm either at the bottom on the right wall of the housing, in front of the nests. However, in this case will increase the risk of damage to the pendulum clock.
Now proceed to the installation. All connections run insulated wire, carefully checking the reliability soldering and connections.
Author: A. Kabanov