


")

The principle of operation is based on measuring the q-factor and inductance of the coil when near to a conductive metal surface.
This simple device can measure the thickness of insulating coatings on metals and to determine the type of metal substrate (color or black) without failure of the coating. With it possible, for example, to find the putty under the paint on the body car and at the same time to check whether galvanized metal housing. Limit measurements is 0.5-8 mm for steel and cast iron, 0.3 to 5 mm for non-ferrous metals.
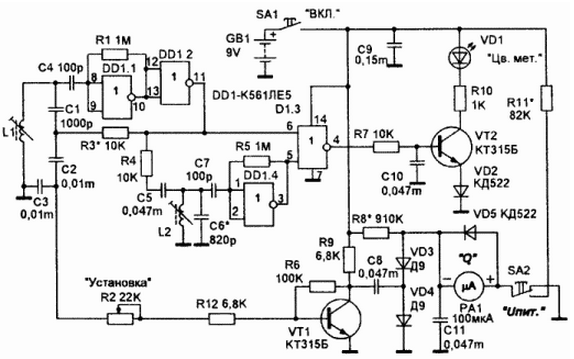
The measuring coil L1 is part of a resonant circuit (L1, C1, C2, C3) generator on the elements DD1.1, DD1.2 with the generation frequency of about 350 kHz. The feature of the circuit of the generator is its ability to work steadily in any substantial change in the amplitude of the voltage on the circuit, this is achieved by high gain in the feedback loop. Since the power "swap" (a rectangle with a CMOS level coming from the output of the element DD1.2 through R3 to C2) does not depend on the voltage on the inputs DD1.1, the oscillation amplitude in circuit decreases with increasing losses in L1 and Vice versa.
When approaching sensor to metal alternating magnetic field of the coil induces on its surface eddy currents, causing losses increase (decrease q) and changing the inductance. This, in turn, affects the amplitude and frequency of oscillations. The sinusoidal signal is taken across R2 increases VT1, rectified by diodes VD3, VD4, and is supplied to the measuring device PA1, which is determined the thickness of the coating. Resistor R2 sets the arrow on a target device the division of the scale before starting the measurement. Since base metals are the best conductivity and degrade the quality factor to a lesser extent, but greatly reduce inductance (the oscillator frequency is increased by 10-15%), is entered into the device detector non-ferrous metals (threshold frequency detector on the elements DD1.3, DD1.4 and the transistor VT1).
The detector works as follows: a Rectangular signal with a frequency of generation is removed from the pin 11 of the chip, is fed to the input 6 of the element DD1.3 directly and the input 5 through the phase-shifting circuit and an inverting amplifier-shaper DD1.4. At the coincidence frequency, signal phase-shifting circuit with frequency generation (the phase shift in the circuit R4, L2, C6 is absent at terminals 5 and 6 there is anti-phase voltage and accordingly a logic 0 at pin 4. With increasing (decreasing) the frequency of the measuring oscillator circuit starts to shift the phase of the signal. Input 5 DD1.3 the pulses come with a lagging phase. At pin 4 MS appears log. 1 in the points of coincidence of the log. 0 at the inputs DD1.3. From pulse constant component stands out chain R7, C10 and upon reaching voltage opening and VT2 VD2 light up led VD1. The device is powered by Krona battery (6F22). Consumption current does not exceed 5mA. Buttons SB1 and SB2 type MP or Mr-1, the first activation of the device, the second control voltage batteries (the unit switches over to the battery circuit through R11 and diodes VD3, VD4 rectifier). Pushers of buttons carved from thick rubber.
The measuring coil L1 contains 100 turns of PEV of 0.1. Wound in half core SB-12 of carbonyl iron filled epoxy and glued flush in the front wall of the housing open part out. The coil L2 is wound also, only the core Assembly and is installed on the Board. Contour capacitors C1 and C6 for the best thermal stability was used of the same type with small TKE. R2 type JS4-1. The measuring device M (full-scale deflection current 100ua, resistance framework of 2.9 kω) is glued into the cutout of the front wall (fixing lugs felled). Rectifier diodes VD3, VD4 necessarily germanium, a VD5 and VD2 silicon. Other details of the features do not have. The side walls of the housing (dimensions 160x54x26) cladding made of three-layer plastic with a thickness 3mm, front and rear walls of the PCB (8mm). A printed circuit Board mounted on 4 racks with a height of 4-5 mm.
To put R2 in the position of the minimum gain and the selection of R3 to set the arrow the device on the middle of the scale. Then use R2 to set the arrow on the end division and bring to the close sensor is a flat plate of steel or iron, the selection of R8 to set the arrow of the device to 0. The selection C6 rude and core L2 exactly beginning to achieve ignition VD1 at the approach of the sensor to the aluminum or copper plates for 4-6 mm (be aware that upon contact of the sensor with non-ferrous metals, the instrument will show a 20-30MKA). For accurate measurements the device need to graduate, enclosing between the sensor and the metal plate isolation of known thickness. The results can be represented in a table or graph and to glue on the top cover of the case (for ferrous and non-ferrous metals graduations different). If you need frequent measurements of the same products precision measuring you can enhance.
To do this, make a metal ruler from the same metal and measured the product, any way to apply a layer insulation with a smooth change of thickness and to put the division in accordance with the current thickness of the layer. The meter is applied first to the measured surface, then resistor R2 sets the arrow on the maximum a possible division of the scale, after which the device is transferred to the lane and made moving along to coincide with the readings. The thickness is read on the graduations on the line With this method of measurement error of the instrument for precision measurement affected.
As shown on the measurement accuracy is little affected by the moisture content of the coating and the thickness of the metal substrate, but when working with non-ferrous metals makes the error the surface finish. You need to consider that the instrument responds only to the surface layer of the metal and if the substrate is, for example, galvanized steel, the led will show a nonferrous metal and measurement will be conducted, respectively, by scale non-ferrous metal. The device can also determine the ferrite materials when this led lights up (in decreasing frequency) and the quality factor of the coil will increase (the meter pointer will go up).
Literature
Author: S. Bartow