


")

An accident happened - your car has failed regulator voltage. How to be? In this issue Amateur radio operator will answer without hesitation: collect new. Yeah, so he was better than the previous! About how to do it in fact, says the author presents in the article here.
On NISSAN-MARCH stopped working generator. The audit showed that the refusal was caused by a faulty voltage regulator, causing the rotor the generator was left without excitation current.
The voltage regulator is designed as hybrid microcircuits, ustanovlennoy in the brush holder generator (HITACHI; voltage 12 V, current load 40 A).
Because of the faulty chip could not be purchased, I decided to make alternative control option, which would ensure high accuracy maintain voltage 13.8 V at the terminals of the battery and had the dimensions, allows you to embed it in a brush holder to replace the failed generator.
The voltage drop at the terminals of the battery during operation of the generator with controller by HITACHI when you turn on the majority of consumers (high beam, rear window defogger, wiper, heater fan) idling car engine does not exceed 0.5 V. In all other possible the operating conditions of the engine and electrical voltage changes at the terminals battery register failed. The measurements I spent universal a galvanometer RM PHILIPS, having accuracy class 1.5, if measuring DC voltage.
As shown, operation of the battery on the car, period service largely depends on the value of the voltage at its terminals, which must be equal to 13.8 V, and the precision of its maintenance [1]. The author of the article [2] notes that the application in the present case the regulator from domestic cars is impractical because it does not provide a high the accuracy of maintaining the voltage at the terminals of the battery. In addition, domestic relay controllers require changes in the wiring of the car Yes and embed them in place spoiled device is not possible.
Meanwhile postavlennym requirements, as it turns out, is quite satisfying the voltage regulator described in [3]. A small number used in it details allowed to post them on the Board size 30x20 mm and easily place it in a brush holder alternator by HITACHI. In this way it is possible to recover the generators and other foreign models cars.
Control circuit depicted in Fig. 1. He also shows his inclusion in the side the network of the car. As already mentioned, the basis of the device taken the controller from [3]. Change subject only to its output stage. Transistors VT1 and VT2 are included under the scheme a composite transistor in which a collector load winding of which is the rotor of the generator.

With the closure of the contacts of the ignition switch SA1 voltage from the battery GB1 will do (via pin. 2) to operational amplifier (op-amp) DA1 controller. On the noninverting input of op-amp appears stable voltage of about 8.2 V, taken with the Zener diode VD1. The inverting input of op-amp is constantly present voltage determined by a resistive divider R1R2R3 and equal to about 7.3 V.
Because Oh DA1 operates without feedback, its output will be almost full battery voltage GB1 attached to the pin. 7 OS. Is the voltage across the VD3 diode and a resistor divider R6R7 will arrive at the base of the composite transistor VT1VT2. As a result, the transistor VT2 will open and from battery through the lamp HL1, the rotor winding of the generator G1 and the transistor VT2 current flows. Will contain checklists the lamp HL1, and in the G1 rotor magnetic field will appear.
After starting the engine produced by working windings of the generator voltage rectified by the diodes, is applied to the rotor of the generator G1 and via connector X1 - to the battery GB1, enabling it to recharge. The voltage on both the findings of the lamp HL1 relation to common wire becomes almost equal, and the lamp HL1 goes out that demonstrates a working power generator.
Increasing the rotational speed of the crankshaft of the engine (and associated with him of the generator shaft), the voltage at inverting input of op-amp DA1 increases. As it will only become equal to the voltage at the noninverting input, operational the amplifier will be turned on, its output voltage drops to almost zero, will lead to the closing of the composite transistor VT1VT2 and the cessation of current through the rotor winding of the generator G1. Voltage at connector X1 decreases, the OS again switches, and the process repeats.
Thus, the connector X1 is set to the average voltage set selection of resistor R2. It is easy to see that the composite transistor operates in a switch mode or it is securely closed, or is open and saturated.
Resistor R8 provides a complete closing of the transistor VT2, when the current the excitation drops to zero. The value of the resistor R5 is reduced to 1.5 MW, thanks what is more clearly shown electric "hysteresis" Oh that reduce the probability of transition of the output stage in a linear mode.
Diode VD2 extinguishes the self-induction EMF in the rotor winding of the generator is arising in the moment closing a compound of the transistor. Diode V1 from the source device is excluded, because the connection of the input of the divider R1R2R3 regulator with an output connector X1 structurally inside the generator brush holder.
Trimmer resistor R3 is also excluded, because once established on the stand the device is in operation no adjustment is required. Moreover, the presence of a setup resistor in conditions of sudden temperature changes, exposure to dust, moisture (condensation) and vibration would reduce the reliability controller.
The device is mounted on the circuit Board of one-sided glass fiberglass thickness of 1 mm. the Drawing Board is presented in Fig. 2. Resistors R4, R6, R7 and diode VD3 is soldered to the printed conductors. Conclusions transistor VT1 bent at an angle of 90 deg.; it come with end-to-end chip. Under the transistor should put a cardboard strip with a thickness of about 0.5 mm.
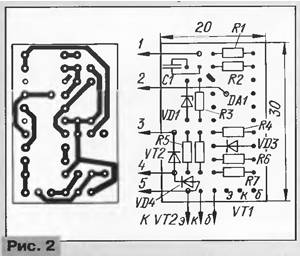
Transistor VT2 is attached outside of the Board, on the inside back cover of the generator the blank area next to the brush holder through the mica strip.
In the controller you can use a capacitor C1-km-5, km-6 or K10-17; the Zener diode VD1 - XE, XE, XG or XG in the case of CD-2 (CD-3). Instead KDB (VD3) you can use any of the series KD521, KD522; diode VD2 - any of series CD in a teardrop-shaped body.
Transistor CTV can be replaced actb-CTG, CTB, CTH. Transistor CTV to replace CTB, CTH
Mounting screw is isolated from the heat sink flange of the transistor VT2 insulating grommet and washer. The cover of the generator in place of the transistor should cleaned with fine emery paper. Before final mounting of the transistor mica gasket should be lubricated on both sides by heat-conducting paste KTP. When no use grease LITOL-24. As shown, the use of Licola gives even more lasting results than pasta KTP.
Chip CRUD to replace other not recommended due to their tendency to the excitation when operating in the described controller. In the extreme case can to try to apply CRUD.
Advantageously the printed track Board on which a significant current flows, duplicate bare copper conductor with a diameter of 0.5 mm.
When assembling the generator should ensure that the connecting wires from transistor VT2 to the Board of the regulator does not touch the rotor of the generator when it is rotation. To do this, after installation of the cards perform trial Assembly of the brush holder with the Board and the back cover and choose the optimal length of the wires.
To establish devices of the conclusions 1 to 3 are combined and connected to the positive output of the adjustable current source voltage 12…15 V, providing a load current of 3 a…5 a, And the output terminal 5 to the negative terminal of the source. To the terminals 1 to 3 and 4 connect the dummy load (generator rotor) - wirewound resistor 4 Ohm power 25…50 watts. You can enable and the rotor of the generator, attaching (not pripaivaya) wires to slip rings collector. In parallel with the load connect a voltmeter with an upper limit of 15…30 V.
Instead of the resistor R2 temporarily solder the trimpot multi-turn resistor SP5-3 impedance 33 kOhm, bringing together middle and one of its extreme conclusions.
Include the source and set the supply voltage of 13.8 V. If the voltmeter displays the voltage that is close to specified, rotate the trimpot screw resistor just before the time of loss of voltage at the load. Then feed the voltage is reduced to 12 V, while the voltmeter should show again voltage. Gradually increase the voltage until failure the voltage across the load. Switching should occur when the voltmeter reading 13,8 V.
If switching voltage is not equal to a specified, more precisely repeat previous operation. In that case, when you first turn on the voltmeter does not shows voltage, the rotation of the screw trimmer achieve deflection, and then carry out the described operations.
The establishment should be carried out quickly, being careful not to overheat and load, and the transistor VT2.
Vypayat from the Board trimmer, perhaps more accurately measure it the resistance and replace the same constant resistance. Again these operations and make sure that switching is done accurately and at the the specified voltage.
Established charge on both sides covered with two layers of glue BF-2 with intermediate drying. Slops paste sealant GED-1 in the brush holder, which, in turn, installed in the rear cover of the generator. Then mounted transistor VT2, assemble the generator and checks his work on the car. Monitor the voltage at the terminals of the battery in various modes engine and electrical equipment.
The operation of the vehicle with the described voltage regulator for more than two years confirmed its reliability and high stability of voltage in onboard network.
Similarly renovated more powerful (12 V, 60 A) generator car NISSAN SUNNY.
Literature
Author: E. Adigamov, Tashkent, Uzbekistan