


")

The device is used to create a lighting effect type "run" in different sides of the two light beams. It can be used for decoration and lighting design of shop Windows, on the dance floors, motorists use the ruler with the running lights as an auxiliary stop signal lights. Combining several lines, you can build a variety of glowing shapes, e.g., polygonal star.
Electric diagram of the device shown in Fig.1. The device can conditionally be divided into three functional blocks: clock generator, the processing unit algorithm the lighting effect and performing a control device (14 the LEDs).

Fig.1
The generator is built on two logic elements circuits 4011, consisting of 4 logical elements 2I-NOT (the scheme can be replaced by domestic analogue LA, CLA. The frequency of the generator is determined by the capacitance of the capacitor and About the resistance of the resistor R1 and potentiometer R16, designed to modify the the frequency of the generator. It was established experimentally that the optimal frequency is obtained when the resistance of the potentiometer to about 100 ohms.
The function of the sequential ignition of LEDs in a line made by two four-digit shift registers type 4015. The register has 4015 serial input and parallel output, as a substitute you can use shift registers IR, CIR, CRIR.
As you know, the shift register is a digital element, which on the weekends bit registers are successively set to the high logic level from the arrival of the trigger pulse. The output of the most significant bit of the register QD DD2.1 is used to reset the device, the other seven outputs are used to controlling the LEDs. After zeroing of the register on the information input the first shift register DD2.2 always present a high level equal to supply voltage. After receipt of the next clock with a clock generator the state of the input D corresponds to the output QA of the shift register DD2.2. At the same time the clock pulse is supplied but the counting input CLK of the second shift register DD2.1, but on its information pin is held low level supplied from the last output of a shift register DD2.2, and the output remains unchanged low level.
The arrival of the next synchronizing pulse leads to the displacement information output from the QA the output QB of the register DD2.2. At the same time on the QA output will be written again high level, which is constantly present on the information input D the first shift register. This situation is repeated twice, and after fourth clock on all the outputs of the register DD2.2 will be present high logic level. On the information input of the second shift register DD2.1 now there is a high level supplied from the output QD first register DD2.2. Then the fifth clock pulse will cause the census information from the D input to the output QA DD2.1. The next two clock will the appearance on the following outputs a high level until the arrival of the eighth clock, when a high level appears at the output QD of register DD2.1. This the high level is supplied to the RST inputs of both registers and resets them. Then the process is repeated again.
Thus, sequentially filling the outputs of the registers which is used to control the line of LEDs. However, the nourishment LEDs directly from these outputs would limit the maximum current, flowing through the LEDs, reducing the brightness of the glow. For use the maximum brightness of the LEDs in the device incorporates an output a Converter IC ULN2003 (analogues: Kl CC, Kl CT). IC ULN2003 contain in its structure 7 Darlington transistors, usually used as buffer stages for approval 5 12-volt peripheral devices and to manage the iconic seven-segment indicators in multiplexing systems.
In the apparatus described each driver chip drives a pair of LEDs (Fig.2).
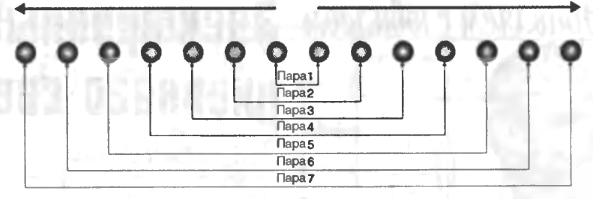
Fig.2
Capacitors C2 and C3 perform the role of smoothing power and suppress possible pulsed emission of the alternating current.
In Fig.3 shows the placement of elements on printed circuit boards, which are made s unilateral circuit, the jumper between the printed conductors on the boards denoted by the letter Z.
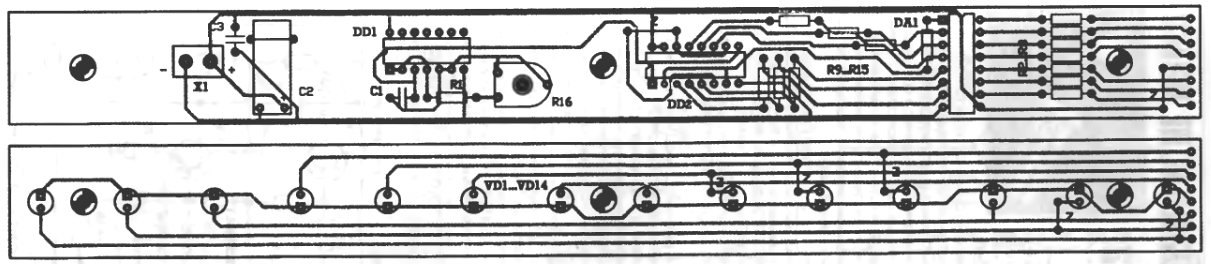
Fig. 3 (click to enlarge)
Boards of the same size are mounted one above the other on the separation length sleeves 2…3 cm and connect with screws with round heads and nuts. You can connect the Board and without the use of bushings, one connection will need a screw length of 3…4 cm and three nuts. In the upper printed the charge on which is soldered the LEDs, insert the screws and clamp to their nuts themselves heads.
Then wind the screws on the second nut to the depth, sufficient for placement on the axis of the screws in the bottom of the circuit Board, and clamp the last remaining nuts (Fig.4).
Fig.4