


")

Distinctive features
- Generation of sinusoidal signals using pulse width modulation (PWM)
- The unification of the various sinusoidal signals in one DTMF signal
- The source code in the languages assembler and C
- Designed to work with STK500
- The size of the program code 260 bytes/size of the table of constants 128 bytes
- The use of the method of conversion table
Introduction
This document describes the methodology for generating DTMF signals (bitonal multifrequency signals) using any AVR microcontroller that contains the unit pulse width modulation (PWM) and static RAM. These signals are widely used in telephony, where they are played when you press the dial button telephone of the apparatus. For proper generation of the DTMF signal is necessary to impose two frequency together: low frequency (fb) and high frequency (fa). In table 1 it is shown how different frequencies are mixed to obtain the DTMF tones when pressing various keys.
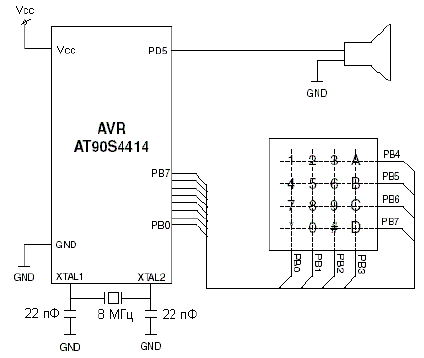
Figure 1. A diagram of the DTMF signal
Table 1. The matrix of the formation of the tone
fb/fa 1209 Hz 1336 Hz 1477 Hz 1633 Hz 697 Hz 1 2 3 A 770 Hz 4 5 6 B 852 Hz 7 8 9 C 941 Hz * 0 # DIn the rows of table 1 presents the values of low frequency, and columns - values of high frequency. For example, the matrix shows that when pressing the "5" should be mixed frequency fb = 770 Hz and fa = 1336 Hz. As a result of addition of two sinusoidal signals of different frequencies formed DTMF signal
 (1)
(1)
where the amplitude ratio K=Ab/Aa the source signals must meet the condition
 (2)
(2)
The principle of operation
In addition to General information about the use of pulse-width modulation will then be shown as pulse width modulation allows to generate sinusoidal signals. In the next paragraph describes as using the base frequency of the PWM to get different frequencies. After consideration of the theoretical foundations will be described directly generator the DTMF signal. Generation of sinusoidal signals
Depending on the ratio of the duration of high VH and low VL voltage levels, the average value at the output of the PWM is changed. If the ratio between the durations of both levels to maintain a constant, the result will be generated constant voltage VAV. Figure 2 shows the signal with pulse-width modulation.
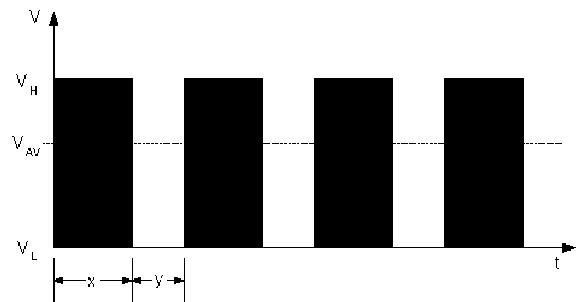
Figure 2. Generation of DC voltage
The voltage level is determined by the expression:
 (3)
(3)
A sine wave may be generated, provided that the average voltage generated by pulse-width modulation will change every PWM period. The ratio between high and low levels should be in accordance with the voltage level of a sinusoidal signal at the appropriate time. Figure 3 this process is illustrated. The source data for PWM is calculated for each period and recorded in the conversion table (TP).
Figure 3 also illustrates the relationship between the frequency the basic sine wave signal and the number of samples. The higher the number samples (Nc) - the higher the accuracy of the simulation result of the signal:
 (4)
(4)
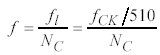
The PWM frequency depends on the resolution of the PWM. When 8-bit resolution, the final value (the top) of the timer is equal to 0xFF (255). Because the timer performs the expense of the forward and reverse directions, this value must be doubled. Therefore, the PWM frequency can be computed by dividing the clock frequency of the timer fCK 510. Thus, when the clock frequency of 8 MHz timer resultant the PWM frequency will be 15.6 kHz .
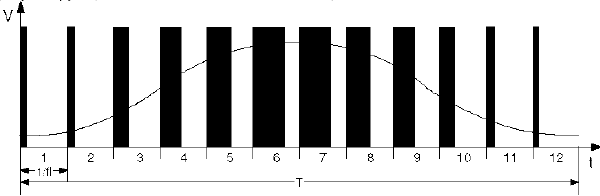
Figure 3. Generating a sinusoidal signal with using PWM
Assume that the sine of the sample is read from the table conversion and not sequentially through one. In this case, at the same the frequency of reading selections will be generated signal frequency doubled (see figure 4).
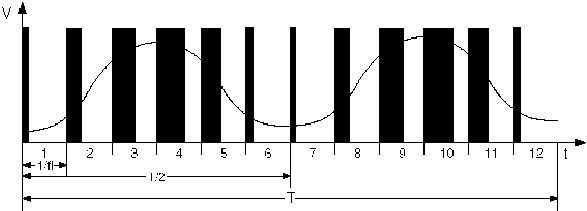
Figure 4. The resultant doubling of frequency (XSW = 2)
By analogy, if not read every second value, and every third, fourth, fifth (respectively, step width 3, 4, 5…) and you can generate Nc-frequencies in the range [1/T .. 0 Hz Hz]. Please note that for high frequencies the resulting waveform will not be sinusoidal. The width of the step in the conversion table denoted as XSW, where
 (5)
(5)
The calculation of the current position in TP for the next PWM period (the timer overflow) is performed using the expression (6). New the value at position XLUT depends on its previous state at position X LUT with the addition of step width XSW
 (6)
(6)
The addition of different frequencies to produce the DTMF signal
The DTMF signal can be generated using the expressions (1) and (2). For simplicity, the arithmetic value of the coefficient K is taken equal to 0.75, so that the arithmetic replace action logical shifts. Taking into account the expression (6) the current value for control PWM can be calculated by the expression:
 (7)
(7)
and given that XLUTa=X LUTa + XSWa ,XLUTb=X LUTb + XSWb, finally we write
 (8)
(8)
The implementation of the DTMF generator
In this application, explains how to build DTMF tone generator using the output 8-bit PWM (OC1A) and tables with 128 samples of values of a sinusoidal function (Nc), each of which is set 7 bits (n). The following expressions show this dependence, as well as show how to compute the elements of the conversion table:
 (9)
(9)
The advantage of using 7 bits is that the amount values of signals of high and low frequency has a size of one byte. For support the full set of DTMF tones need to calculate 8 values for each of the DTMF frequencies from table 1 and drop them in the conversion table.
To achieve higher accuracy, the following is done solution: the value calculated by expression 5 require only 5 bytes. For use all 8 bytes, which will reduce the rounding error this value is multiplied by 8. A pointer to a conversion table written in the same way. But this requires two bytes for remember 8-fold value. This means that you must run 3 right-shift operation module on the basis of Nc (logical multiplication by Nc-1) before using these bytes as a pointer to the values of a sine function
 (10)
(10)
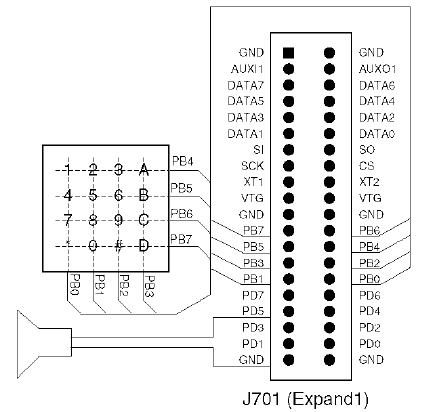
Figure 5. Diagram of the module for connection to STK500
The PWM signal is generated at pin OC1A (PD5). Additional output filter will promote greater compliance sinusoidal the shape of the signal. When you decrease the PWM frequency may be necessary applying a filter with a steeper frequency response to obtain a good result.
The connection of the keyboard shown in figure 1. Work the keyboard should be organized in such a way as to be able determine the key pressed. This can be accomplished by the following algorithm:
- to configure younger tetrad port to the output and set log. "0"
- to configure high tetrad port To the input connection pull-up resistors
- string button pressed is defined as the discharge of senior tetrad with a log. "0"
- to configure high tetrad port to the output and set log. "0"
- to configure younger tetrad port To the input connection pull-up resistors
- a column with a button pressed is defined as the discharge of the younger tetrad from the log. "0"
Approx.: In STK200 between the connector pin of PORTB and conclusions microcontroller BP5, PB6 and PB7 is connected in series resistors (see scheme STK200). This will cause problems if the keyboard is connected to the connector PORTB.
Figure 6 illustrates the operation of a subroutine for determining a pressed key. Depending on the key pressed is determined the interval duration. The interrupt routine uses this the value for computing installations PWM for two sinusoids DTM-tone. The interrupt routine shown in figures 7 and 8.
This procedure calculates a value for comparison with the output the timer for the next PWM period. The interrupt routine first calculates the position of the next sample value in the conversion table, and reads the value stored there.
The position of the sample in the conversion table is determined pulse duration, and the pulse length is determined by the generated frequency.
The final value that is recorded in the register comparison of the timer is determined by using the formula (7) where takes into account the sample values of the two DTMF frequencies.
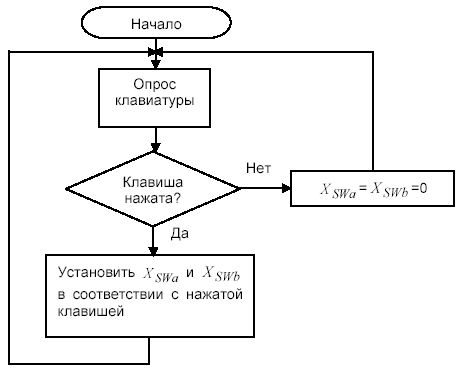
Figure 6. The block diagram of the main program
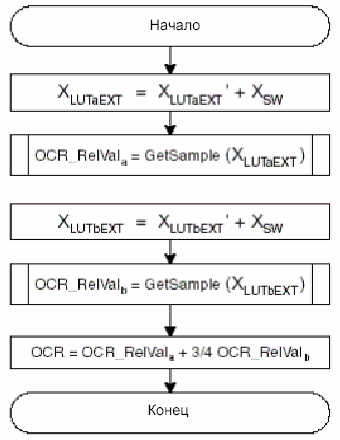
Figure 7. A block diagram of processing procedures interrupt the timer overflow
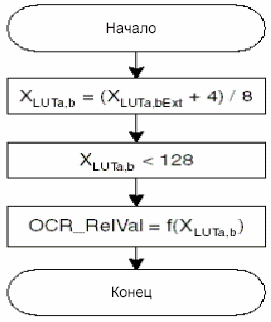
Figure 8. Flowchart of the procedure of reading sample "GetSample"
Publication: www.cxem.net