


")

Many motorists are rushing to install in your car so-called a device to disable the "masses", by which, without removing terminals, the battery is easily detachable from the electrical outlet. Nothing complex here no, you only need to purchase one in the store from commercially available mechanical the load-disconnectors and fasten it in a suitable location under the hood. There switch the RAD-1 with remote control, which will save you from having to open the hood. However, the controller itself still under tension, and to disable the "masses" directly from the interior of the car there should be installed a long negative cable and drilling a hole in the flap of the engine compartment.
We offer our readers a diagram of the electronic switch turns the "masses", not having mechanical contacts and, therefore, more reliable and durable. Except also, this device can be used as anti-theft.
E-switch the "masses" consists of only two semiconductor devices: SCR V2 (see wiring diagram) and semiconductor diode V1. The first performs the role of the electromagnetic relay, triggered in the presence of even a short pulse on the control electrode. Such a signal may be fed, closing the microswitch S1 is mounted in the cabin. Then SCR V2 opens, the resistance will be small, and through the device may occur a significant current. However, SCR current flows only in one direction - from the battery in the vehicle's electrical system. And so that the battery could be recharged from generator in parallel with the SCR, but in reverse towards him polarity, included diode V1.
Design of electronic disconnect switch shown in the figure. Both a semiconductor device mounted on the duralumin area size 50mmx50mmx3mm, a length of 100 mm In the same enclosure, it is necessary to drill two holes - with a diameter of 21 mm for SCR and a diameter of 6.2 mm for the average diode power. On another shelf corner drill a hole the size of the bolt attachment to the car body.
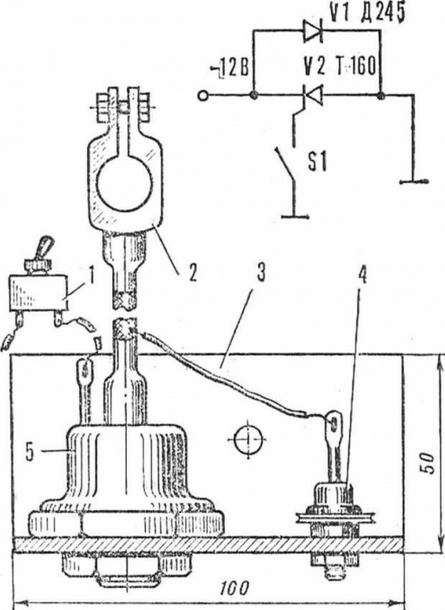
The design of the electronic unit: 1 - micro switch, 2 - swivel terminal, 3 - area, 4 - diode, 5 - SCR.
All electrical connections follow the stranded Assembly wire, and the output of the cathode of SCR connect using the cable in a metal braid the flare battery terminal. Braid then wrap with tape.
Ready the device is placed in a metal casing and paint nitroemalyu the colour of the car.
So as not to drill into the car body hole for the control wire, find holders that secure the brake line to the engine compartment, and gently knock the bottom. You will receive a 5 mm hole between the engine compartment and interior, through which miss the trigger wire.
Remove the screws of the cover that covers the steering column, drill a hole the desired diameter and install the micro switch. To one of its output connect the trigger wire, the second wire going to ground.
Author: N. Videoshow